Quantcast
Channel: Recipes – Panlasang Pinoy
Viewing all 460 articles
Browse latest View live

Chicken Teriyaki, Brown Rice, and Sunny Side Up Egg Recipe

$
0
0

Chicken Teriyaki, Brown Rice, and Sunny Side Up Egg Recipe sounds like a good idea for lunch or breakfast – if you intend to eat something heavy for breakfast. This is a complete meal that can satisfy your hungry tummy anytime of the day. I’m not sure if there is a short name for this meal – something like tapsilog or longsilog, so I decided to use the long name instead. As long as its name is the satisfaction and gastronomic pleasure that this dish can provide you; all you have to do is get the ingredients ready and go straight to the kitchen.

Do not get intimidated with this dish because this is not hard to cook. There are three main items that you will need to prepare: the chicken, rice, and fried egg. I suggest that you start with the chicken teriyaki because this takes a while to setup. Make the marinade from the recipe below and start to marinate the chicken as early as possible so that the chicken can absorb the flavor. This will make your chicken teriyaki flavorful. Next is to cook the brown rice.

How to Cook Brown Rice

Cooking brown rice is not difficult either. The first thing that you need to do is to wash the rice with running water to ensure that all impurities are removed. Once the rice is cleaned, you can decide whether you will use a rice cooker to cook the brown rice or do it the manual way – which is by using a cooking pot and a timer.

If you decide to use a rice cooker, all you have to do is to combine 1 cup of cleaned brown rice with 2 cups of water. Cover the rice cooker, plug it in the electric outlet, and turn it on. Wait until the rice cooker beeps to indicate that the rice is cooked. Pretty easy, isn’t it.

Now comes the manual part. Grab a cooking pot and boil 2 1/2 cups water. When the water starts to boil, put-in the cleaned rice and cover the pot. Wait for the water to boil again and then reduce the heat to low. Cook for 5 minutes and then turn the heat to a simmer. Continue to cook for 18 to 20 minutes. Make sure that you check on the rice to see if it will need more water. You will know that the rice is uncooked if you feel that the center is still somewhat hard when you nibble on it. What you can do is to cover it and continue to simmer for a few more minutes. If the rice is dry, add more water (start with 1/2 cup) until the rice gets that nice soft texture.

How to Cook Sunny Side Up Egg

Cooking Sunny Side Up Egg is simple. Here is one of my methods: Heat 1 tablespoon of cooking oil in a frying pan (non-tick pan is better). Set the heat to low. Crack the egg into the pan with hot oil. Wait for the egg whites to slowly form. Try to adjust the heat to a simmer if the whites start to burn. Sprinkle salt over the egg. When the egg whites turn into a stable solid form, you are done. Some people want the egg yolk to be somewhat stable too. I do this by covering the pan for a few minutes to trap the heat. This will cook the yolk a bit making the texture a bit stable.

Try this Chicken Teriyaki, Brown Rice, and Sunny Side Up Egg Recipe. Have a great time cooking!

chicken teriyaki meal

Chicken Teriyaki, Brown Rice, and Sunny Side Up Egg Recipe

Ingredients

  • 1 1/2 lbs. boneless and skinless chicken breast
  • 1/4 cup soy sauce
  • 2 tablespoons water
  • 2 tablespoons brown sugar
  • 1/4 teaspoon garlic powder
  • 2 tablespoons Mirin or cooking wine
  • 3 cups cooked brown rice
  • 3 eggs, cooked sunny side up
  • 1 tablespoon toasted sesame seeds

Cooking Procedure

  1. Make the marinade by combining the soy sauce, brown sugar, Mirin (or cooking wine), water, and garlic powder. Stir until all the ingredients are properly distributed.
  2. Place the chicken breasts in a Ziploc bag or in a bowl. Mix-in the marinade. Seal the bag and put inside the refrigerator. Marinate overnight.
  3. Heat the grill. Grill the marinated chicken for 4 to 7 minutes per side or until the internal temperature reads 165F. You can flip the chicken twice while grilling each side for half the time per rotation to avoid one side from getting burnt.
  4. Arrange the cooked brown rice in a bowl. Put-in the grilled chicken teriyaki over the rice and top with sunny side up egg. Sprinkle some toasted sesame seeds on top of the chicken.
  5. Serve. Share and enjoy!

Number of servings (yield): 3
Panlasang Pinoy Cookbook

Download the Free Panlasang Pinoy eCookbook


The post Chicken Teriyaki, Brown Rice, and Sunny Side Up Egg Recipe appeared first on Panlasang Pinoy.

Ginataang Langka with Pork Recipe

$
0
0

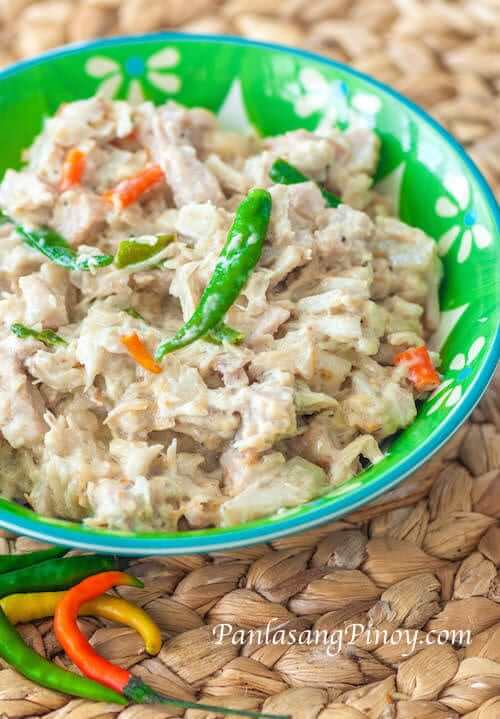
I enjoyed having Ginataang Langka with Pork for lunch. The combination of flavors was really good and the spice from the chili pepper made it even better. There is no other way to eat this but with warm steamed white rice. I suggest that you control your rice intake because this yummy spicy dish can make you eat without you consciously noticing.

I am thankful that there are canned unripe jackfruits nowadays in the Asian groceries and Filipino stores. Just like canned coconut milk, both of them come-in handy anytime you need them.

ginataang-langka-with-pork-2

Ginataang Langka with Pork is best if the pork is as tender as it can be. Simmering the pork in coconut milk for several minutes can do this. Do not be afraid to add a cup or more of water to the coconut milk if you think that the pork is not tender enough. The water will eventually evaporate and you will still get that thick creamy coconut sauce.

I indicated in the recipe below that the chili pepper is an optional ingredient. Please do not be obliged to add the peppers if you are not able to handle spicy foods. Ginataang Langka with pork will still be delicious even without it.

Try this Ginataang Langka with Pork Recipe. Enjoy!

ginataang-langka-with-pork-1

Ginataang Langka with Pork Recipe

Ingredients

  • 20 oz. unripe jackfruit, chopped
  • 10 oz. pork, cubed
  • 2 cups coconut milk
  • 4 pieces chili pepper, chopped (optional)
  • 1 medium onion, sliced
  • 1 teaspoon minced garlic
  • 1 tablespoon fish sauce
  • 1/4 teaspoon ground black pepper
  • 2 tablespoons cooking oil

Watch the cooking video:

http://www.youtube.com/watch?v=Yyn9fQrWxOw

Cooking Procedure

  1. Heat the cooking oil in a pan.
  2. Once the oil becomes hot, sauté the onion and garlic.
  3. Add the pork. Cook until medium brown.
  4. Pour the coconut milk in the pan. Let boil. Cover and simmer for 20 minutes. Add water if needed.
  5. Add the ground black pepper, chili, and fish sauce. Stir.
  6. Add the jackfruit. Stir and cook for 5 to 7 minutes.
  7. Transfer to a serving bowl. Serve.
  8. Share and enjoy!

Number of servings (yield): 3

Panlasang Pinoy Cookbook

Download the Free Panlasang Pinoy eCookbook


The post Ginataang Langka with Pork Recipe appeared first on Panlasang Pinoy.

Crusted Pork Chop with Adobo Rice Recipe

$
0
0

This Crusted Pork Chop with Adobo Rice Recipe was what I made for breakfast. Sometimes, I love having rice for breakfast on big days wherein I expecting every hour to be busy. I need the strength and energy to boost my brain and keep-up with the tasks ahead.

Making your own crusted pork chop is easy. You might have seen some of our similar crusted pork chop recipes such as the tonkatsu and the likes. The recipe below captures the details on how to make a simple crusted pork chop.

crusted-pork-chop-with-adobo-fried-rice-recipe


How to Make Adobo Rice

So, I mentioned about how to make crusted pork chop, but what about the adobo rice? Making your own adobo rice is quick and easy. Here is how I do it:

My secret is using leftovers – yes, I use leftover pork adobo or chicken adobo and steamed white rice to make adobo rice. I do it by first shredding the meat using my hands. Make sure that you have enough adobo sauce left, as it will help make the dish taste better. As for the rice, I add around half a teaspoon of salt for every 4 cups of leftover rice. I use my hands to gently mix the salt with the rice and in the process; I prevent the rice from sticking from each other.

Here comes the easy part — cooking the adobo rice. Assuming that you have 4 cups of leftover rice, heat 2 tablespoons of cooking oil in a wok and then put-in 2 cloves of minced garlic. Add the shredded adobo meat (pork or chicken) once the garlic starts to brown. Cook the meat for 1 minute and then add the rice in. Toss and cook for 5 to 7 minutes. Add around 3 tablespoons of adobo sauce while tossing the rice. Now you have your delicious adobo rice. All you have to do is follow the recipe below for the crusted pork chop.

Try this Crusted Pork Chop with Adobo Rice Recipe. Happy Cooking!

crusted-pork-chop-with-adobo-fried-rice-recipe-2

Crusted Pork Chop with Adobo Rice Recipe

Ingredients

  • 4 pieces pork chops (5 to 8 oz. each)
  • 1 cup Panko bread crumbs
  • 2 eggs, beaten
  • 1 1/2 teaspoon salt
  • 1/2 teaspoon ground black pepper
  • 1/2 cup cooking oil

Cooking Procedure

  1. Rub salt and pepper on the pork chops. Let it stay for 15 minutes.
  2. Heat the cooking oil in a frying pan. Once the oil gets hot, adjust the heat to low.
  3. Arrange the eggs and breadcrumbs in separate bowls. Dip each pork chop into the beaten eggs and then dredge with breadcrumbs. Make sure that the entire pork chops are completely covered.
  4. Pan fry the pork chops for 6 to 9 minutes per side depending on the thickness of the pork chop. Note: you can increase the heat gradually if needed. Remember that too much heat can burn the outer part of the pork chop while leaving the center raw. Adjust the heat as necessary.
  5. Remove the fried crusted pork chop from the frying pan. Transfer to a serving plate with Adobo rice and egg.
  6. Serve. Share and enjoy!

Number of servings (yield): 4

Panlasang Pinoy Cookbook

Download the Free Panlasang Pinoy eCookbook


The post Crusted Pork Chop with Adobo Rice Recipe appeared first on Panlasang Pinoy.

Grilled Mussels Recipe

$
0
0

This Grilled Mussels Recipe makes a perfect seafood appetizer for many reasons. To name a few, it is delicious, easy to prepare, and budget friendly. I am used to do grilled mussels with butter, garlic, and cheese. I thought that it was the best thing that grilled (or baked) mussels can be – I just realized that this grilled mussels recipe is promising and as good as what I use to have.

Grilled Mussels

While Grilled mussels require less cooking time, it is important that we clean them well before serving. This means scrubbing the shell and removing the hair like thing inside them – that hair is called the beard. I clean the mussels by using a brush or a scouring pad. The beard can be removed after the mussels are opened. The easiest way of opening them is by boiling. The shell automatically opens after the mussels boil for a few minutes. You can remove the beard on each piece once the temperature goes down.

I recommend this grilled mussels recipe to everyone. I find it great with white wine. I also love to eat it with my favorite soda crackers. Have you tried this Grilled Mussels Recipe yet?

Try this Grilled Mussels Recipe. Enjoy!

Grilled Mussels Recipe

Grilled Mussels Recipe

Ingredients

  • 1 lb. mussels
  • 1 medium plum tomato, diced
  • 1 large yellow onion, minced
  • 2 teaspoons minced garlic
  • 2 tablespoons tomato paste
  • 4 tablespoons bread crumbs
  • 2 tablespoons chopped parsley
  • 1 tablespoon chopped mint
  • 1 tablespoon olive oil
  • 1 teaspoon lemon juice

Cooking Procedure

  1. Clean the mussels and boil in 2 cups of water for at least 2 to 5 minutes.
  2. Let the mussels cool. Drain and remove the beard. Set aside.
  3. Heat the olive oil in a pan.
  4. Sauté the onion until soft
  5. Add the garlic and continue to sauté for 1 minute.
  6. Add the tomato and tomato paste. Sauté for 1 minute. Transfer to a bowl and let cool.
  7. Meanwhile combine breadcrumbs, parsley, mint, and lemon juice. Mix well.
  8. Scoop the sautéed onion, garlic, and tomato mixture and arrange on top of the mussels. Add the breadcrumbs mixture above.
  9. Heat the grill and grill the mussels for 5 to 7 minutes in medium heat.
  10. Transfer to a serving plate.
  11. Serve as an appetizer.
  12. Share and enjoy!

Number of servings (yield): 4

Panlasang Pinoy Cookbook

Download the Free Panlasang Pinoy eCookbook


The post Grilled Mussels Recipe appeared first on Panlasang Pinoy.

Chicken Enchilada Casserole Recipe

$
0
0

Your lunch or dinner will be more interesting when you make Chicken Enchilada Casserole. This quick and easy Chicken Enchilada Casserole Recipe will show you how it’s done in the simplest way possible.

I like to make Chicken Enchilada Casserole instead or regular (individual) chicken enchiladas when I have other things to do. I like the idea that I can leave the Chicken Enchilada Casserole in the oven to bake while I complete my other tasks. I always enjoy the outcome of this recipe – I am sure that you will love it too.

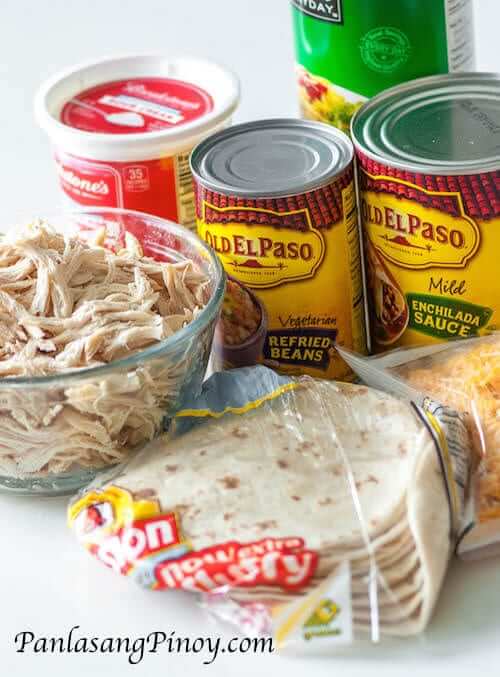
Chicken Enchilada Casserole Ingredients

Before you proceed there are some things that I need to clarify. I prepared the cooked shredded chicken in this Chicken Enchilada Casserole Recipe by boiling almost a pound of boneless and skinless chicken breast for 30 minutes. Once the chicken is completely cooked. I drain the water and let the chicken cool down. It will be easier to shred the chicken using your hands when it is not that hot. As for the other ingredients, I got them all straight from the grocery to save some time.

Chicken Enchilada Casserole preparation

In my opinion, Chicken Enchilada Casserole is even better with hot sauce. You can add some hot sauce with your sliced portion of chicken enchilada while it is still hot. My favorite brand of hot sauce for chicken enchilada casserole is Frank’s Red hot — this is also the brand that I use when making Buffalo Chicken Wings and the wing sauce.

Try this Chicken Enchilada Casserole Recipe. Enjoy!

Chicken Enchilada Casserole Recipe

Chicken Enchilada Casserole Recipe

Ingredients

  • 12 pieces flour tortilla
  • 29 ounces enchilada sauce
  • 3/4 lb. cooked shredded chicken
  • 1 teaspoon ground cumin
  • 1 1/2 cup Monterey jack cheese
  • 1 (16 oz.) can refried beans
  • 2 cups sour cream

Cooking Procedure

  1. Preheat oven to 350F.
  2. Combine the ground cumin with the shredded chicken. Mix well. Set aside.
  3. Meanwhile, scoop around 1/2 cup of enchilada sauce and pour in a baking dish. Spread the sauce all over the dish.
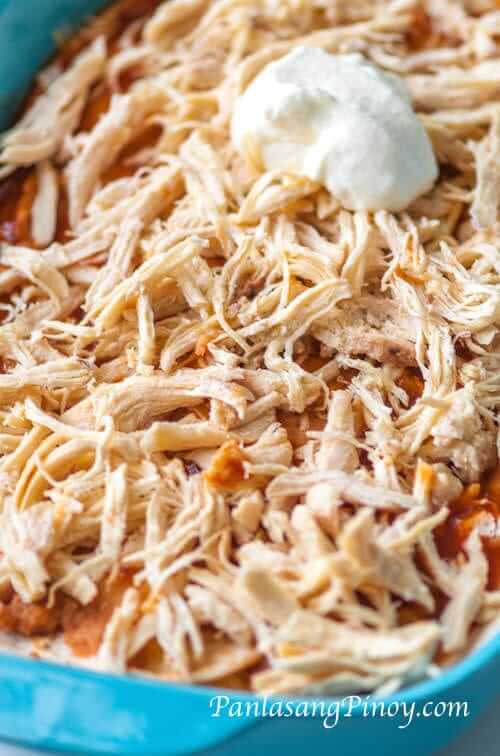
  4. Lay four pieces of flour tortilla over the enchilada sauce. Spread some refried beans and sour cream over the tortilla. Arrange half of the shredded chicken on top and then top with cheese and enchilada sauce.
  5. Make the next layer by arranging four pieces of flour tortilla on top of the enchilada sauce. Do the same step as in the first layer by spreading refried beans and sour cream over the tortillas. Top with the remaining chicken. Add cheese and enchilada sauce on top.
  6. Make the last layer by arranging the last 4 flour tortilla pieces over the enchilada sauce. Spread the remaining refried beans, sour cream, and enchilada sauce. Top with Monterey jack cheese.
  7. Bake the Chicken Enchilada Casserole for 35 to 40 minutes.
  8. Remove from the oven. Serve.
  9. Share and enjoy!

Number of servings (yield): 6

Panlasang Pinoy Cookbook

Download the Free Panlasang Pinoy eCookbook


The post Chicken Enchilada Casserole Recipe appeared first on Panlasang Pinoy.

Tasty Pork Afritada Recipe

$
0
0

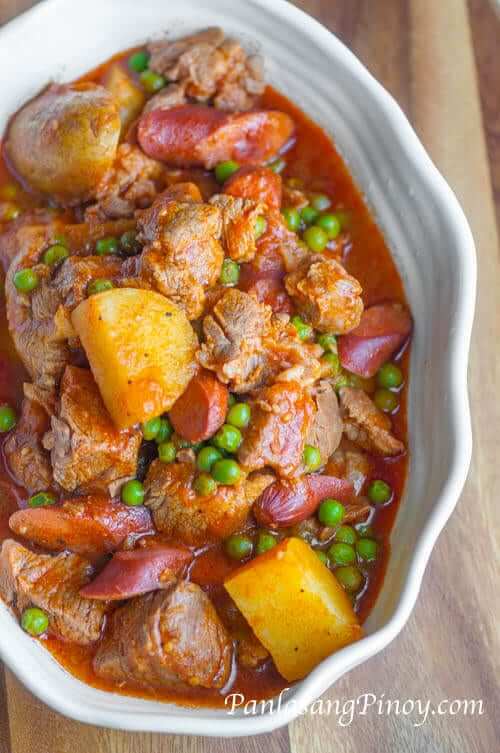
This tasty Pork Afritada is my third version of pork afritada that I am sharing with you. Since you guys are important to me, I always try to provide everyone with the very best recipes. My inspiration for this pork afritada recipe came from the chicken afritada that you guys loved.

The difference of this Pork Afritada Recipe from the previous versions is somewhat obvious: there are no carrots and bell peppers in this recipe; hotdogs and green peas were also added. I think that this dish is really amazing because I enjoyed it and was able to grab an extra cup rice, which is uncommon for me these days. Being individuals who know how to appreciate good food, I know that you will like this afritada recipe too.

The success of this recipe is on the meat. Like all stews, the pork should be really tender. You can do this by simmering the meat longer until it becomes really tender. This recipe makes use of beef broth. There are alternatives to beef broth that you can use such as 3 cups of water mixed with 1 beef or pork cube; adding 2 teaspoons of beef powder will work too. As for the hotdogs, you can use the traditional Filipino red hotdog, beef franks, or wieners.

Easy Pork Afritada Recipe

Easy Pork Afritada Recipe

Ingredients

  • 2 lbs. pork shoulder, cut into cubes
  • 1 large yellow onion, minced
  • 4 cloves garlic, minced
  • 6 pieces hotdogs or wieners, sliced diagonally
  • 1 (16 oz.) can tomato sauce
  • 1 1/2 cups frozen green peas
  • 4 pieces potatoes, cleaned and quartered
  • 2 teaspoons granulated white sugar
  • 3 tablespoons cooking oil
  • 2 to 3 cups beef broth
  • Salt and ground black pepper to taste

Cooking Procedure

  1. Heat the cooking oil in a cooking pot or deep pan.
  2. Saute the garlic and onion when the oil becomes hot.
  3. Once the onion is soft, add the pork and cook until light brown (around 3 to 5 minutes).
  4. Pour-in the tomato sauce and beef broth. Stir. Let boil. Cover and simmer for 45 to 60 minutes or until the pork becomes tender.
  5. Add the hotdogs and potatoes. Cook for 8 minutes.
  6. Add the green peas, sugar, salt, and pepper. Stir and cook for 3 minutes.
  7. Transfer to a serving bowl. Serve.
  8. Share and enjoy!

Number of servings (yield): 4

Panlasang Pinoy Cookbook

Download the Free Panlasang Pinoy eCookbook


The post Tasty Pork Afritada Recipe appeared first on Panlasang Pinoy.
Easy Tuna Kilawin Recipe

$
0
0

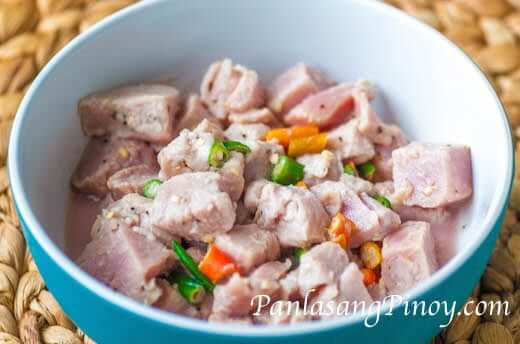
Tuna Kilawin or Kilawing Tuna is a Filipino dish wherein cubed fresh tuna is mixed with vinegar, lemon, or calamansi and chilled until the fish is gradually cured by the vinegar or citrus juices. Tuna kilawin is considered as an appetizer in the Philippines – it is also a popular pulutan amongst many beer-loving individuals.

There are many ways to prepare Tuna Kilawin. This Easy Tuna Kilawin Recipe is one of the simplest and easiest because it requires less ingredients and the process is fairly easy. I am using lemon for this Tuna Kilawin Recipe, you can also use calamansi or lime as substitutes.

Easy Tuna Kilawin

The secret to a good tuna kilawin is the proper fish to citrus juice ratio and the amount of time spent to cure the fish. We should have enough citrus juice to cure the fish and leave it in the fridge for at least 3 hours – although you can do it overnight if you want the fish to be completely cured. It will also be great to serve this dish cold so that it can stay fresh and taste delightful.

You might be asking where to source the fish. Fresh frozen tuna should be available in your local groceries in the frozen seafood section. If you live near the ocean, chances are that fresh ahi tuna are available — fresh is always better.

Try this Easy Tuna Kilawin Recipe. Cheers!

Easy Tuna Kilawin Recipe

Easy Tuna Kilawin Recipe

Ingredients

  • 10 ounces fresh (or fresh frozen) ahi tuna, cubed
  • Juice from 3 pieces lemon
  • 6 pieces Thai chili, chopped
  • 1/4 teaspoon garlic powder
  • 1/2 teaspoon ginger powder
  • 1/4 teaspoon granulated white sugar
  • 1/4 teaspoon salt
  • A dash of ground black pepper (optional)

Cooking Procedure

  1. Combine lemon juice, salt, garlic powder, ginger powder, and sugar. Mix well.
  2. Place the cubed ahi tuna in a large bowl. Pour-in the lemon mixture and gently toss until all the ingredients are well blended.
  3. Add the chopped chili and ground black pepper. Gently toss. Cover and place inside the fridge for at least 3 hours.
  4. Serve chilled. Share and enjoy!

Number of servings (yield): 3

Panlasang Pinoy Cookbook

Download the Free Panlasang Pinoy eCookbook


The post Easy Tuna Kilawin Recipe appeared first on Panlasang Pinoy.
Garlic Mashed Potato

$
0
0

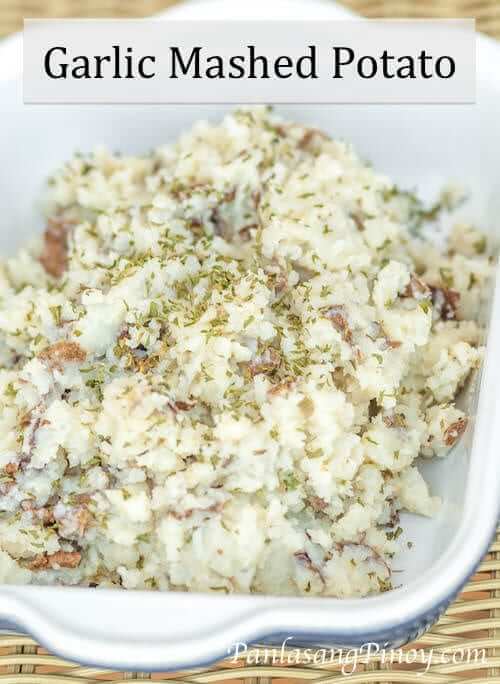
One of my favorite side dishes aside from homemade French fries is mashed potato. It will be even better if it is garlic mashed potato with gravy on top. I love to have it with fried dishes such as fried chicken and grilled dishes such as New York strip steak and the like.

This Garlic Mashed Potato recipe will guide you how to easily prepare your own garlic mashed potato the easiest way possible. I am using baking potatoes for this recipe and I will not peel the skin of the potato; rather, the skin will be scrubbed until clean so that we can take advantage of the nutrients which are mostly found in the skin of the potato.

garlic-mashed-potato-ingredients

Making your own garlic mashed potato is very easy. All you have to do is to clean and boil the potato until soft. We will need a potato masher or a large fork to mash the potatoes and then all the remaining ingredients are combined and mixed together until everything is well incorporated. That’s it! You will have your simple yet delicious garlic mashed potatoes in no time.

Try this Garlic Mashed Potato Recipe. Enjoy!

garlic-mashed-potato

Garlic Mashed Potato

Ingredients

  • 3 medium baking potatoes, cleaned
  • 1/4 cup whole milk
  • 1/2 teaspoon salt
  • 1/2 teaspoon garlic powder
  • 1/4 teaspoon ground black pepper
  • 1 teaspoon dried parsley
  • 4 cups water (for boiling)

Cooking Procedure

  1. Boil the water in a cooking pot.
  2. Once the water starts to boil, add the potatoes (with skin-on). Boil for 20 minutes.
  3. Drain the water and let the spuds cool down.
  4. Place the potatoes in a mixing bowl. Mash using a potato masher or a fork.
  5. Add the salt, pepper, garlic powder, parsley, and milk. Continue to mash until all the ingredients are evenly distributed.
  6. Transfer to a serving bowl. Serve as is or with delicious KFC style gravy.
  7. Share and enjoy!

Number of servings (yield): 4

Panlasang Pinoy Cookbook

Download the Free Panlasang Pinoy eCookbook


The post Garlic Mashed Potato appeared first on Panlasang Pinoy.


Paklay Recipe

$
0
0

Paklay is a stew made-up of pig and cow innards. This dish is popular in the southern parts of the Philippines and is best enjoyed as a main dish or as pulutan. Although it might seem that it needs an acquired taste to enjoy this dish, I must confess that I fell in love with paklay the moment I tried it –  and it became a habit to cook paklay when I have the chance.

This Paklay recipe depicts the way that I prepare the dish. I am not claiming that this is an authentic recipe, but I think that it is something that is worth your attention and effort because it is just really good.

I made sure that I made all the innards tender by boiling in water for long hours. The ginger, garlic, and onion did a great job in minimizing the gamy aroma and flavor of this dish. I also thought that the pineapple and bamboo shoots were a great addition – these added a sour flavor that blends well with the rest of the ingredients.

How do you eat paklay? As for me, I enjoy eating paklay as it is – no rice or any side dish at all. How about you?

Try this Paklay Recipe. Enjoy!

Paklay Recipe

Paklay Recipe

Ingredients

  • 1 cup julienned Bamboo shoots
  • 1 lb. pig liver, sliced into thin strips
  • 1 (20 oz.) can Pineapple chunks, drained
  • 5 pieces dried bay leaves
  • 1/2 lb. pig kidney, cleaned
  • 1/2 lb. pig heart
  • 1 lb. ox tripe
  • 1/2 lb. pig stomach
  • 1 large red onion, minced
  • 1 head garlic, minced
  • 2 1/2 teaspoons Annatto powder
  • 2 thumbs ginger, minced
  • 1 large red bell pepper, julienned
  • 1 piece beef cube (or 2 teaspoons beef powder)
  • 2 cups water (for cooking)
  • 5 cups water (for boiling)
  • Salt and pepper to taste
  • 3 tablespoons olive oil

Cooking Procedure

  1. Boil 5 cups of water in a large cooking pot.
  2. Once the water starts to boil, add 1 tablespoon salt, pig stomach and ox tripe. Boil in medium heat for 60 minutes.
  3. Add the kidney and heart. Continue to boil for another 60 minutes or until all the innards are tender. Discard the water and let the innards cool down. Chop the innards and set aside.
  4. Meanwhile, heat the cooking oil in a large clean cooking pot.
  5. Sauté the onion, garlic, and ginger.
  6. Once the onion gets soft, add the chopped innards, bay leaves, and liver. Cook for 3 minutes.
  7. Add the pineapple chunks, bell pepper, and beef cube.
  8. Pour-in 2 cups of water and add the annatto powder. Stir and let boil.
  9. Add the bamboo shoots. Cover and simmer for 25 minutes. Add more water if needed.
  10. Add salt and pepper to taste.
  11. Transfer to a serving bowl.
  12. Serve. Share and enjoy!

Number of servings (yield): 6

Panlasang Pinoy Cookbook

Download the Free Panlasang Pinoy eCookbook


The post Paklay Recipe appeared first on Panlasang Pinoy.
Sweet Potato Casserole

$
0
0

Sweet Potato Casserole is a good example of a simple and easy to make sweet potato dessert. I never thought that this simple recipe will result into something really good. Anyone can make Sweet potato casserole because the steps are very basic. I am sure that you will like what you will be making.

I started by peeling and slicing the sweet potatoes into cubes and boiled them afterwards. You can also boil the sweet potatoes with skin-on and then peel them after boiling. Once the potato is ready, I used a potato masher to mash them – a fork can be used as an alternative tool if you don’t have a potato masher.

Sweet Potato Casserole Recipe

The next step is all about combining and mixing the ingredients which will then yield the sweet potato mixture. You will need a deep baking pan at least 3 inches in height. Arrange the potato mixture in the baking pan and spread. The last thing that we need to prepare is the topping. This can be simply done by combining and mixing the remaining ingredients and top it over the sweet potato mixture. The pecan chips will then be spread on top of the topping as our final layer. Easy isn’t it? Then we bake the sweet potato casserole until it’s just about right.

It seems like you now have an idea on how to make sweet potato casserole, but it will be better if you will refer to the recipe below for the details. You can enjoy this dish either warm or cold. I prefer my Sweet Potato Casserole cold though.

Try this Sweet Potato Casserole Recipe. Enjoy!

Sweet Potato Casserole_

Sweet Potato Casserole Recipe

Ingredients

  • 3 large sweet potatoes, peeled and cubed
  • 3/4 cup all-purpose flour
  • 3/4 cup granulated white sugar
  • 1/4 cup fresh whole milk
  • 2 eggs
  • 1 teaspoon vanilla extract
  • 1/4 teaspoon almond extract
  • 2 to 3 oz. pecan chips
  • 1/2 cup brown sugar
  • 4 tablespoons butter, softened
  • 3/4 teaspoon salt
  • 4 cups water (for boiling)

Cooking Procedure

  1. Pour the water in a cooking pot. Let boil.
  2. Add the diced sweet potatoes. Continue to boil for 15 to 20 minutes or until the sweet potatoes are soft.
  3. Remove the sweet potatoes from the pot and let the water drain. Transfer to a large mixing bowl and let cool to room temperature.
  4. Meanwhile, pre-heat the oven to 350F.
  5. Mash the sweet potatoes using a potato masher or a fork. Add the milk, white sugar, vanilla and almond extracts, 2 tablespoons of butter, eggs, and 1/2 teaspoon salt. Mix well until all the ingredients are well distributed.
  6. Arrange the mixture in a baking pan.
  7. Create the topping by combining all-purpose flour, brown sugar, remaining 2 tablespoons butter, and 1/4 teaspoon salt. Mix all the ingredients well and spread over the potato mixture in the baking pan.Top with pecan chips.
  8. Place the baking pan in the oven and bake for 28 to 33 minutes.
  9. Remove the pan from the oven. Let cool.
  10. Serve. Share and enjoy!

Number of servings (yield): 6

Related links:

Center Cut Cook – Sweet Potato Casserole
How Sweet It Is – Lightened-up Sweet Potato Casserole

Panlasang Pinoy Cookbook

Download the Free Panlasang Pinoy eCookbook


The post Sweet Potato Casserole appeared first on Panlasang Pinoy.
Special Goto Recipe

$
0
0

Goto is a type of rice porridge with innards of either pig or cow. This Special Goto Recipe uses both ox tripe and pig intestine. Goto has been famous in the Philippines because it is affordable and can easily satisfy hunger. This has also been a breakfast favorite and a rainy day comfort food.

The most important thing that you should remember before cooking this special goto is to clean the ox tripe and pig intestine thoroughly. If you can wash it several times until the pungent smell is gone, that is the best. Also, we will need to boil them for a couple of hours or more until the texture is soft enough for us to chew – the softer, the better.

Ingredients for Goto Recipe

When making any type of rice porridge, some people think that they need to add more rice. Adding more rice will result in adding more water later on. This will affect the volume of the other ingredients too. Make sure that you start with just 1 cup of rice (good for 3 to 4 persons) and work your way to more if you think that this is not enough. The ratio of the ingredients below is perfect for 3 to 4 persons.

Goto is best served with egg, green onions, toasted garlic, and chicharon. I also love to have it with a little fish sauce and calamansi (or lemon).

Try this Special Goto Recipe. Enjoy!

Special Goto

Special Goto Recipe

Ingredients

  • 1 cup rice
  • 1 lb. ox tripe, cleaned
  • 1 lb. pig large intestine, cleaned
  • 4 eggs, boiled and shelled
  • 5 cups water (for cooking)
  • 6 cups water (for boiling)
  • 2 teaspoons beef powder or 1 beef cube
  • 1 teaspoon turmeric powder (optional)
  • 2 tablespoons minced ginger
  • 1 medium onion, minced
  • 5 cloves garlic, minced
  • 2 teaspoons garlic powder
  • 3 tablespoons cooking oil
  • 1 head toasted garlic
  • 1/4 cup chopped green onion
  • 1/2 cup crushed chicharon
  • Salt and pepper to taste

Cooking Procedure

  1. Boil 6 cups of water in a deep cooking pot.
  2. Add the ox tripe, pig intestine, and 1 teaspoon salt. Boil for 2 to 3 hours or until soft. Add water as needed. Remove the tripe and intestine from the pot to cool down and then slice into bite sized pieces. Set aside.
  3. Heat the cooking oil in a deep cooking pot.
  4. Saute the onion, ginger, and garlic.
  5. Once the onion is soft, add the tripe and intestine. Cook for 2 to 3 minutes.
  6. Add the beef powder( or cube), turmeric powder, and garlic powder.
  7. Pour-in the water. Stir and let boil.
  8. Add the rice. Allow the water to boil once more and then adjust the heat between low to medium. Cook for 30 to 45 minutes or until the desired texture is achieved. Add water if needed and stir every 5 minutes or so to prevent the rice from sticking on the pan.
  9. Add salt and pepper to taste.
  10. Transfer to a serving bowl. Add egg and top with green onions, toasted garlic, and crushed chicharon.
  11. Serve. Share and enjoy!

Number of servings (yield): 4

Panlasang Pinoy Cookbook

Download the Free Panlasang Pinoy eCookbook


The post Special Goto Recipe appeared first on Panlasang Pinoy.

Ahi Tuna Sandwich with Wasabi Mayonnaise

$
0
0

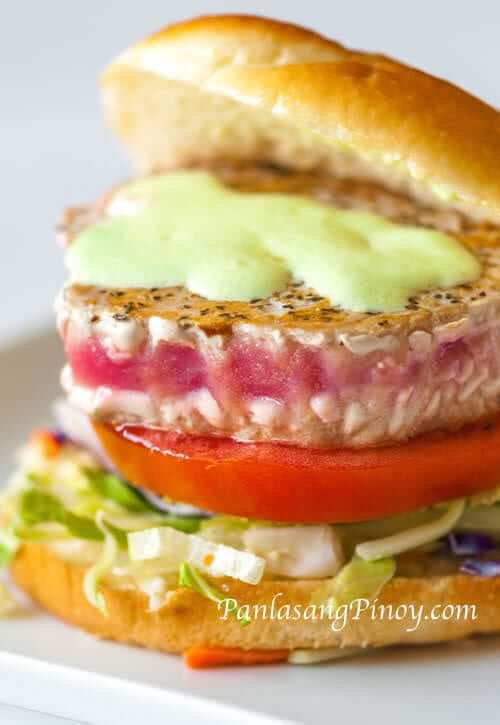
If you love tuna, Ahi Tuna Sandwich with Wasabi Mayonnaise will interest you. I grew up eating different tuna dishes. I have had grilled tuna belly, tuna jaw (panga ng tuna in Filipino), tuna cooked in coconut milk (ginataang tuna), fried tuna, tuna soup, tuna sashimi, tuna sushi, and so on. I loved every tuna dish that I had especially raw tuna. This seared ahi tuna sandwich makes use of sushi grade tuna that are seared on both sides, but the center is left raw – just like that of a sashimi. We all know that raw tuna is best eaten with wasabi – this sandwich has it in mayonnaise form.

It took me only about 10 to 12 minutes to prepare everything. Searing the tuna is the only step that involved cooking and the rest is just basic sandwich assembly. I also saved time making wasabi mayonnaise because I used store bought wasabi mayo. These days products such as wasabi mayonnaise and the likes are readily available in most grocery stores.

I understand that most of you do not like to eat raw tuna. What you can do is to sear the tuna longer so that the inside gets cooked as well. This means that you won’t have that reddish color in the middle. If you don’t like the taste of wasabi, use the plain mayonnaise instead and try to squeeze-in a little lime or lemon to give it that fresh taste.

Try this Ahi Tuna Sandwich with Wasabi Mayonnaise.

Ahi Tuna Sandwich with Wasabi Mayo

Ahi Tuna Sandwich with Wasabi Mayonaisse

Ingredients

  • 4 (6 oz.) sushi grade tuna steaks
  • 4 Kaiser Buns or hamburger buns
  • 1 large beef steak tomato, sliced
  • 1 cup chopped iceberg lettuce
  • 4 tablespoons wasabi mayonnaise
  • 4 tablespoons mayonnaise
  • 1/8 teaspoon sesame oil
  • Cooking oil spray
  • Salt and pepper

Cooking Procedure

  1. Sprinkle enough salt and pepper all over the tuna steaks. Let it stand for 5 minutes.
  2. Heat a non-stick flat pan or grill pan. Lightly spray cooking oil on the pan to prevent the steaks from sticking.
  3. Sear each side of the tuna steaks for 1 to 2 minutes per side. If you want your tuna steak to be well done, add more searing time. Remove the steaks from the pan and place in a clean plate.
  4. Meanwhile combine the mayonnaise (white mayo) with the sesame oil. Mix well. Spread 1 tablespoon of the mayonnaise mixture on both sides of the Kaiser or hamburger buns. Arrange the chopped lettuce and sliced tomato on one bun. Top with the seared ahi tuna steak.
  5. Spread the wasabi mayonnaise over the ahi tuna steak. Top with the other slice of the bun.
  6. Serve. Share and enjoy!

Number of servings (yield): 4

Related links:

Seattle food geek – Ahi Tuna Burger with Nori fries and Wasabi Garlic Mayo

kitchenconfidante – Seared Ahi Tuna with Chimichurri Sauce, Arugula and Avocado

Panlasang Pinoy Cookbook

Download the Free Panlasang Pinoy eCookbook


The post Ahi Tuna Sandwich with Wasabi Mayonnaise appeared first on Panlasang Pinoy.

Instant Pancit Canton with Vegetables

$
0
0

Instant Pancit Canton maybe the staple food in the Philippines next to rice. Although this is not the healthiest food, most people consume this because of its ease in preparation and lower price compared to the real deal. I myself eat instant pancit canton on some occasions, but I try to limit my intake. I won’t lie to you that sometimes I even crave for it – maybe because I used to eat a lot of these back then. What I usually do is use olive oil and sesame oil to replace the oil that comes in the package and add vegetables to make it look healthy the least.

Instant pancit canton with vegetables2

I am not urging or asking you guys to consume instant pancit canton most of the time. I am simply suggesting to make instant pancit canton a little bit better when you crave for it by adding healthy oils and real vegetables – you can also add real meat if you prefer.

I know that some of you are also trying to do something to tweak instant pancit canton and make it better. Can you tell us what you do or probably share your recipe? You can use the comments section below.

Instant pancit canton with vegetables

Instant Pancit Canton with Vegetables

Ingredients

  • 2 individual packages of instant pancit canton (any brand and flavor)
  • 1 1/2 to 2 teaspoons olive oil
  • 1/2 cup julienned carrots
  • 1/2 cup julienned broccoli stem
  • 1/4 teaspoon sesame oil
  • 3/4 cup chopped purple or green cabbage
  • 1/2 teaspoon salt
  • 4 cups water

Cooking Procedure

  1. Pour water in a deep cooking pot. Bring to a boil
  2. Once the water starts to boil, add salt.
  3. Put in the noodles, carrots, broccoli, and cabbage. Continue to boil for 2 to 3 minutes or until the instant noodles are soft, but not soggy.
  4. Drain the water by pouring the entire cooking pot in a strainer or colander with holes small enough to hold the noodles. Place the strainer with noodles under the faucet and let cold water run. This will stop the cooking process and will help the veggies retain its texture and color — similar to blanching.
  5. Make sure that all the water is drained. Transfer the noodles with veggies in a bowl.
  6. Meanwhile, combine the olive oil, sesame oil, and the seasoning included in the packages (soy sauce mixture and seasoning powder). Mix well. Note: I do not use the oil in the package. The olive oil is used as its substitute.
  7. Serve with garlic bread. You may also top this with chopped green onions.
  8. Share and enjoy!

Number of servings (yield): 2

Panlasang Pinoy Cookbook

Download the Free Panlasang Pinoy eCookbook


The post Instant Pancit Canton with Vegetables appeared first on Panlasang Pinoy.
Tuyo with Rice and Tomato

$
0
0

Tuyo is a type of sun dried fish. This is best eaten with spicy vinegar dip and rice. Tuyo is usually consumed for breakfast in the Philippines, although this dried fish can also be eaten for lunch or dinner.

A recipe on how to cook tuyo is not really necessary. Most of us would know that the traditional way of cooking tuyo is to pan fry it quickly until the texture of tuyo turns a bit crisp. This process releases an odor (which I think is delectable) that only tuyo lovers appreciate. If you are in the Philippines, I think that it is all right to cook tuyo this way because the neighbors won’t mind the smell anyway. However, its quite different here in Chicago (or at least from my neighborhood). I must admit that frying tuyo releases a fishy smell that might upset the neighbors. As a precaution, I bake tuyo (and turn on my exhaust fan) to reduce the smell.

The simple tuyo recipe below shows how I do it. Do you have your own way of cooking tuyo? How do you do it?

tuyo

Tuyo with Rice and Tomato

Ingredients

  • 10 pieces tuyo (salted dried fish)
  • 3 cups cooked white rice
  • 3 plum tomatoes, wedged
  • Cooking oil spray
  • 1/2 cup spiced vinegar (sinamak)

Cooking Procedure

  1. Preheat oven to 400F.
  2. Arrange the tuyo fish in an aluminum foil sheet. Spray both sides of the fish with cooking oil. Secure the fish inside the sheet by covering with another aluminum sheet and secure the sides.
  3. Open your vent (this is important). Bake for 6 to 10 minutes.
  4. Remove the fish from the sealed sheet and arrange in individual plates with a cup of white rice and wedged tomato.
  5. Serve with spiced vinegar.
  6. Share and enjoy!

Number of servings (yield): 3

Panlasang Pinoy Cookbook

Download the Free Panlasang Pinoy eCookbook


The post Tuyo with Rice and Tomato appeared first on Panlasang Pinoy.

Rib Eye Steak with Potatoes

$
0
0

Rib Eye Steak with Potatoes is perfect for dinner along with a glass of red wine. Just like any other steak dish, it is important to not overcook the steak so that it will be juicy and tender. This easy rib eye steak recipe will show you how to quickly make your medium rib eye steak for you to enjoy.

Most of the time, I make my own rub for steaks. This involves salt, ground black pepper, garlic powder, and cayenne pepper for a little kick. Make sure that you let the rub get absorbed by the steak before grilling. I leave the rubbed steak for at least 10 minutes to let the meat absorb the flavor – then I start grilling.

I set the grill in medium to high heat so that the steak gets seared right away. This will prevent the liquid from going out of the meat which, will keep the rib eye steak moist. Moist steaks are always pleasant and enjoyable to eat. The grilled baby potatoes goes well with the rib eye steak. I love its buttery potato taste.

Try this Rib Eye Steak with Potatoes Recipe. Cheers!

Rib Eye Steak with potato

Rib Eye Steak with Potatoes

Ingredients

  • 1 lb. rib eye steak
  • 1/2 teaspoon salt
  • 1/2 teaspoon ground black pepper
  • 1/2 teaspoon garlic powder
  • a pinch of cayenne pepper powder
  • 1 pack Yukon gold potatoes (10 small gold potatoes)
  • 1 tablespoon olive oil

Cooking Procedure

  1. Prepare the rub by combining salt, ground black pepper, garlic powder, and cayenne pepper. Mix well.
  2. Rub the mixture all over the rib eye steak. Let it stay for 10 minutes.
  3. Meanwhile place oil on a large bowl then sprinkle a little salt. Add-in the potatoes and coat with oil.
  4. Heat-up the grill.
  5. Grill the rib eye steak for 5 to 6 minutes per side.
  6. Grill the potatoes for 10 to 12 minutes.
  7. Let the steak rest for 10 minutes. Arrange the rib eye steak in a serving plate along with the potatoes.
  8. Serve with your favorite steak sauce. Share and enjoy!

Number of servings (yield): 2

Panlasang Pinoy Cookbook

Download the Free Panlasang Pinoy eCookbook


The post Rib Eye Steak with Potatoes appeared first on Panlasang Pinoy.


Pancit Udon Recipe

$
0
0

Pancit Udon is my own version of Pancit using udon noodles. This Pancit Udon recipe is very easy to follow and it taste really good too. If you want a different noodle other than canton, bihon, sotanghon, or palabok, this Pancit Udon Recipe is worth your time.

Unlike the other pancit recipes that we featured, the noodles or udon in this recipe needs to be boiled first. I simply do this by boiling water in a deep cooking pot and add the udon noodles once the water starts to boil. Boiling the udon for 10 to 12 minutes is about right, but it is always best to check the noodles to ensure that it is not soggy nor undercooked. Once the noodles are done, I drain the liquid and pour olive oil all over the noodles and make sure the all noodles are coated with oil. This prevents the noodles from sticking with each other.

Once the noodles are ready, it time to complete the pancit – and this is really a quick and easy process. The recipe below will tell you how to quickly and easily cook pancit udon.

Try this Pancit Udon Recipe. Enjoy!

Pancit Udon

Pancit Udon Recipe

Ingredients

  • 1 package (12.8) oz. Udon noodles
  • 10 pieces squid balls, cut in half
  • 1/2 small cabbage, chopped
  • 1 medium carrot, julienne
  • 1 medium yellow onion, sliced
  • 1/4 lb. pork, sliced into thin pieces and chopped
  • 1/2 cup soy sauce
  • 1 lemon
  • 1/4 cup chopped green onions or scallions
  • 1 1/2 to 2 tablespoons olive oil
  • 3 tablespoons cooking oil
  • 3 cloves garlic, minced
  • 8 to 10 cups water (for boiling)
  • Salt and pepper to taste

Cooking Procedure

  1. Prepare the udon noodles by boiling the water in a deep cooking pot.
  2. Once the water starts to boil, put-in the udon noodles, boil for 10 to 12 minutes or until just about right and not soggy.
  3. Drain the water and place the noodles in a colander or strainer to let the excess water drip. Immediately transfer the noodles to a large bowl and pour-in the olive oil. Gently toss the noodles until covered in olive oil.Set aside. Note: this will prevent the noodles from sticking to each other.
  4. Meanwhile, heat cooking oil in a a large and wide wok or pan.
  5. Saute the onion and garlic.
  6. Add the pork once the onion turns soft. Cook for 2 minutes.
  7. Add-in the squid balls. Cook for another 2 minutes.
  8. Put-in the carrots and cabbage. Continue to stir fry for 3 minutes.
  9. Slowly add the noodles in the pan.
  10. Pour-in the soy sauce and squeeze the lemon. Stir fry for 3 to 5 minutes.
  11. Add salt and pepper to taste.
  12. Transfer to a serving plate and top with chopped green onions.
  13. Serve. Share and enjoy!

Number of servings (yield): 4

Panlasang Pinoy Cookbook

Download the Free Panlasang Pinoy eCookbook


The post Pancit Udon Recipe appeared first on Panlasang Pinoy.

Grilled Lobster Tails Recipe

$
0
0

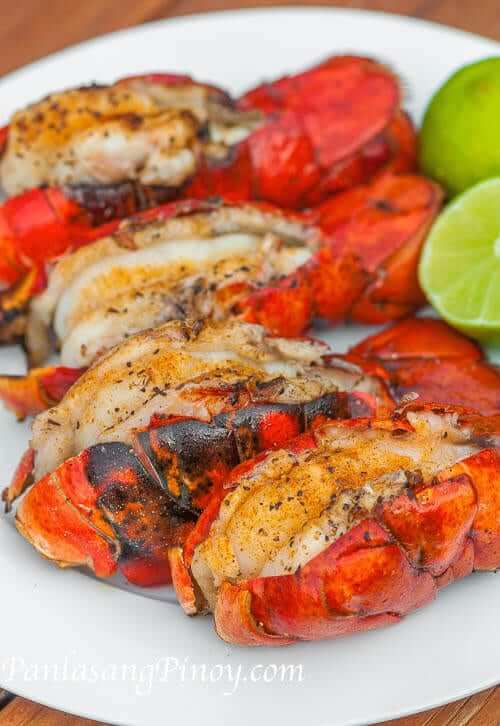
Grilled Lobster Tails are perfect for lunch on a warm summer day. It is quick and easy to make and it is delicious. I love to have grilled lobster tails with a cold glass of lemonade (or Chardonnay, sometimes) – I think that this combination is refreshing.

I made these grilled lobster tails using he freshest lobster tails that I can get my hands on. The seasoning is simple too because I want the taste of lobster to stand out. For this reason, I lightly seasoned the lobster tails with seasoned salt and ground black pepper. I also brushed some butter to add that rich flavor. Lastly, I squeezed half a lime (or lemon) on the grilled lobster tails to make it complete. Easy isn’t it?

Grilled lobster tails is best eaten with grilled corn on the cob, or even mashed potato. If you love the idea of surf and turf, try it with filet mignon.

Try this Grilled Lobster Tails Recipe. Cheers!

Grilled Lobster Tails

Grilled Lobster Tails Recipe

Ingredients

  • 4 pieces lobster tails, cleaned
  • 1/2 teaspoon Lawry’s seasoned salt
  • 1/4 teaspoon ground black pepper
  • 1 tablespoon melted butter
  • Cooking oil spray (high heat resistant for grilling)
  • 2 pieces lime

Cooking Procedure

  1. Cut open the lobster tail by cutting through the upper shell lengthwise using a pair of kitchen shears. Force the shell to open by pulling the cut sections on opposite directions and then use your hands to slightly pull the lobster meat out to a point that a quarter of it sticks out of the shell.
  2. Brush the lobster meat with butter. Lightly sprinkle some seasoned salt and ground black pepper.
  3. Spray cooking oil to the grill and then start to heat-up your grill.
  4. Grill the lobster tails (cut side down) for 5 to 6 minutes.
  5. Turn-over the lobster tail and grill the other side for 5 to 7 minutes.
  6. Remove from the grill. Arrange in a serving plate. Squeeze the lime on top.
  7. Serve with Chardonnay. Share and enjoy!

Number of servings (yield): 4

Related links:

Sweet bites blog – Grilled Lobster with Cilantro Butter

A girl and her food – Grilled Lobster Tails

Panlasang Pinoy Cookbook

Download the Free Panlasang Pinoy eCookbook


The post Grilled Lobster Tails Recipe appeared first on Panlasang Pinoy.

Delicious Reuben Sandwich

$
0
0

Reuben Sandwich is a type of hot sandwich that makes use of corned beef brisket, sauerkraut, and cheese. Reuben Sandwich is a delicious treat that will surely fill you up.

The corned beef brisket needs to be cured and cooked properly before you use it. Preparing cured corned beef brisket takes a little time and patience, this article about making corned beef from scratch might help. If you think that the process can be tedious, cured corned beef brisket is available in the grocery stores here in North America. As for our good friends who don’t have access to these in the grocery, making your own is the way to go – don’t worry because your patience and hard work will be rewarded later on.

Sauerkraut, on the other hand, is fermented cabbage. It taste great with Reuben Sandwich. I usually buy ready made sauerkraut since these are not that expensive and can save me time.

Reuben Sandwich 2

Delicious Reuben Sandwich

Ingredients

  • 1/4 lb. corned beef brisket, sliced
  • 2 slices whole wheat bread
  • 1 tablespoon mayonnaise
  • 2 slices cheese
  • 1/2 cup Sauerkraut

Cooking Procedure

  1. Spread mayonnaise on one side of both bread slices.
  2. Arrange the cheese on top of one slice of bread with mayo.
  3. Generously top with corned beef brisket.
  4. Add Sauerkraut on top and then finish by placing the other bread slice over the Sauerkraut mayo side down.
  5. Serve. Share and enjoy!

Number of servings (yield): 1

Panlasang Pinoy Cookbook

Download the Free Panlasang Pinoy eCookbook


The post Delicious Reuben Sandwich appeared first on Panlasang Pinoy.

Sinigang na Isda sa Kamias

$
0
0

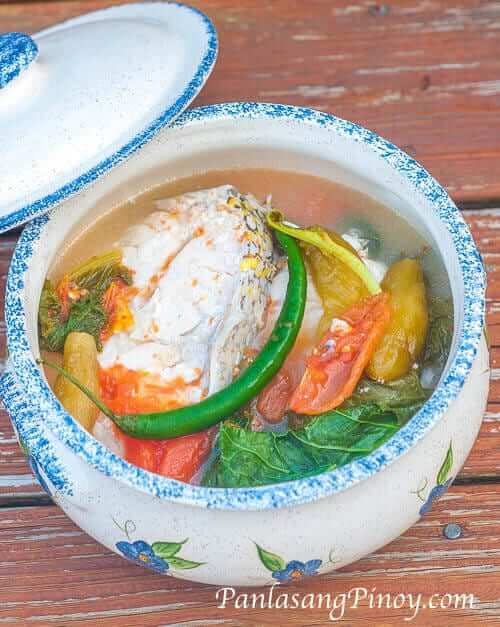
Sinigang na Isda sa Kamias is a type of Filipino sour soup. This soup dish involves fish, tomato, mustard greens, long green peppers, and onion. The souring agent for this sinigang recipe is bilimbi, which is locally known as kamias.

This Sinigang na Isda sa Kamias recipe is straightforward. You can enjoy your sour fish soup dish in less than 30 minutes; this recipe will only requie you to boil the ingredient – there is no sautéing involved, which means that this dish is not oily at all.

I used fish steaks for this Fish sinigang recipe. Do not limit yourselves with fish steaks, you can also use medium whole fish such as tilapia, pompano, grouper, red snapper, or any type of fish that you think is appropriate.

As for the kamias, I used the fresh frozen ones that I got from the Filipino store, but you can always consume fresh kamias or sun dried kamias.

Try this Sinigang na Isda sa Kamias Recipe. Enjoy!

Sinigang na Isda sa Kamias

Sinigang na Isda sa Kamias

Ingredients

  • 2 lbs. fish steaks or 2 whole medium fish, cleaned
  • 12 pieces fresh or fresh frozen kamias (bilimbi)
  • 4 plum tomatoes, wedged
  • 1 medium yellow onion, wedged
  • 4 pieces long green pepper
  • 6 to 8 leaves, mustard greens
  • 6 cups water
  • Salt and pepper to taste.

Cooking Procedure

  1. Boil the water in a large cooking pot.
  2. Once the water starts to boil, add the tomatoes, kamias, and onion. Cover and let boil for 8 minutes.
  3. Add the fish (any type) and long green peppers. Cover and cook in medium heat for 10 to 12 minutes.
  4. Add the mustard greens, salt, and pepper. Stir.
  5. Turn the heat off. Cover and let the residual heat cook the leaves for 5 minutes.
  6. Transfer to a serving bowl.
  7. Serve with white rice.
  8. Share and enjoy!

Number of servings (yield): 4

Panlasang Pinoy Cookbook

Download the Free Panlasang Pinoy eCookbook


The post Sinigang na Isda sa Kamias appeared first on Panlasang Pinoy.
Baked Swai Fillet Recipe

$
0
0

I think that this simple Baked Swai Fillet is something that you should try for many reasons. The first reason will be the taste, it is not that overpowering, unlike other types fish, while the smell is not too fishy. Baked Swai fillet is also easy to prepare and this recipe has very minimal ingredients. It only takes less than 20 minutes to prepare and cook this fish dish.

Are you familiar with Swai? What is Swai, anyway? Swai is a name or term given to the meat of a freshwater fish called Iridescent shark. The name might sound confusing, don’t worry because this is not really the kind of shark that lives in the ocean, rather this fish is a type of shark catfish that lives in the rivers of Southeast Asia.

baked-swai-fillet-2

Swai recipes and different Swai dishes is slowly getting popular these days because it sells cheaper compared to other fish fillets in the market. I must admit that this baked Swai fillet exceeded my expectations in terms of taste and texture. Oh – by the way, I tried using a different kind of seasoning for this recipe; It is a salt free Lemon Pepper Seasoning blend. This seasoning is best if you want your fish or any seafood to taste fresh and mild – the type wherein you can really taste the flavor of the ingredients and not the seasoning.
Try this Baked Swai Fillet Recipe. Cheers!

baked-swai-fillet

Baked Swai Fillet

Ingredients

  • 6 pieces Swai fillet
  • 2 tablespoons Mrs. Dash salt free Lemon Pepper Seasoning blend
  • 2 tablespoons melted butter
  • Cooking oil Spray

Cooking Procedure

  1. Preheat oven to 425 Fahrenheit.
  2. Line a baking tray with aluminum foil.
  3. Grease the the foil by spraying coooking oil spray all throught.
  4. Meanwhile, brush the melted butter on the fish and then sprinkle the lemon pepper seasoning all over the fish (swai fillet). Arrange the fish over the aluminum foil.
  5. Bake for 10 minutes.
  6. Remove from the oven and transfer to a serving plate.
  7. Serve. Share and enjoy!

Number of servings (yield): 6

Panlasang Pinoy Cookbook

Download the Free Panlasang Pinoy eCookbook


The post Baked Swai Fillet Recipe appeared first on Panlasang Pinoy.

Viewing all 460 articles
Browse latest View live