Quantcast
Channel: Recipes – Panlasang Pinoy
Viewing all 460 articles
Browse latest View live

Sweet and Sour Mahi-mahi

$
0
0

I was craving for Sweet and sour fish today, but I am too lazy to go to the Asian store to grab some fresh red snapper. I thought that I can always get frozen fish fillets from my local grocer – and that is what I did. Mahi-mahi is the fish of choice today. To those that are not familiar with this fish variety, mahi-mahi is also known as dolphin fish. Hey — before anyone reacts negatively, please let me clarify that dolphin fish is just a common name given to mahi-mahi; this is not a dolphin or anyway related to the cute sea creatures that we love and protect. I can assure you that no real dolphins were hurt during the filming of this video. If you feel that you don’t like to use mahi-mahi to make sweet and sour fish, the choice is your. However, I suggest that you use fish that has white meat — this takes salmon and tuna out of the list.

Sweet and sour Mahi-mahi is one of the easiest and quickest fish dish that you can make. I like the idea that this takes less than 20 minutes to prepare and cook. This is a perfect dish for me to make today because I plan to take some time to watch TV and see how the sports community thinks about the boxing fight of Manny Pacquiao and Tim Bradley last night. If you happen to read this post in a later time, this news can be considered already as history . So, Pacquiao won with a unanimous decision. I enjoyed the fight and also the side show during the fight — you know what I mean. There was no voodoo, he won because he was a good and experienced fighter.

Anyway, let me get my thoughts back to this Sweet and Sour Mahi-mahi recipe before I get off-track. As I was saying, I am using frozen mahi-mahi fillets for this recipe because I was too lazy to travel 32 miles (a total of 64 both ways) to go to my Asian grocer for some fresh red snapper. Mahi-mahi fillets really works great as an ingredient for sweet and sour fish; I liked how its flavor blends well with the sauce. I think that I learned a new lesson today: Sometimes, I do not need to go far to get fresh ingredients. I added the word “Sometimes” because it is not true most of the time. You might know me by now, and you know how I will travel around just to get the ingredients that I needed — within a radius of 100 miles that is. I am not trying to waste time and gas when I do that, the only thing that I have in mind is to present the best recipe to you guys — our loyal readers. You always deserve the best!

This recipe is a combination of fried fish and sweet and sour sauce. I fried the mahi-mahi fillets in medium heat after seasoning each piece with salt and pepper. I also dredged the fish in all-purpose flour to give it a nice texture and to prevent the cooking oil from splattering. This makes me feel a little bit safe from oil attacks while frying the fish. The sweet and sour sauce that I used came from the sweet and sour sauce that I posted a few years back. I used 2 servings of the sweet and sour sauce recipe and added some bell pepper, carrots, and onion. The result is an amazing sweet and sour mahi-mahi dish completed within 20 minutes.

I love to hear your thoughts on this recipe. If you have questions or even a quick story to share, please drop me a comment and I will reply to you as soon as I can.

Try this delicious Sweet and Sour Mahi-mahi recipe. Enjoy!

Sweet and Sour Mahi-mahi

Sweet and Sour Mahi-mahi Recipe

Ingredients

  • 1 lb. frozen Mahi-mahi fillets
  • 1/4 cup all-purpose flour
  • 2/3 cups rice wine vinegar
  • 1/2 small red bell pepper, julienned
  • 1/2 small green bell pepper, julienned
  • 1/4 cup carrots, julienned
  • 1 small red onion, sliced
  • 1 teaspoon dark soy sauce
  • 1/4 cup tomato ketchup
  • 1/2 cup brown sugar
  • 1 1/2 tablespoons cornstarch diluted in 3 tablespoons water
  • 1/2 cup cooking oil
  • Salt and pepper to taste

Cooking Procedure

  1. Season Mahi-mahi fillets with salt and pepper.
  2. Heat the cooking oil in a frying pan.
  3. When the oil gets hot, dredge the seasoned mahi-mahi fillets in all-purpose flour. Fry each side in medium heat for 3 to 5 minutes or until medium brown. Remove the fried fish from the pan. Arrange in a serving plate. Set aside.
  4. Meanwhile, make the sweet and sour sauce by combining vinegar, soy sauce, ketchup, and sugar in a bowl. Mix well.
  5. Heat a saucepan and pour-in the vinegar mixture. Let boil.
  6. Adjust the heat to medium and then add the carrots, bell peppers, and onion. Stir and cook for 2 minutes.
  7. Pour-in the cornstarch diluted in water. Stir quickly. Continue to stir gently until the texture becomes thick.
  8. Turn the heat off. Scoop some sweet and sour sauce and top over the fried Mahi-mahi.
  9. Serve with warm steamed white rice.
  10. Share and enjoy!

Number of servings (yield): 4

>>Download the Free eCookbook here<<


Easy Calamari Recipe

$
0
0

Calamari is probably one of the easiest and quickest appetizers to prepare. Every time we order calamari restaurants, I was always surprised on how fast the servers get back to us with the order already with them — still hot and crunchy on the outside, while very soft in the inside. That is how a perfect calamari should be, in my opinion. I personally like the calamari fritti of Lou Malnati’s and the spicy calamari of Olive Garden is also a good one. The good news is you do not need to dine-in any restaurant to enjoy a perfectly delicious calamari appetizer. You can always make this in your home kitchen, but make sure to open the windows and vent, or else your place will smell appetizing too.

Most of us have had calamari, at least once or several times. For the benefit of those who are not familiar to this yummy appetizer, calamari refers to a squid dish. This is usually made from squid rings. The squid is dipped in a batter or dredged in a breading of some sort (depending on the recipe) and deep fried until the texture of the breading becomes crisp. This Easy Calamari Recipe will help you understand better on what a basic calamari is all about. This dish can have different names around the world; in particular, this is known as “calamares” in the Philippines, and there are hundreds of good calamares recipes that you can try. Calamari also refer to whole small squids that are cooked the same way. While the squid is the life of a calamari dish, the batter/breading and the dip plays an important role in making your calamari more enjoyable to eat.

Going  back to this Easy Calamari Recipe, I am showing you a very basic way to make calamari. This recipe involves squid rings which you can get in the frozen seafood section of your favorite supermarket, already available in ring form. You can also use fresh squid. If using fresh squid, clean it thoroughly and remove the skin and all the things inside it. Slice the squid crosswise with your desired thickness to create the rings.

Do you know how calamari in restaurants get their soft texture? Well, not all squids are soft, but there is a way to ensure that the squid that you will be enjoying will be soft the moment it reaches your mouth. My technique is to marinade the squid or squid rings in fresh milk for at least 3 hours (marinating overnight works best for me). The lactic acid found in milk reacts with the squid making it less tougher overtime. This is the reason why you see the squid swimming in milk in this cooking video. This technique will also work for Inihaw na Pusit (Grilled Squid), as long as you do not over cook your squid.

http://www.youtube.com/watch?v=YmC25_LNbpA

Try this Easy Calamari Recipe. Let me know what you think.

Easy Calamari Recipe

Easy Calamari Recipe

Ingredients

  • 1 lb. calamari rings, soaked in milk for 3 hours
  • 1/2 cup all-purpose flour
  • 1 1/2 teaspoon salt
  • 2 teaspoons garlic powder
  • 2 teaspoons dried parsley flakes
  • Lemon wedges
  • 2 cups cooking oil

Cooking Procedure

  1. Combine the flour, salt, garlic powder, and parsley flakes. Mix well and set aside.
  2. Heat the cooking oil in a wok or a deep cooking pot.
  3. Drain the milk of the calamari. Dredge the calamari rings one-at-a-time on the flour mixture. Make sure that the calamari ring is completely coated with the mixture.
  4. Deep fry the coated calamari rings on hot oil for 2 minutes or until the calamari turns light brown.
  5. Strain the calamari from the wok or cooking pot using a skimmer or strainer. Let the excess oil drip.
  6. Transfer the fried calamari in a serving plate.
  7. Serve with lemon wedges.
  8. Share and enjoy!

Number of servings (yield): 4

>>Download the Free eCookbook here<<

Sardines with Misua and Patola Recipe

$
0
0

Sardines with Misua and Patola or simply — Misua Soup — is a regular soup dish made from thin flour noodles, sardines, and luffa. The thin flour noodles are known as misua in the Philippines. The sardines refer to canned sardines in tomato sauce, while luffa is a type of vegetable; it is known as Patola in Filipino.

I am featuring this recipe because I grew-up enjoying this dish. It is simple and very quick and easy to prepare. I remember having this dish in the Philippines every rainy season or when there is a typhoon — and the power is down. Brown-outs happen most of the time back then — when it is raining hard or during typhoon season. I’m not sure if this is still the case right now in Manila, though. Anyway, I think that my mom chooses to cook Misua with Sardines and Patola (and fried tuyo too) because it is done once the water starts to boil – literally speaking. Then we can have a quick lunch or dinner (depending on the time of day) and go back to what we are doing which is to place an empty pail under leaking parts of the ceiling, or to monitor the rise of water from the nearby creek and get ourselves ready for a possible flood. We were always thankful because our place never got flooded. You know what; I really enjoy eating when it’s raining crazy. It seems like heavy rain and the cold breeze (or strong wind) combined improves my appetite. Can any of you relate to that?

Going back to this Sardines with Misua and Patola Recipe, you can use either the hot (red can) or the regular (green can) sardines, as long as it is tomato sauce based. I don’t think that Spanish style sardines will work well for this recipe, and beside it costs more than the tomato sauce based sardines. If you want to have Spanish style sardines, I suggest that you enjoy it as it is – take it out of the can or bottle and eat it with warm rice or with bread.

I like to eat Sardines with Misua and Patola with warm steamed white rice. It also works best for me to eat it with spicy patis (fish sauce). Aside from this recipe, you can also do a simpler version by removing the patola, which will be this Sardines with Misua Recipe. You can also replace the sardines with meatballs to transform it to a dish called almondigas.

Try this simple Sardines with Misua and Patola Recipe.

Sardines with Misua and Patola Recipe

Sardines with Misua and Patola Recipe

Ingredients

  • 4 ounces Misua noodles
  • 15 ounce canned sardines in tomato sauce
  • 1 medium patola (luffa) peeled and sliced
  • 1/2 cup chopped green onions
  • 1/2 to 1 head garlic, crushed
  • 1 medium onion, diced
  • salt and pepper to taste
  • 3 tabespoons cooking oil
  • 4 to 5 cups water

Cooking Procedure

  1. Heat the cooking oil in a soup pot.
  2. Saute the garlic until medium brown.
  3. Add-in the onion. Continue to saute until the texture becomes soft.
  4. Pour-in the sardines in tomao sauce. Stir.Cook for a 2 minutes.
  5. Put-in the patola and cook for 1 minute.
  6. Pour-in the water. Let boil. Simmer for 3 to 5 minutes.
  7. Add-in the misua. Gently stir. Cook for 2 minutes.
  8. Add salt and pepper to taste. Put-in the green onions.
  9. Tranfer to a serving bowl. Serve.
  10. Share and enjoy!

Number of servings (yield): 4

http://www.youtube.com/watch?v=LlMTTQJXBt0

Panlasang Pinoy Cookbook

Download the Free Panlasang Pinoy eCookbook


The post Sardines with Misua and Patola Recipe appeared first on Panlasang Pinoy.

Simple Baked Pork Chop Recipe

$
0
0

Baked Pork Chop is a good idea for lunch especially when you do not feel to prepare something fancy. This Simple Baked Pork Chop Recipe is a time saver and it has a great flavor that you will like. I like the recipe because it reminds me of barbecue pork chop. I can make pork chops with almost the same barbecue goodness inside my kitchen without any need of a grill. I also love the tender moist pork chops that this recipe produces.

As the name implies, this Baked Pork Chop Recipe is totally simple and really easy; all we need to do is to season the pork chop, sear, and bake them. Although everything seems to be a walk in the park, I make sure that the pork chops are seasoned well before searing. When preparing this baked pork chop recipe, If possible, I rub the salt and pepper all over the pork chops so that there is no open spot left. Waiting for at least 15 minutes before you sear the pork is recommended because it gives time for the flavor to get absorbed. Searing correctly is also important because this process locks the moisture in the pork, which makes helps make it soft and tender.

One more thing, I am using my favorite barbecue sauce for this Baked Pork Chop Recipe. Simply spread the barbecue sauce all over the pork chops before baking them. This adds a nicer twist to this baked pork chop recipe – you can also do the same to other baked pork or chicken recipes if you desire.

Baked Pork Chop recipe

Simple Baked Pork Chop Recipe

Ingredients

  • 4 pieces thick cut pork chops
  • 3/4 cups barbecue sauce (use your favorite brand)
  • cooking oil spray
  • 1/2 teaspoon salt
  • 1/4 teaspoon ground black pepper

Cooking Procedure

  1. Sprinkle salt and pepper on both sides of the pork chop. Let it stay for 15 minutes so that the pork can absorb the flavor.
  2. Heat a skillet or frying pan. Spray enough cooking oil (using the cooking oil spray) on the skillet.
  3. Sear each side of the pork chop for 3 minutes or until brown. Note: Doing this will help retain some moisture inside the pork chops.
  4. Preheat the oven to 350 degrees Fahrenheit.
  5. While the oven is being preheated, spread the barbecue sauce on both sides of the seared pork chops.
  6. Arrange the pork chops in a baking pan. Bake for 20 minutes.
  7. Transfer to a serving plate. Serrve with grilled corn. mashed potatoes, or white rice.
  8. Share and enjoy!

Number of servings (yield): 4

Panlasang Pinoy Cookbook

Download the Free Panlasang Pinoy eCookbook


The post Simple Baked Pork Chop Recipe appeared first on Panlasang Pinoy.

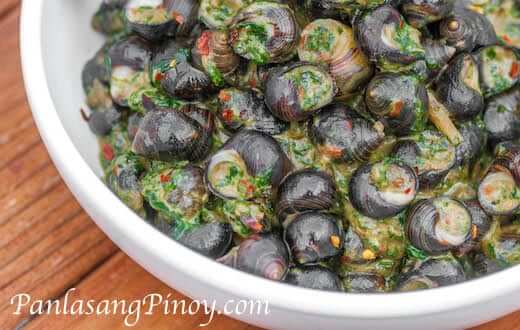
Snails with Spinach in Coconut Milk Recipe

$
0
0

This Snails with Spinach in Coconut Milk Recipe is similar to a Filipino recipe called “Ginataang Kuhol”. While the later involves golden snails (kuhol) and water spinach (kangkong), this recipe makes use of sea snails and fresh spinach; the rest of the ingredients are similar.

Have you tried preparing and cooking snails? If you have not, do not worry because the process is simple –just make sure that you wash the snails well; I use a brush to clean them up. A toothbrush is a nice tool to use because you can brush all the sides of the snail with ease. I also soak the snails in tap water for 3 hours before cooking.

It will be better if you can create an opening in the “apex” of the shell. This will help you eat the snail easily later on, without the need of a toothpick to pick the contents of the shell. Unlike kuhol, the shell of sea snails are tougher. The apex is the pointy part of the snail opposite to the huge opening. I did try to do it, but it took me some time and I did exert some effort, so I decided not to do it. I just used a toothpick to pick the snail. It tasted really good!

Try this Snails with Spinach in Coconut Milk Recipe. Let me know what you think.

Snails with Spinach in Coconut Milk Recipe

Snails with Spinach in Coconut Milk Recipe

Ingredients

  • 2 lbs. sea snails
  • 2 cups coconut milk
  • 1 cup chopped spinach
  • 2 tablespoons shrimp paste (bagoong alamang)
  • 1 tablespoon fish sauce (paris)
  • 1 medium onion, minced
  • 1 thumb ginger, minced
  • 1 teaspoon minced garlic
  • 3 tablespoons cooking oil
  • 1/4 teaspoon ground black pepper
  • 1 teaspoon crushed red pepper

Cooking Procedure

  1. Heat the cooking oil in a cooking pot.
  2. Saute the garlic, ginger, and onion when the oil becomes hot.
  3. Add-in the ground black pepper and crushed red pepper. Stir.
  4. Pour-in the coconut milk. Let boil. Simmer (cook in low heat) for 10 minutes.
  5. Add-in the sea snails. Increase the heat to medium. Stir and cover. Cook for 15 to 20 minutes while gently stirring every 3 minutes.
  6. Put-in the spinach. Stir and continue to cook for 3 minutes.
  7. Transfer to a serving plate.
  8. Serve. Share and enjoy!

Number of servings (yield): 5

Panlasang Pinoy Cookbook

Download the Free Panlasang Pinoy eCookbook


The post Snails with Spinach in Coconut Milk Recipe appeared first on Panlasang Pinoy.

Brined Roast Beef

$
0
0

Brined Roast Beef has always been popular because of many reasons. The main reason is probably its great flavor especially when dipped roast beef gravy; it also goes well with almost any side dish. I personally like roast beef with mashed potatoes. Roast beef sandwich is also a good idea. One thing common to Filipinos is roast beef with rice, which I think is also a good combination.

Making roast beef may sound like a simple thing — well, that is true. All you have to do is season the beef and roast it in the oven. However, roast beef is best when it is juicy and moist in the inside. It should also absorb the spices to make it even taste better. I make this possible by soaking the beef in brine before roasting it. This method helps the flavor to penetrate the meat and keep the moisture in. This brined roast beef recipe will really be helpful if you like your roast beef the way I do.

Brined Roast Beef Recipe

To make the brine, I combine all the ingredients for brining and let it boil for a while. The temperature is balanced by shocking the brine with ice cubes. I then arrange the beef in a large resealable bag and pour the brine with ice in it. The process is completed by sealing the bag and placing it in the refrigerator overnight before roasting.

Roast Beef marinated

Try this Brined Roast Beef Recipe. Let me know what you think.

Brined Roast Beef

Ingredients

  • 3 lbs. ribeye or eye of round
  • 1 tablespoon sea salt
  • 1 teaspoon ground black pepper
  • 2 teaspoons garlic powder (for brine)
  • 5 tablespoons sugar(for brine)
  • 5 tablespoons sea salt(for brine)
  • 2 1/2 tablespoons ground black pepper (for brine)
  • 2 tablespoons ginger powder (for brine)
  • 1 1/2 teaspoons cinnamon powder (for brine)
  • 1 1/2 cups water (for brine)
  • 3 cups ice cubes (for brine)

Cooking Procedure

  1. Combine all the brining ingredients in a saucepan, except for the ice cubes. Mix well.
  2. Place the saucepan in a stovetop. Let boil and continue to cook for 2 minutes.
  3. Arrange the ice cubes in a large metal mixing bowl. Pour-in the boiling mixture in the mixing bowl. Stir.
  4. Meanwhile, place the beef inside a large resealable bag. Pour the brine mixture inside the bag. Seal and place inside the refrigerator. Let it brine for 16 to 20 hours.
  5. After brining the meat, discard the brine. Preheat oven to 375 Fahrenheit.
  6. Rub salt, pepper, and garlic powder all over the meat and then place it in a roasting rack.
  7. Roast the beef for 23 to 27 minutes per pound. Note: A 3 lbs. beef needs to be roasted for 69 to 81 minutes.
  8. Remove the meat from the oven. Let is rest for 12 to 15 minutes.
  9. Carve the roast beef. Serve.
  10. Share and enjoy!

Number of servings (yield): 5

Panlasang Pinoy Cookbook

Download the Free Panlasang Pinoy eCookbook


The post Brined Roast Beef appeared first on Panlasang Pinoy.

White Chocolate Chip Cookie

$
0
0

Chocolate Chip Cookie has always been a favorite. It can be enjoyed as a snack, a dessert, or as something to nibble-on while watching TV or while feeding your brain with sugar for that AHA moment. There have been countless chocolate chip cookie recipes that I tried and most of them satisfied my expectation. However, I always go back to my childhood wherein white chocolate has been my favorite for a while. This led me to bake this delicious white chocolate chip cookie.

Making chocolate chip cookie is very easy. You cannot go wrong as long as you have the proper ingredients with the correct measurement. Once you are done making your Chocolate Chip Cookie masterpiece, it is up to you if you want it to sit in the cookie jar for several days or finish your Chocolate Chip Cookie on the spot. Anyway, you can always make a new batch of White Chocolate Chip Cookie or any other cookies for the cookie jar.

To make it quite different, I try to eat white chocolate chip cookie with cold chocolate milk. This combination is really good. I felt like being pampered and sometimes it can be a stress reliever too.

Give this White Chocolate Chip Cookie a try.

Chococlate Chip Cookie

White Chocolate Chip Cookie

Ingredients

  • 1 cup white chocolate chips
  • 2 1/2 cups all purpose flour
  • 1 cup granulated white sugar
  • 1 teaspoon baking soda
  • 2 medium eggs
  • 3/4 cup unsalted butter, softened
  • 2 teaspoons vanilla extract
  • 1/2 teaspoon salt

Cooking Procedure

  1. Combine AP flour, salt, and baking soda in a bowl. Mix well and set aside.
  2. Using a hand or stand mixer, cream the butter and then gradually add the sugar. Whisk-in the eggs and the vanilla extract.
  3. Gradually add-in the flour-mixture into the creamed butter mixture and fold using a spatula.
  4. Add the white chocolate chips and continue to fold until the ingredients are mixed well.
  5. Cover the mixing bowl with a cling wrap and refrigerate the dough for at least 3 hours (I usually do this 1 day in advance).
  6. Remove the cookie dough from the refrigerator and allow it stand in room temperature for 8 to 12 minutes.
  7. Preheat oven to 330 degrees Fahrenheit.
  8. Prepare the cookie sheet or baking tray by lining it with parchment paper.
  9. Scoop about 2 1/2 to 3 tablespoons of cookie dough and form it into a ball using your clean hands.You can add more white chocolate chips by pressing it in the ball. Arrange the cookie dough balls in the cookie sheet or baking tray. Make sure to leave space between each cookie dough balls as each will need more room when it flattens later on.
  10. Bake for 10 minutes. Remove from the oven and let the temperature cool down.
  11. Serve. Share and enjoy!

Number of servings (yield): 6

Panlasang Pinoy Cookbook

Download the Free Panlasang Pinoy eCookbook


The post White Chocolate Chip Cookie appeared first on Panlasang Pinoy.

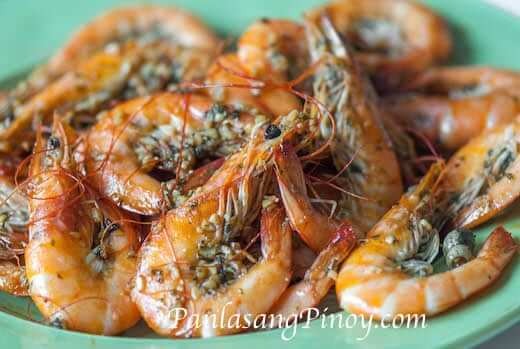
Chili Garlic Shrimp Saute

$
0
0

Chili Garlic Shrimp Saute is a quick and easy shrimp recipe to make for lunch. I like this dish because I can make a quick and delicious lunch in less than 30 minutes. I also like how Chili Garlic Shrimp Saute compliments well with rice — it is full of flavor.

I used medium shrimp for this recipe. It is recommended to use shrimp with shells and head on because the shell and head helps keep the flavor in the shrimp. If you plan to use prawns, that will work too. Nothing in the recipe needs to be changed and the result will even be better.

Have you tried cooking Chili Garlic Shrimp Saute before? If you haven’t, this is the proper time for you to make your own Chili Garlic Shrimp Saute dish. You will definitely love it.

Try this Chili Garlic Shrimp Saute Recipe. Cheers!

Chili Garlic Shrimp Saute

Chili Garlic Shrimp Saute

Ingredients

  • 1 lb. Shrimp, cleaned
  • 2 tablespoons butter, melted
  • 2 tablespoons olive oil
  • 1 teaspoon crushed red chili flakes
  • 1 teaspoon dried parsley flakes
  • 2 teaspoons minced garlic
  • Salt and pepper to taste

Cooking Procedure

  1. Heat butter and olive oil in a saute pan.
  2. Put-in the garlic and crushed red chili flakes. Cook in medium heat until the garlic turns light brown (this will take between 2 to 3 minutes).
  3. Add the shrimp. Saute for 8 minutes.
  4. Sprinkle salt and pepper, and add the parsley flakes. Continue to cook for 2 to 4 minutes.
  5. Transfer to a serving plate. Serve.
  6. Share and enjoy!

Number of servings (yield): 4
Panlasang Pinoy Cookbook

Download the Free Panlasang Pinoy eCookbook


The post Chili Garlic Shrimp Saute appeared first on Panlasang Pinoy.


Adobo Pork Chops

$
0
0

Adobo Pork Chops is a simple pork adobo variation using one of the most favorite pork cuts: pork chops. This adobo pork chops recipe has a mild favor and is best eaten with — what else, but rice. As far as I am concerned, rice is still the best side dish for adobo dishes with sauce. However, bread or other sides will prove worthy depending on special situations, but not this one. In fact, this will do good with steamed white rice, garlic fried rice (or sinangag), and even yang chow fried rice. Sometimes, I like it too with brown rice.

This Adobo Pork Chops recipe tastes really good. I am not saying that this is the best pork adobo recipe around, but it simplicity and ease in preparation will make you like this recipe above the rest. The best thing about this Adobo Pork Chops is that it makes use of pork chops, which is probably one of your favorite pork cuts. I personally love pork chops and use it in most of the dishes that I make. Do you love pork chops too?

Everytime I cook Adobo Pork Chops, I see to it that I prepare more than what I need — so this means I have lots of leftovers. Why? Adobo is something that you can keep in the fridge for at least a few days. This means that I can heat-up some adobo pork chops left over when I am too busy to cook or too lazy to do anything for dinner.

This Adobo Pork Chops is really awesome. Try this recipe today!

Adobo Pork Chops

Adobo Pork Chops

Ingredients

  • 2 lbs. pork chops
  • 4 tablespoons dark soy sauce
  • 5 cloves garlic, crushed
  • 3 tablespoons white or cane vinegar
  • 2 teaspoons whole peppercorn
  • 4 to 5 pieces dried bay leaves
  • 1 cup water
  • salt to taste (if necessary)
  • 3 tablespoons cooking oil

Cooking Procedure

  1. Heat cooking oil in a wide and deep pan.
  2. Once the oil is hot, pan fry the pork chops turning them over once each side turns light to medium brown (this will take around 3 to 5 minutes per side depending on the thickness of your porkchops).
  3. Put-in the garlic, peppercorns, and bayleaves. Continue to cook until the garlic turns light brown (2 to 3 minutes).
  4. Pour-in water and soy sauce. Bring to a boil.
  5. Cover and simmer until the liquid reduces to half (around 40 to 50 minutes). You can add more water if needed.
  6. Pour-in the vinegar. Let the liquid boil. Stir and continue to cook (uncovered) for 10 minutes.
  7. Add salt if needed. The soy sauce alone gives this dish enough saltiness. You can add salt according to your preference.
  8. Serve with steamed white rice.
  9. Share and enjoy!

Number of servings (yield): 4

Panlasang Pinoy Cookbook

Download the Free Panlasang Pinoy eCookbook


The post Adobo Pork Chops appeared first on Panlasang Pinoy.

Crab and Pork Shumai Recipe

$
0
0

This Crab and Pork Shumai Recipe produce one of the best shumai or siomai that I have tried. Crab and pork seems to be a good combination when done the appropriate way. Before we move further, please let me clarify that shumai, siomai, and shaomai is one and the same. The difference in names (or spelling of names) has something to do with geographical location. For example, shumai is called siomai in the Philippines, and siomay in Indonesia. Of course each location has a different way to prepare this dish, but the results are all delicious.

How do you make siomai, anyway? Contrary to what most people think, the process of making shumai is quick and simple. You should be good to go as long as you have all the ingredients with you, as well as the major cooking equipment – which is a steamer. There is no preference with regards to the steamer. I have used a rice cooker/steamer to make siomai; I was also able to use a multi-purpose steamer several times; using a bamboo steamer also works great.

This Crab and Pork Shumai Recipe is really a keeper. I hope that you can try to make this one of these days. Cheers to good life!


Crab and Pork Shumai Recipe

Crab and Pork Shumai Recipe

Ingredients

  • 2 lbs ground pork
  • 12 ounces crab meat
  • 3 tbsp sesame oil
  • 1 large egg
  • 1 medium sweet onion, minced
  • 1 cup minced carrots
  • 1 pack won ton wrapper
  • 1/2 teaspoon ground black pepper
  • 2 tsp salt
  • Cooking oil spray
  • 5 cups water (for steaming)

Cooking Procedure

  1. In a large mixing bowl, combine the pork and crab meat. Mix well using a spatula or long wooden spoon.
  2. Add the sesame oil, egg, salt, pepper, onions, and carrots. Continue to mix until all the ingredients are properly incorporated. You can even mix using your hand if you feel comfortable doing this.
  3. Scoop around 1 to 1 1/2 teaspoon of mixture and place at the middle of a wonton wrapper.
  4. Fold the wonton wrapper to cover all the sides. Make sure that you leave the top open. Do this step until you are down with the last shumai. If you need more guidance on this step, this pork siomai recipe cooking video might be helpful.
  5. Spray cooking oil on the base of a bamboo or metal steamer to avoid the shumai from sticking. I use Pam cooking oil spray all the time, but feel free to use whatever brand suits you. If you do not have a cooking oil spray around, you can spread about a tablespoon of cooking oil using a paper towel.
  6. Arrange the shumai on steamer. Make sure that you leave a little space in between each piece to prevent the shumai from sticking to each other.
  7. Pour the water into the steamer and let boil.
  8. Steam the crab and pork shumai for 20 to 25 minutes.
  9. Remove from the steamer and serve with ponzu or soy sauce and a lemon dip.
  10. Share and enjoy!

Number of servings (yield): 6

Panlasang Pinoy Cookbook

Download the Free Panlasang Pinoy eCookbook


The post Crab and Pork Shumai Recipe appeared first on Panlasang Pinoy.

Pancit Bato Noodle Soup

$
0
0

Pancit Bato is a type of Filipino Noodle that originated in the town of Bato, in Camarines Sur (Bicol region, Philippines). Pancit Bato Noodle Soup is a good way to cook using this noodle. Think of this dish as a healthier and more delicious version of your favorite instant noodle soup; it is simple yet satisfying and budget friendly too.

This Pancit Bato Noodle Soup recipe calls for chicken broth or chicken stock. Please do not worry if you don’t have this ingredient on hand. You can always use an alternative ingredient for chicken broth. For example, 1 1/4 tablespoon of chicken base (powder) can be combined with 2 cups of water. You may also use chicken bouillon (I prefer Knorr). Add 1 chicken bouillon to 2 cups of warm water and stir. You now have a couple of alternatives. I know that Pancit Bato is the star of this recipe, but sometimes it is not always available. If this is the case, you can use pancit canton as a substitute. I’m sure it will work because I already tried it myself. I also find it better if you add Sriracha sauce to your soup, but do this if you can tolerate spicy food. Otherwise, stick to the recipe below. Happy cooking!

Try this delicious Pancit Bato Noodle Soup Recipe today. Enjoy!

Pancit Bato Noodle Soup

Pancit Bato Noodle Soup Recipe

Ingredients

  • 1/2 lb. Pancit Bato
  • 1/4 small cabbage, chopped
  • 1/2 cup julienned carrots
  • 3/4 cup snap peas
  • 2 cups chicken broth (or stock)
  • 2 cups water
  • 4 ounces thinly sliced pork
  • 2 tablespoons cooking oil
  • Salt and pepper to taste

Cooking Procedure

  1. Heat oil in a soup pot.
  2. Once the oil becomes hot, saute the pork until the color turns light to medium brown (around 3 to 4 minutes).
  3. Pour-in the chicken broth or chicken stock and water. Let boil.
  4. Cover the soup pot and simmer for 20 minutes or until the pork becomes tender.
  5. Add-in the snap peas and carrots. Cook for 2 minutes.
  6. Put-in the cabbage and noodles. Stir and cook for 3 minutes.
  7. Sprinkle salt and pepper to taste. At this point, you can add more chicken broth (or water) if necessary.
  8. Transfer to a serving bowl. Serve.
  9. Share and enjoy!

Number of servings (yield): 3

Panlasang Pinoy Cookbook

Download the Free Panlasang Pinoy eCookbook


The post Pancit Bato Noodle Soup appeared first on Panlasang Pinoy.

Recipe for Barbecue Chicken Marinade

$
0
0

There is no doubt that chicken barbecue is really delicious. The secret to a yummy chicken barbecue is not only in the sauce, but also in the marinade. I have a good recipe for barbecue chicken marinade that I have been using for a while. This recipe for barbecue chicken marinade has always produced great tasting barbecue chicken!

Some of you might be making your barbecue chicken or chicken barbecue right on the spot using only barbecue sauce for basting. While this method is acceptable to some, I personally make sure that I soak the chicken in any marinade for at least 3 hours (but I use this Recipe for Barbecue Chicken Marinade 60% of the time). This will make the chicken more flavorful because the marinade (which is the source of flavor) is absorbed by the meat. This will mean that your chicken will be taste both inside and out, whereas using barbecue sauce to baste without marinating will only provide flavor on the outside. Smoking chicken is an entirely different thing though. The rub for the chicken is enough because there is ample time in the smoking process for the chicken to absorb all the flavor from the rub.

The next time you think of making Chicken Barbecue, try this recipe for Barbecue Chicken Marinade.

Recipe for Barbecue Chicken Marinade

Recipe for Barbecue Chicken Marinade

Ingredients

  • 12 oz. Lemon lime soda (Sprite or 7-Up)
  • 1/2 cup dark soy sauce
  • 1 large lemon
  • 2 teaspoons salt
  • 1 tablespoon garlic powder
  • 1/2 teaspoon ground black pepper

Cooking Procedure

  1. In a large bowl, Combine soy sauce, juice of 1 lemon, salt, ground black pepper, and garlic
  2. powder. Stir and mix well.
  3. Pour-in the lemon lime soda. Stir.
  4. You can use this to marinate chicken barbecue right on the spot, or you can place this inside the fridge for a day. Make sure to stir again before using.

Number of servings (yield): 4

Panlasang Pinoy Cookbook

Download the Free Panlasang Pinoy eCookbook


The post Recipe for Barbecue Chicken Marinade appeared first on Panlasang Pinoy.

Easy Chicken Barbecue Recipe

$
0
0

After long months of winter, spring is finally here. This means that I can start to heat-up the grill and make my favorite barbecue dishes. Chicken barbecue is in the top 5 of my list and the version that I grew-up making when I was in the Philippines was the first version of chicken barbecue that I prepared for this year.

As we all know, there are hundreds of chicken barbecue recipes around. There are quick and simple chicken barbecue recipes that involve only chicken and barbecue sauce, while there are others that require marinades. This Chicken barbecue recipe that I will feature today makes use of a not so common marinade mixture. The recipe for barbecue chicken marinade that I used may not be popular, but it works great; that is the reason why I still use this recipe until today when I make chicken barbecue.

After making several chicken barbecue throughout the years, my major challenge is how to prepare the perfect chicken barbecue without burning the skin of the chicken. The answer to my problem was simply “patience”. Instead of grilling the chicken directly over heat (may it be in a charcoal or gas grill) in a short period of time, I arranged the chicken in the middle part of the grill and I only applied heat on the sides. This time, I took due diligence to measure the temperature and added more grilling time. The result was a great tasting and good looking chicken barbecue that I am really proud of.

This Easy Chicken Barbecue works great in any occasion. Always keep that grill going!

Chicken Barbecue

Chicken Barbecue

Ingredients

  • 1 1/2 to 2 lbs chicken, cut into serving pieces
  • 1 recipe of chicken barbecue marinade
  • 1/4 cup barbecue sauce
  • 1 tablespoon soy sauce
  • 1 teaspoon lemon juice
  • 1/4 cup lemon lime soda

Cooking Procedure

  1. Make the basting sauce by combining barbecue sauce, soy sauce, lemon juice, and lemon lime soda in a bowl. Mix well. Set aside.
  2. Arrange the chicken in a large bowl. Pour-in the chicken barbecue marinade. Make sure that all the chicken slices are coated with the marinade. Cover the bowl with a cling wrap. Refrigerate overnight.
  3. Heat-up your grill (around 320F). If you are using a charcoal grill, limit the charcoal in the two sides leaving an opening on the middle. If you are using a gas grill, only activate all the burner except the one in the middle (I am referring to the grill burners, not the one on the side, if your grill has one).
  4. Skewer at least 2 chicken slices in bamboo or metal skewers. Arrange the chicken in the middle of the grill wherein there is no direct heat in the bottom. The heat should be coming from the sides. This will take sometime to cook the chicken, but it prevents the skin from burning.
  5. Cover the grill (if applicable), and barbecue the chicken for 12 to 15 minutes.
  6. Turn the chicken over to barbecue the other side. Baste the top of the chicken with the basting sauce. Barbecue for another 12 to 15 minutes.
  7. Flip the chicken once more and baste the top part. Continue to barbecue for 12 to 15 minutes.
  8. Turn the chicken over for the last time and brush some basting sauce on the top part. Continue to barbecue for 12 to 15 minutes.
  9. Using a meat thermometer, measure the internal temperature of the chicken. A safe temperature for poultry is 165F. If the temperature of your chicken barbecue is 160F and above, this means you are done; otherwise, continue to barbecue the chicken until the desired internal temperature is achieved.
  10. Transfer to a serving plate.
  11. Serve. share and enjoy!

Number of servings (yield): 4

Panlasang Pinoy Cookbook

Download the Free Panlasang Pinoy eCookbook


The post Easy Chicken Barbecue Recipe appeared first on Panlasang Pinoy.

Rosemary Baked Chicken Recipe with Vegetables

$
0
0

Baked Chicken is probably the easiest and one of the healthiest ways to prepare chicken; all we need to do is rub the chicken with seasoning and place it in the oven to cook. The next best thing to baked chicken is Rosemary Baked Chicken; it is like placing your simple baked chicken one level higher in terms of flavor. This Rosemary Baked Chicken Recipe will guide you on how to quickly make your tasty baked chicken dinner.

While making baked chicken sounds easy, we need to remember that the chicken should be fully cooked before we serve it. I indicated the baking temperature and time in the recipe below. However, the thickness of the chicken breasts and the oven (brand and age) that we are using will not always be the same. Due to this reason, I strongly recommend the use of a meat thermometer every time you bake or roast meat such as this rosemary baked chicken. The safe temperature for chicken is 165F, but you can stop at 160F and let the residual heat cook the meat until 165F. This will ensure that the inside of the chicken breasts are cooked while leaving some moisture, which is an important thing to remember when making baked chicken.

Try this Simple Rosemary Baked Chicken Recipe with Vegetables. Enjoy!

Rosemary Baked Chicken Recipe with Vegetables

Rosemary Baked Chicken with Vegetables

Ingredients

  • 4 boneless skinless chicken breasts (around 3 to 4 ounces per piece)
  • 2 teaspoons garlic powder
  • 3/4 to 1 teaspoon salt
  • 1 tablespoon dried rosemary
  • 1/4 teaspoon ground black pepper
  • 1 tablespoon lemon juice
  • 1 tablespoon olive oil
  • 1 pack frozen mixed vegetables, thawed

Cooking Procedure

  1. Combine rosemary, garlic powder, salt, pepper, and lemon juice, and olive oil in a bowl. Mix well.
  2. Meanwhile, cook the vegetables according to your preference. You can steam the vegetables or stir-fry them using a little cooking oil. Sprinkle some salt and pepper and arrange in a plate. Set aside.
  3. Rub the mixture over the chicken breasts. Arange the chicken breasts in a resealable bag and pour-in the remaining mixture. Marinate for 15 to 30 minutes.
  4. Preheat the oven to 375 degrees Fahrenheit.
  5. Arrange the marinated chicken breasts in a baking pan.
  6. Bake one side for 15 minutes. Turn the chicken breasts over and bake the other side for another 15 minutes or until internal temperature reads 160 degrees fahreneheit (you will need to use a meat thermometer to get the internal temperature of meats).
  7. Transfer the Baked Chicken on the plate where the vegetables are placed.
  8. Serve your baked chicken with vegetables. Share and enjoy!

Number of servings (yield): 4

Useful links:

Baked Pesto Chicken Parmesan – Iowa Girl Eats
Oven Baked Buttermilk Chicken Strips – Wishful Chef

Panlasang Pinoy Cookbook

Download the Free Panlasang Pinoy eCookbook


The post Rosemary Baked Chicken Recipe with Vegetables appeared first on Panlasang Pinoy.

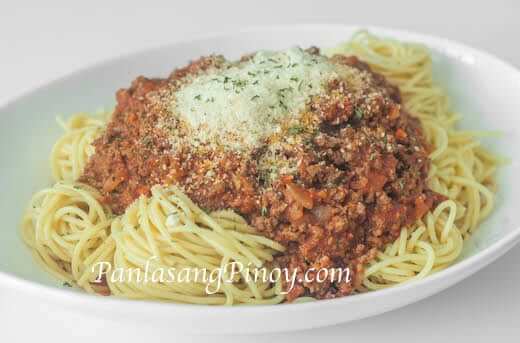
How to Make Spaghetti with Meat Sauce

$
0
0

Making your own Spaghetti with Meat Sauce might not sound that easy. Before you get intimidated with the idea, let me tell you that you can make your own spaghetti even if you have little or no cooking experience. Please open your mind and believe that you can do it — allow me to teach you how to make spaghetti with meat sauce. Use this recipe and the instructional video below as a guide.

How to Make Spaghetti: Making spaghetti starts with cooking the noodles. I always suggest that you follow the instructions in cooking the spaghetti noodles from the package because not all noodles are created the same. What we want to achieve (regardless of the brand of noodles) is the perfect al dente spaghetti. Make sure that the noodles are not undercooked because it will not be pleasant to eat. You will know that spaghetti is undercooked if the inner part is still somewhat hard after you bite. A quick solution here is to continue to cook the spaghetti for a few more minutes. On the other hand, if the spaghetti gets overcooked, try to wash the noodles with cold water right away. This will stop the cooking process and it can also prevent the spaghetti from being soggy. It is also a good idea to add a couple teaspoons of salt in the boiling water before putting-in the spaghetti. The salt will be absorbed by the noodles giving it additional flavor.

How to Make Spaghetti Meat Sauce: The meaty spaghetti sauce will give life to your spaghetti dish. I always opt for the leanest possible ground beef (90% lean) and I use tomato puree every time I make traditional spaghetti. The lean meat means that the beef is low in fat, which in turn can lead to lower cholesterol. The tomato puree has a thicker consistency compared to tomato sauce and has bolder flavor. Always start to make the meat sauce by browning the beef and add the rest of the ingredients afterwards. Make sure that you give enough time for the sauce to simmer so that the flavor from the meat and tomato will be fully extracted.

I hope that you can find this How to Make Spaghetti with Meat Sauce post and the accompanying video useful. Have a great day!

How to Make Spaghetti with Thick Meat Sauce

How to Make Spaghetti with Meat Sauce

Ingredients:

  • 1 1/2 lbs. ground beef (90% lean)
  • 1 lb. spaghetti noodles
  • 3 cups tomato puree
  • 4 tablespoons tomato paste
  • 2 tablespoons olive oil
  • 2 teaspoons minced garlic
  • 1 medium yellow onion, minced
  • 1/2 cup minced carrots
  • 1/2 teaspoon dried basil
  • 1/2 teaspoon dried thyme
  • 1/2 teaspoon dried oregano
  • 1 teaspoon salt
  • 1/4 teaspoon ground black pepper

Watch the Cooking Video

http://www.youtube.com/watch?v=Bw1hAGPrVSQ

Cooking Procedure

  1. Cook the spaghetti noodles according to package instructions until al dente. Drain the water and arrange in a serving plate. Set aside.
  2. Start to make the meat by browning the beef. Do this by placing the meat in a deep pan. Turn-on the heat to medium. Cook the beef until brown while stirring once in a while.
  3. Add-in the olive oil, garlic, onion, and carrots. Stir and cook until the onion turns soft.
  4. Pour-in the tomato puree. Stir and let boil. Cover and simmer for 15 to 20 minutes. Add water if the sauce starts to reduce.
  5. Remove the cover and put the heat back to medium. Add the oregano, thyme, basil, salt, and ground back pepper. Stir and cook for 3 minutes.
  6. Put-in the tomato pasta. Stir and cook for 2 minutes.
  7. Top the spaghetti meat sauce over the cooked spaghetti noodles. Sprinkle Parmesan cheese on top.
  8. Serve. Share and enjoy!

Number of servings (yield): 4
Useful links:

Italian Sausage Spaghetti – Simply Recipes
Carrot Spaghetti - Oatmeal with a Fork

Panlasang Pinoy Cookbook

Download the Free Panlasang Pinoy eCookbook


The post How to Make Spaghetti with Meat Sauce appeared first on Panlasang Pinoy.


Chicken Egg Fried Rice Recipe

$
0
0

Here is another chicken egg fried rice recipe that you can easily make when you are craving for one. It is delicious and can be completed in less than 20 minutes. I used to crave for chicken egg fried rice and I am sharing this recipe so you too will know what to do when that moment happens. Don’t worry if you are an amateur cook or have no prior cooking experience. All you have to do is follow this step by step recipe and you should be alright.

One thing that you have to prepare beforehand is the rice. Since all fried rice makes use of cooked rice regardless if its brown or white, you should be able to have this before starting. Leftover rice is always the best candidate for this chicken egg fried rice recipe, so don’t throw away your leftovers. Instead, convert it into something delicious.

The result of this chicken fried rice recipe can be enjoyed as is, or you can also eat this with other delicious dishes such as beef with broccoli and orange chicken.

Try this Chicken Egg Fried Rice Recipe. Happy Cooking!

Chicken Egg Fried Rice Recipe

Chicken Egg Fried Rice Recipe

Ingredients

  • 4 ounces skinless and boneless chicken breasts, thinly sliced
  • 2 eggs
  • 3 cups cooked white rice (left overs will do)
  • 2 tablespoons butter
  • 1 tablespoon olive oil
  • 1 teaspoon garlic powder
  • 1/2 teaspoon salt
  • 1/2 cup frozen green peas

Cooking Procedure

  1. Heat the olive oil in a wide pan.
  2. Once the oil turns hot, stir fry the chicken slices for 2 to 3 minutes until the chicken turns light brown.
  3. Melt-in the butter.
  4. Once the butter starts to get hot, crack the eggs-in. Let the eggs cook while quickly stirring to mix the yolk with the eggwhites.Using your frying spatula, try to chop the eggs into several small pieces within the pan.
  5. Put-in the rice. Toss and continue cook for 3 minutes.
  6. Add-in the garlic powder, salt, and green peas. Toss while cooking for 3 to 5 minutes more.
  7. Transfer to a serving plate.
  8. Serve.Share and enjoy!

Number of servings (yield): 3

Panlasang Pinoy Cookbook

Download the Free Panlasang Pinoy eCookbook


The post Chicken Egg Fried Rice Recipe appeared first on Panlasang Pinoy.

Homemade Chicken Noodle Soup Recipe

$
0
0

I love the idea of being able to make my own chicken noodle soup at home. Aside from having the chance to enhance my cooking skills, I also get the opportunity to make chicken noodle soup the way I like it, and within my budget. This homemade chicken noodle soup recipe is exactly how I want it done.

Most of us turn to chicken soups whenever we feel cold or if we are not feeling well. There is something to chicken soup or homemade chicken noodle soup that makes us feel better and comfortable – not to mention, that it never fails to keep me warm on a cold day. I think that this homemade chicken noodle soup recipe and chicken noodle soups, in general, has that power of recharging the body with energy and makes us feel better.

As I was looking around for answers on what is in chicken noodle soup that makes a person feel better and recover quickly from colds, sore throat, fatigue, and headache, I was not able to find a solid answer. There is no study, so far, mentioning a single component of chicken noodle soup or chicken soup that makes the magic happens. I think that I am okay with this for the mean time – what is important is that this chicken noodle soup recipe that I have here can possibly work wonders for me and you.

Try this Homemade Chicken Noodle Soup Recipe. Cheers!

Homemade Chicken Noodle Soup Recipe

Homemade Chicken Noodle Soup

Ingredients

  • 2 1/2 lbs. chicken (whole)
  • 4 to 5 ounces uncooked egg noodles
  • 12 to 15 cups low sodium chicken broth
  • 1 large sweet onion, diced
  • 2 cups carrots, diced
  • 1 cup celery stalk, diced
  • 3 tablespoons salted butter
  • 1 teaspoon minced garlic
  • 1/4 cup chopped fresh flat leaf parsley
  • 1 teaspoon chopped fresh thyme
  • Salt and ground black pepper to taste

Cooking Procedure

  1. Bring the chicken broth to a boil in a large cooking pot.
  2. Add-in 1 cup carrots, 3/4 cups celery, half of the diced onions, 1 teaspoon thyme, 1/4 cup chopped parsley. Let the broth reboil and continue to boil (covered) for 10 minutes.
  3. Put-in the whole chicken. Let the broth reboil once more. Adjust the heat to a simmer and continue to cook the chicken for 60 to 90 minutes. This will make the chicken tender while extracting its flavor.
  4. Remove the chicken from the cooking pot. Let it cool down and then discard the skin and bones. Chop the chicken meat into small pieces.Make sure that the stock in the cooking pot is continously simmering.
  5. Meanwhile melt the butter in a large saute pan.
  6. Saute the remaining onion, carrots, and celery. Add the garlic and continue to saute until the onion becomes soft.
  7. Add-in the chopped chicken. Saute for 5 minutes.
  8. Gently slide-in the contents of the saute pan (chicken and the vegetables) to the cooking pot where the stock is in. Increase the heat to medium and wait until the liquid boils.
  9. Add the egg noodles. Cook for 8 to 10 minutes. You can add water if needed.
  10. Add salt and pepper to taste.
  11. Transfer to a serving bowl.
  12. Serve. Share and enjoy!

Number of servings (yield): 4

Panlasang Pinoy Cookbook

Download the Free Panlasang Pinoy eCookbook


The post Homemade Chicken Noodle Soup Recipe appeared first on Panlasang Pinoy.

Taco Fried Rice Recipe

$
0
0

Filipino food is awesome, but sometimes there is a craving for other dishes. If you crave for Mexican and Chinese at given time, the best way is to satisfy your desire by preparing a dish that represents both – like Taco fried rice. You are in luck because I have a quick and easy Taco fried rice recipe just for you.

This Taco fried rice recipe is an easy hack using the quickest methods possible. Unlike the Carne Asada taco (which I really like a lot), this recipe makes use of ground beef and instant taco seasoning (store bought). These ingredients are easy to find and quick to prepare. As for the rice, I recommend leftover white rice. You can always cook white rice for this purpose, but make sure to start this recipe when the rice cools down. Rice in room temperature (or from the fridge) is less sticky compares to warm rice.

You won’t have any hard time cooking Taco fried rice. This is easier to cook compared to yang chow fried rice. Sinangag  (garlic fried rice) is still the easiest and quickest fried rice to make, as far as I am concerned.

After cooking this delicious taco fried rice, what I did was to top it with chopped parsley (cilantro will do too), diced carrots, and a couple tablespoons of sour cream. It was really good!

Try this Taco fried rice recipe. Happy cooking!

Taco Fried Rice

Taco Fried Rice Recipe

Ingredients

  • 3 to 4 cups cooked white rice (preferably leftover rice)
  • 2 tablespoons cooking oil
  • 1/2 teaspoon salt
  • 1/2 lb. ground beef (80% lean)
  • 1/2 pouch (1/2 oz.) taco seasoning mix
  • 1/4 cup chopped flat leaf parsley
  • 1/4 cup water

Cooking Procedure

  1. Sprinkle the salt over the cooked white rice. Using a large spoon, gently toss the rice to distribute the salt equally and to avoid the rice from forming.Set aside.
  2. Meanhwile, heat the cooking oil in a pan.
  3. Once the oil becomes hot, put-in the ground beef and cook until it turns light to medium brown (3 to 5 minutes).
  4. Pour-in the water and then mix-in the taco seasoning. Stir and continue to cook for 5 minutes or until the liquid evaporates.
  5. Add-in the rice. Toss once in a while using a flat spatula. Make sure that you DO NOT press the rice with the spatula as the rice can stick with each other — we want out rice to be as loose as possible.Continue to cook for 5 to 8 minutes in medium heat.
  6. Transfer to a serving plate. Top with chopped parsley.
  7. Serve. Share and enjoy!

Number of servings (yield): 4

Panlasang Pinoy Cookbook

Download the Free Panlasang Pinoy eCookbook


The post Taco Fried Rice Recipe appeared first on Panlasang Pinoy.

Easy Turkey Embutido Recipe

$
0
0

Turkey Embutido is a good alternative to traditional embutido recipes because of its low fat and low cholesterol content. There is no doubt that traditional embutido tastes really great. However, some of us who are trying to eat low fat and low cholesterol foods might have hesitations.

While trying to come-up with alternatives to our favorite Filipino recipes, I thought of making myself some turkey embutido so that I can enjoy my favorite Filipino food while I am trying to limit my fat and cholesterol content. The outcome was really amazing! If you will notice, I added a couple tablespoons of olive oil in the recipe because turkey lacks fat – I needed to add olive oil to improve the texture of our turkey embutido.

There are several ways to enjoy turkey embutido, I opted to eat it as it is after steaming. I also find it good to eat with soda crackers. I love to hear from you. What is the best way to eat embutido, in your opinion?

Turkey Embutido

Easy Turkey Embutido

Ingredients

  • 3 lbs. ground turkey
  • 2 eggs
  • 3/4 cup sweet pickle relish
  • 1 (8 oz.) can tomato sauce
  • 1 cup sharp cheddar cheese, grated
  • 1 1/2 cup raisins
  • 2 large carrots finely minced
  • 1 large onion finely minced minced
  • 1 teaspoon garlic powder
  • 2 tablespoons olive oil
  • 3 teaspoons salt
  • 1/2 teaspoon ground black pepper
  • 2 cups regular or Italian bread crumbs
  • 8 to 10 cups water.

Cooking Procedure

  1. In a large mixing bowl, combine the ground turkey, onion, carrots, raisins, sweet pickle relish, olive oil, tomato sauce, and eggs. Mix well using a spatula or a stand mixer.
  2. Add the cheese, garlic powder, salt, pepper, and bread crumbs. continue to mix until all the ingredients are evenly dispersed.
  3. Cut the aluminum foil into 12″ x 12″ individual pieces. This recipe can use between 5 to 7 pieces of aluminum foil.
  4. Scoop around 1 1/2 to 2 cups of mixture into one end of the aluminum foil and mold the mixture to shape like a long cylinder. Secure the mixture by folding-in the opposite the sides of the aluminum foil and roll foil to the opposite side. Do this step until you finish wrapping all the mixture.
  5. Meanwhile, boil the water in a steamer.Once the water starts to boil, arrange the wrapped turkey embutido in the steamer. cover and steam for 40 to 50 minutes.
  6. Remove the steamed embutido from the steamer and let the it cool down. Once the embutido reaches room temperature, you can do either the following: refrigerate for at least 3 hours and serve cold; or slice and pan fry for a few minutes.
  7. Serve. Share and enjoy!

Number of servings (yield): 10

Panlasang Pinoy Cookbook

Download the Free Panlasang Pinoy eCookbook


The post Easy Turkey Embutido Recipe appeared first on Panlasang Pinoy.

Pork Burger Patties

$
0
0

I love to have Pork Burger Patties in between two buns or with rice, just like my favorite burger steak — with creamy mushroom gravy, of course. The good news is making your own pork burger patties has never been this easy. Baking the pork burger patty requires less oil and extracts the fat from the ground meat; this makes your pork burger less fatty — this is a good thing.

This pork burger patties recipe will show you how to make pork burger patties the easiest way possible using basic ingredients that are easily accessible in your local grocery. I’m confident that you will enjoy making these pork burgers as much as you enjoy eating them. Since most kids love burger and anything with ground meat, this recipe is kid friendly and you can even make these for your child’s school lunch.

Pork Burger Patties before baking


Are sometime in a hurry and have less than 1 hour to prepare your family’s meal? It only takes less than 50 minutes to prepare and cook this dish, so time will be on your side in this case —  and if you want to upgrade this to another level — our burger steak recipe is always here to help you.


Pork Burger Patties mixture

Try this Pork Burger Patties Recipe. Enjoy!

Baked Pork Burger Patties_

Pork Burger Patties Recipe

Ingredients

  • 2 1/4 lbs. Ground pork
  • 1 large carrot, minced
  • 1 medium onion, minced
  • 1 teaspoon paprika (optional)
  • 1/2 teaspoon ground black pepper
  • 1 teaspoon garlic powder
  • 1/2 cup bread crumbs
  • 1 teaspoon salt

Cooking Procedure

  1. Preheat the oven to 375 Fahrenheit.
  2. In a large bowl, combine the ground pork, carrot, onion, paprika, garlic powder, egg, salt, pepper, and bread crumbs. Mix until the ingredient are distributed properly.
  3. Arrange an aluminum foil sheet on top of a baking tray. Lightly grease the top of the sheet with cooking oil to prevent the patties from sticking.
  4. Scoop ½ cup of ground meat mixture and mold each into a ball shaped figure. Gently press on the ball shaped meat mixture to form a flat ground pork burger patty. Arrange the pork patties over the greased aluminum foil sheet.
  5. Place the baking tray with pork burger patties inside the oven and bake for 25 to 35 minutes or until the pork internal temperature reads 160 degrees Fahrenheit.
  6. Remove the baked pork burger patties from the tray and arrange in a serving plate. Serve with your favorite dipping sauce.
  7. Share and enjoy!

Number of servings (yield): 6

Panlasang Pinoy Cookbook

Download the Free Panlasang Pinoy eCookbook


The post Pork Burger Patties appeared first on Panlasang Pinoy.

Viewing all 460 articles
Browse latest View live