Quantcast
Channel: Recipes – Panlasang Pinoy
Viewing all 460 articles
Browse latest View live

Sweet Chicken Asado Recipe

$
0
0

Just like my favorite chicken adobo, I always enjoy eating Sweet Chicken Asado for either lunch or dinner — I don’t even mind having the leftovers the next day for breakfast. This Sweet Chicken Asado was inspired by the pork asado recipe that I published back then when I was starting this food blog.

I am trying my best to limit my rice intake for some reason. However, there are times that I cannot control myself especially when dishes such as this is served in front of me; it’s just too good to ignore – I don’t want to regret it later on. I always know that the best way to eat dishes such as this sweet chicken asado is with warm white rice – so let there be rice and lots of it.

Sweet Chicken Asado Recipe

Eggs also go well with sweet chicken asado – I mean, you can have it with fried egg and rice for breakfast, or salted egg and rice for lunch. Sweet Chicken Asado, a piece of boiled egg, and a cup of rice sounds right for dinner. Yum!

Try this Sweet Chicken Asado Recipe. Cheers!

Sweet Chicken Asado

Sweet Chicken Asado Recipe

Ingredients

  • 2 lbs. chicken thighs (bone-in)
  • 3 tablespoons soy sauce
  • 2 tablespoons sugar
  • 4 cloves crushed garlic
  • 1/2 teaspoon 5 spice powder
  • 4 pieces star anise
  • 3 tablespoons cooking oil
  • 2 cups chicken broth
  • 1/2 teaspoon salt
  • 1/4 teaspoon ground black pepper
  • 3 tablespoons cooking oil

Watch the Cooking video:

http://www.youtube.com/watch?v=LXfAMonuIYY

Cooking Procedure

  1. Rub salt all over the chicken. Let it stay for 10 minutes.
  2. Heat the cooking oil in a wide cooking pot.
  3. Pan-fry both sides of the chicken in medium heat for 5 minutes per side.
  4. Scoop out the excess oil. Add the garlic and cook until light brown.
  5. Pour-in the soy sauce and chicken broth. Stir and let boil.
  6. Put-in the 5 spice powder and star anise. Cover and simmer for 30 to 35 minutes. Note: Add water if needed.
  7. Add-in the sugar and ground black pepper. Stir.
  8. Transfer to a serving bowl. Serve.
  9. Share and enjoy!

Number of servings (yield): 5
Panlasang Pinoy Cookbook

Download the Free Panlasang Pinoy eCookbook


The post Sweet Chicken Asado Recipe appeared first on Panlasang Pinoy.


Baked Chicken Parmesan Recipe

$
0
0

This Baked Chicken Parmesan Recipe is a winner. It is simple to make and all you have to do is bake it in the oven – although you will still need to cook the spaghetti noodles. If you are feeling lazy (and I am always feeling this way, so you are not alone), skip the spaghetti and eat it with bread or whatever side dish is available in your pantry.

So, how do you bake chicken Parmesan? Here is how I do it – you’ll see all the details in the recipe below. I usually prepare 3 bowls: the first bowl will have the all-purpose flour, the second will hold the beaten eggs, and the third will have the breadcrumb mixture. I also have a baking tray or pan ready and this has been already greased with cooking oil spray. Simply dredge the chicken breast in flour and then dip in the beaten egg mixture. One the chicken is coated with egg; roll it over the breadcrumb mixture until the entire chicken breast is fully coated. Arrange the crusted chicken pieces on the baking pan and bake.

The details above are almost complete, for the final steps of your baked chicken Parmesan, you will need to pour marinara sauce over the chicken and top it with Parmesan and Mozzarella cheeses.

Try this Baked Parmesan Chicken Recipe. Cheers!

Baked Chicken Parmesan

Baked Chicken Parmesan Recipe

Ingredients

  • 4 pieces (5 to 7 oz.) boneless chicken breasts
  • 1/2 teaspoon garlic powder
  • 1/2 teaspoon Italian seasoning
  • 1/2 teaspoon sea salt
  • 1/2 teaspoon ground black pepper
  • 3/4 cup plain bread crumbs
  • 1/2 cup all-purpose flour
  • Cooking oil spray
  • 2 eggs, beaten
  • 1/4 cup shredded Parmesan cheese
  • 1 cup mozzarella cheese
  • 2 cups marinara sauce
  • 1 lb. spaghetti noodles

Cooking Procedure

  1. Cook the Spaghetti noodles according to package instructions. Set aside.
  2. Preheat oven to 360 Fahrenheit.
  3. In a bowl, combine bread crumbs, garlic powder, Italian seasoning, sea salt, and ground black pepper. Mix well and set aside.
  4. Dredge the chicken breast in flour then dip in beaten eggs and roll in the bread crumb mixture.
  5. Spray cooking oil on a wide baking dish. Arrange the bread crumb coated chicken pieces on the baking dish and then spray some cooking oil on top of the chicken pieces.
  6. Bake for 18 to 20 minutes.
  7. Remove the baking dish from the oven. Top the chicken pieces with marinara sauce, Parmesan cheese, and mozzarella cheese. Put the baking dish back in the oven and continue to bake for 7 minutes or until the cheese melts.
  8. Arrange the spaghetti noodles in serving plates. Top with the baked chicken Parmesan and more marina sauce as needed.
  9. Serve. Share and enjoy!

Number of servings (yield): 4

Panlasang Pinoy Cookbook

Download the Free Panlasang Pinoy eCookbook


The post Baked Chicken Parmesan Recipe appeared first on Panlasang Pinoy.

Chicken and Rice Casserole Recipe

$
0
0

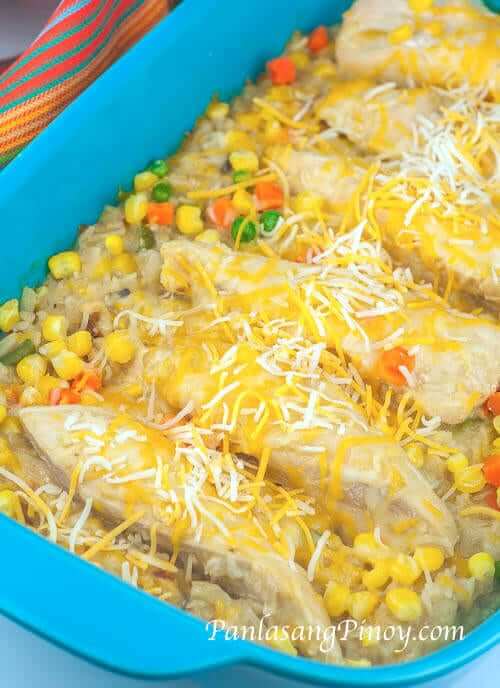
Chicken and Rice Casserole is an easy to prepare casserole recipe that is full of flavor. I like how the flavor of cream of chicken and mushroom blends with the rest of the ingredients – there is always a celebration going-on in my mouth every time I chew.

By the definition that I provided above, it is obvious that I am a fan of Chicken and Rice Casserole. I mean, the flavor is out of this world and the preparation was so quick. If I have all the ingredients in front of me, I can prepare Chicken and Rice Casserole to be ready for baking in 2 minutes. Once the Chicken and Rice Casserole is ready for baking, I placed it inside the oven and did other things while waiting for it to cook. I had time to catch up with other important things that needs attention while the oven bakes our dinner. Awesome!

If you are thinking of a delicious chicken dish that is packed with flavor and that the kids will approve, maybe you ought to check out this Chicken and Rice Casserole Recipe. The result is great and the ingredients are not expensive.

Try this Chicken and Rice Casserole Recipe. Enjoy!

Chicken and Rice Casserole

Chicken and Rice Casserole

Ingredients

  • 1 to 1 1/2 lbs. boneless chicken breasts, sliced lenghtwise into 4 to 6 pieces
  • 1 (10 oz. can) Cream of Chicken and Mushroom
  • 1 cup mixed vegetables
  • 1 cup uncooked Jasmine or long grain rice
  • 2 cups water
  • 1/4 envelope French onion dip mix
  • 1/2 teaspoon sea salt
  • 1 cup shredded sharp cheddar cheese

Cooking Procedure

  1. Preheat the oven to 375F.
  2. Lightly salt the chicken breast. Set aside for 10 minutes.
  3. In a large bowl, combine Cream of Chicken and Mushroom, water, and French onion dip mix. Stir to mix.
  4. Add-in rice and mixed vegetables. Gently stir to distribute all the ingredients.
  5. Pour the rice mixture on a baking dish. Top with the chicken pieces.Place inside the oven and bake for 30 minutes.
  6. Remove the baking dish from the oven and gently stir the rice mixture so that it will be cooked equally.Place it back in the oven and continue to bake for 20 to 30 minutes or until the rice is about done. Remove from the oven and top with shredded cheese.
  7. Put it back in the oven for 5 minutes or until the cheese melts.
  8. Take the baking dish from the oven and serve.
  9. Share and enjoy!

Number of servings (yield): 4

Panlasang Pinoy Cookbook

Download the Free Panlasang Pinoy eCookbook


The post Chicken and Rice Casserole Recipe appeared first on Panlasang Pinoy.

Chicken and Miswa Soup Recipe

$
0
0

Are you looking for a delicious Filipino Soup that you can quickly prepare? This Chicken and Miswa Soup Recipe is a good idea. I like Chicken and Miswa Soup because this is something that even a beginner can prepare and it is also budget friendly.

I prepared this Chicken and Miswa soup by first boiling the chicken. I used boneless and skinless chicken breasts for this recipe, but you can use chicken with bone-in. All I did was to boil the chicken until it fully cooked, let it cool, and manually shred the meat. If you use bone-in chicken, the same steps still apply – just be sure not to add the bones in the soup. The water that we used for boiling will be our chicken stock.

Chicken and Miswa Soup

I competed the soup by sautéing the veggies together with the shredded chicken. The remaining stock and a few cups of chicken broth were added. Once the liquid boils, the rest of the ingredients are mixed-in the pot. It is very simple and straightforward.

Try this Chicken and Miswa Soup Recipe. Enjoy!

Chicken and Miswa Soup Recipe

Chicken and Miswa Soup Recipe

Ingredients

  • 1/2 lb. boneless chicken breast
  • 3 to 4 cups chicken broth
  • 3 cups water
  • 4 ounces Miswa (Chinese Vermicelli)
  • 1/2 cup chopped green onions
  • 1 small yellow onion, minced
  • 4 cloves garlic, crushed and minced
  • 2 tablespoons cooking oil
  • 1 teaspoon annatto powder (atsuete powder)
  • Salt and pepper to taste

Cooking Procedure

  1. Bring water to a boil in a cooking pot.
  2. Once the water starts boiling, add the chicken breast and boil for 15 to 18 minutes (add more water if needed).
  3. Remove the chicken and let cool. Shred the chicken meat manually. Set aside.
  4. Heat the cooking oil in a clean cooking pot.
  5. Sauté the onion and garlic
  6. Once the onion becomes soft, add the shredded chicken meat. Continue to cook for2 minutes.
  7. Add in the annatto powder and then pour-in the remaining water from the pot where the chicjen was boiled. Pour-in the chicken broth.
  8. Stir and let boil.
  9. Cover and simmer for 15 minutes. You can add more water or chicken broth if the liquid reduces.
  10. Put-in the miswa noodles. Stir and cook for 2 minutes.
  11. Add the chopped green onions, salt, and ground black pepper.
  12. Transfer to a serving bowl. You can top this with toasted garlic.
  13. Serve. Share and enjoy!

Number of servings (yield): 3

Panlasang Pinoy Cookbook

Download the Free Panlasang Pinoy eCookbook


The post Chicken and Miswa Soup Recipe appeared first on Panlasang Pinoy.
Gluten Free Banana Bread with Almonds Recipe

$
0
0

This Gluten Free Banana Bread with Almonds is for those of you who are searching for gluten free bread recipes. I realized that gluten free foods and recipes should be regularly added to this food blog for the sake of our friends and readers who are sensitive with gluten.

Gluten free ingredients should not be an issue in relation to the quality of this banana bread recipe. The outcome is still delicious, tasty, and moist banana bread – the only difference is that this banana bread is gluten free.

Gluten free banana bread or banana bread in general is one of the easiest breads to make. It does not need to be kneaded nor do we need to a lot extra time to wait for the mixture to rise – we just need to mash the banana, mix all the ingredients and make sure that everything is well blended, and then bake; it is convenient and not time consuming.

I like my banana bread chilled, so I let the bread cool down to room temperature after baking and place it in the fridge for 3 hours or so before I eat it. All of us have different preferences, I suggest that consume your gluten free banana bread in any state or way that pleases you.

Gluten Free Banana Bread with Almonds Recipe. Enjoy!

Gluten Free Banana Bread

Gluten Free Banana Bread

Ingredients

  • 4 medium ripe bananas, mashed
  • 1 1/2 cups gluten-free all-purpose flour
  • 1 teaspoon baking soda
  • 1/4 teaspoon salt
  • 3 eggs, beaten
  • 1 cup granulated white sugar
  • 1 teaspoon vanilla extract
  • 1/2 cup gluten free sliced almonds
  • 3/4 cup canola oil

Cooking Procedure

  1. Preheat oven to 350 Fahrenheit.
  2. In a mixing bowl, combine gluten-free flour, sugar, baking soda, and salt. Mix well.
  3. Stir-in the mashed bananas, eggs, vanilla extract, canola oil, and almonds. Whisk until all the ingredients are well distributed.
  4. Pour the mixture in a loaf pan.
  5. Bake for 50 minutes.
  6. Remove from the oven. Let cool.
  7. Slice into individual servings.
  8. Serve. Share and enjoy!

Number of servings (yield): 4

Panlasang Pinoy Cookbook

Download the Free Panlasang Pinoy eCookbook


The post Gluten Free Banana Bread with Almonds Recipe appeared first on Panlasang Pinoy.

Bacon and Cheese Breakfast Casserole Recipe

$
0
0

Bacon and Egg Breakfast Casserole is one of my favorite breakfast casserole recipes. I love bacon and I am a believer of the saying “you can never go wrong with bacon” — I think that it is true. Bacon makes dishes tastes better and this Bacon and Egg Breakfast Casserole is the proof.

Preparing your own Bacon and Egg Breakfast Casserole is really simple. All you need to do is to first prepare the bacon by cooking it until crisp. I know that most of you are familiar with cooking bacon, but for those who are not here are some ideas on how to cook bacon.

How to Cook Bacon on a stove top using a pan

Cooking bacon over a stove top using a pan is the most common method of cooking bacon. You will need a wide frying pan for this method. I do this by arranging the bacon strips on the pan then I turn the heat on. You’ll notice that the oil will form while the bacon starts to cook. Grab a spoon and scoop the excess fat out of the pan while the bacon cooks; this helps the bacon melt more fat and get crisp quicker. Once one side seems to be crisp, use a tong to turn the bacon over so that the other side gets crispy — as you can imagine, this will require you to be in front of the stove-top all the time. Also, there is a possibility that oil from the bacon may splatter.

How to Cook Bacon in the Oven

This method of cooking bacon will require a wide baking tray and aluminum foil. This is done by lining a sheet of aluminum foil on the baking tray. Arrange the bacon strips flat over the foil. Preheat the oven to 400F and bake the bacon for 16 to 18 minutes or until crisp. You’ll see that the fats turns to oil; the good thing about it is that you can easily discard the oil and your bacon will lesser in fat while being crispy.

How to Cook Bacon in the microwave

I once tried to use the microwave to cook bacon. It is true that cooking bacon in the microwave can produce crispy bacon similar to the ones cooked in a pan or baked, but you have to use a tool called the microwave bacon cooker. All you need to do is arrange the bacon on the microwave bacon cooker and follow the instructions on how to cook bacon in the microwave in terms of time and power settings.

Regardless of how you decide to cook bacon, what we need to accomplish for this bacon and egg breakfast casserole is nice crispy bacon. Once you have the bacon ready, you can either crumble or chop the bacon. This will be added to the mixture composed of egg, cheese, milk, and green onions which will be baked in the oven to produce our delicious bacon and egg breakfast casserole.

Try this Bacon and Egg Breakfast Casserole Recipe. Enjoy!

Bacon and Cheese Breakfast Casserole

Bacon and Cheese Breakfast Casserole

Ingredients

  • 6 bacon strips
  • 6 eggs, beaten
  • 1 1/4 cup fresh milk
  • 3/4 cup chopped green onions
  • 1 cup shredded Monterey jack cheese
  • 1/2 teaspoon salt
  • 1/2 teaspoon ground black pepper

Cooking Procedure

  1. Arrange the bacon in a pan. Cook until crisp. Set Aside.
  2. In a mixing bowl, combine eggs, milk, salt, pepper, and cheese. Mix well.
  3. Crumble the bacon strips and add to the egg mixture along with the green onions. Stir.
  4. Preheat oven to 350 Fahrenheit.
  5. Pour the mixture into a baking dish. Cover the dish with a greased aluminum foil (greased side down).
  6. Bake for 40 minutes or until the eggs are done.
  7. Remove from the oven. Serve.
  8. Share and enjoy!

Number of servings (yield): 4

Panlasang Pinoy Cookbook

Download the Free Panlasang Pinoy eCookbook


The post Bacon and Cheese Breakfast Casserole Recipe appeared first on Panlasang Pinoy.

Beef Kebab Recipe

$
0
0

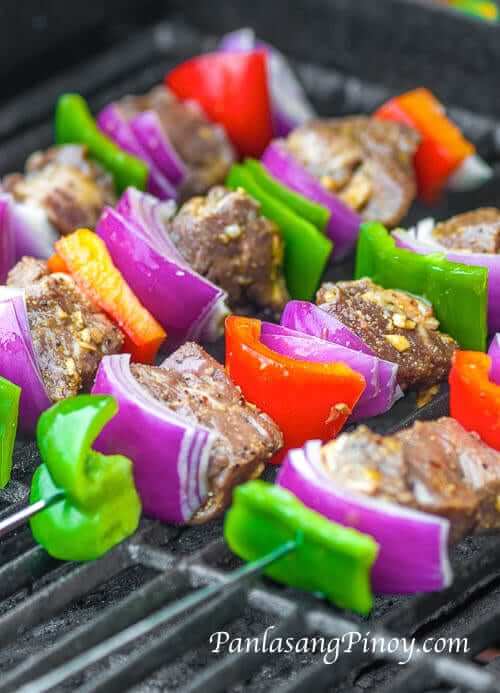
It is always nice to stare at Beef Kebabs because of all the different colors that it posses. Aside from the delightful look, beef kebabs also tastes good especially if the meat is juicy and tender. This beef kebab recipe will give you a nice looking juicy and tender beef kebab that tastes delicious.

The secret for a tender beef kebab is the cut of beef that you will use. For example, this beef kebab recipe recommends the use of beef tenderloin, which is the most tender cut of beef. This is the same cut that I used for this beef kebab recipe. One good thing about using beef tenderloin for kebabs or any other recipe is that you do not need to cook the beef for a long time; a few minutes of searing is just enough. Searing beef tenderloin or any other beef cut seals all the juice inside making it juicy and pleasant to eat. Imagine having a nice juicy and tender beef tenderloin in a form of a kebab, that is what you will have when you try this beef kebab recipe.

Beef Tenderloin

I tried to make this beef kebab recipe to be more of the Asian side by using common Asian ingredients for the marinade; ginger, soy sauce, and sesame oil are some examples. What I did was combine all the marinade ingredients in a large mixing bowl and marinated the tenderloin slices for a few hours until the meat absorbs the flavor. Once the meat is ready, you can proceed to skewer the beef tenderloin with the rest of the vegetables using a metal or bamboo skewer.

Beef Tenderloin Marinade

Grilling beef kebab is really quick and easy. All I did was to heat-up the grill and started to grill the beef kebabs for 3 minutes per side. This gave me medium beef tenderloin with a juicy inside. I must say that I really loved the outcome of this beef kebab recipe.

Try this Beef Kebab Recipe. Let me know what you think.
Grilled Beef Kabob

Beef Kebob

Beef Kebab Recipe

Ingredients

  • 1 lb. beef tenderloin, cubed
  • 1/4 cup light soy sauce
  • 1 tablespoon minced ginger
  • 1 teaspoon minced garlic
  • 1 teaspoon sesame oil
  • 1 tablespoon olive oil
  • 1 teaspoon granulated white sugar
  • 2 teaspoons rice wine vinegar
  • 1 medium red bell pepper, sliced
  • 1 medium green bell pepper, sliced
  • 1 medium red onion, sliced
  • A few dashes of salt and ground black pepper

Cooking Procedure

  1. Make the beef tenderloin marinade by combining soy sauce, vinegar, ginger, garlic, sesame oil, olive oil, sugar, salt, and ground black pepper in a large bowl. Mix well.
  2. Add the cubed beef tenderloin on the bowl with the beef tenderloin marinade. Gently toss to coat the beef. Let it stay for 1 hour.
  3. Using a metal or bamboo skewer, assemble the beef kebob by skewering the vegetables and marinated beef tenderloin.
  4. Heat-up the grill and start grilling the beef kebobs for 3 minutes per side. This will give you a medium beef that is juicy and tender in the inside. Add more time if you want your beef well done, but it will be less tender.
  5. Transfer to a serving plate. Serve with Saffron rice.
  6. Share and enjoy!

Number of servings (yield): 4

Panlasang Pinoy Cookbook

Download the Free Panlasang Pinoy eCookbook


The post Beef Kebab Recipe appeared first on Panlasang Pinoy.

Sinangag Recipe

$
0
0

Sinangag or Garlic Fried Rice has been a favorite part of every Filipino breakfast. Sinangag can go well with many dishes regardless if these are fried dishes or stews. I personally like to have sinangag with fried salted dried fish such as tuyo, daing, and danggit. Of course, sinangag is also best with tapa, tocino, longganisa, and corned beef.

Although it seems simple to cook sinangag, the success of this fried rice relies on the type and condition of rice that you will use. Based on my experience, it is best to use the non sticky rice varieties. Jasmine rice or long grain rice works good for me, and it is even better if these are left over rice from the previous day. You see, leftover rice will be less sticky and it is not that soft compared to newly cooked rice.

Another thing that you should be cognizant of is the ratio of oil vs. rice. Make sure not to put too much oil as it will make the entire dish oily and unpleasant. It is now time for you to make sinangag. Let me know if you have questions by posting a comment below.

Try this Sinangag Recipe. Enjoy!

Sinangag

Sinangag Recipe

Ingredients

  • 3 cups cooked white rice (leftover Jasmine rice is preferred)
  • 5 cloves crushed garlic
  • 2 1/2 tablespoons cooking oil
  • 1/2 teaspoon sea salt

Cooking Procedure

  1. Heat the cooking oil in a wide pan.
  2. While the cooking oil is being heated, add the crushed garlic. Note: make sure that the oil is not hot when you add the garlic. Let the garlic slowly cook while the oil gets heated until it becomes golden brown and crisp.
  3. Add-in the rice; gently stir to distribute the ingredients. Continue to cook for 3 minutes.
  4. Sprinkle the salt over the rice and continue to mix all the ingredients gently. Cook for another 3 to 5 minutes.
  5. Transfer to a serving plate. Serve with your favorite entrée.
  6. Share and enjoy!

Number of servings (yield): 3

Panlasang Pinoy Cookbook

Download the Free Panlasang Pinoy eCookbook


The post Sinangag Recipe appeared first on Panlasang Pinoy.


Melon Juice

$
0
0

Melon Juice or Cantaloupe Juice is a simple and refreshing drink that you can prepare not only during summer time, but the whole year round as long as you have access to cantaloupe. It is very easy to make and the ingredients are inexpensive.

There are many ways to make melon or cantaloupe juice. This version suggest that the cantaloupe be scraped using a scraping tool. I got the scraping tool from the Philippines. It is usually sold in the wet market and grocery stores. I also use that same tool to make buko salad.

You can also modify the recipe below by adding fresh milk to make your melon juice richer. 1 cup of milk will do. In case you want to add more milk, try to add a little sugar too to balance the sweetness.

Try to make this Melon Juice using the recipe below. Cheers!

Melon Juice

Melon Juice (Cantaloupe)

Ingredients:

  • 1 small cantaloupe
  • 3/4 to 1 cup granulated white sugar
  • 10 to 12 cups water
  • 1/2 teaspoon vanilla extract
  • Ice cubes

Cooking Procedure

  1. Slice the cantaloupe into half. Remove all the seeds.
  2. Using a melon baller or special cantaloupe scraper (I got mine from the Philippines), scrape the cantaloupe and place in a large bowl. Set aside.
  3. In a large pitcher, combine water, sugar, and vanilla extract. Stir until the sugar is diluted. Add the shredded cantaloupe. Stir again.
  4. Put lots of ice. Serve.
  5. Share and enjoy!

Number of servings (yield): 6

Panlasang Pinoy Cookbook

Download the Free Panlasang Pinoy eCookbook


The post Melon Juice appeared first on Panlasang Pinoy.

Saffron Rice Recipe

$
0
0

Saffron Rice or yellow rice is a delicious rice dish that is flavorful and smells real nice. Saffron rice makes use of saffron threads, which is considered as one of the most expensive spices in the world. No wonder this saffron rice is amazing.

Cooking saffron rice is just like cooking your regular white rice on a stove top, except that there are more ingredients involved. The process is simple; all you have to do is place all the ingredients in a pot, let boil and simmer until the rice completely absorbs the liquid. You will need to stir the mixture at the middle of the cooking process to make sure that the ingredients are well distributed. I do this because ingredients such as butter floats and rice on the top part will only be the ones to absorb it – stirring keeps all the ingredients equally spread.

Saffron rice can also be cooked in the rice cooker. All you have to do is perform steps 1 and 2 below and let the rice cooker do the rest.

Try this Saffron Rice Recipe. Enjoy!

Saffron Rice

Saffron Rice Recipe

Ingredients

  • 2 cups uncooked long grain white rice
  • 1/2 teaspoon saffron
  • 3 1/2 cup water
  • 3 tablespoons melted butter
  • 1/2 cup minced red bell pepper
  • 1/2 cup minced green bell pepper
  • 1/4 teaspoon salt

Cooking Procedure

  1. Clean the rice by washing placing it in a bowl with water. Discard the water.
  2. Put the rice on a cooking pot. Pour-in 3 1/2 cups water and add the butter, saffron, bell peppers and salt. Stir.
  3. Heat the cooking pot (covered) in a stove top. Let boil.
  4. Once the liquid starts to boil, adjust the heat to a simmer. Continue to simmer for 15 to 20 minutes or until the rice completely absorb the liquid. Try to gently stir the rice in the middle of the process to ensure that the ingredients are distributed evenly.
  5. Transfer to a serving bowl with your favorite main dish such as beef kebobs.
  6. Serve. Share and enjoy!

Number of servings (yield): 4

Panlasang Pinoy Cookbook

Download the Free Panlasang Pinoy eCookbook


The post Saffron Rice Recipe appeared first on Panlasang Pinoy.

Slow Cooked Beef Brisket Recipe

$
0
0

Slow Cooked Beef Brisket sounds like a nice idea for dinner during a busy day. It is full of flavor and also very tender. You can have this with bread as beef brisket sandwich, with tortillas and make some beef brisket taco burrito, or simply with white steamed rice – which I prefer.

I love to make Slow Cooked Beef Brisket when I am busy but want something nice for dinner. All I do is have all the ingredients in the crock pot or slow cooker in the morning, and I let time do the magic. As I mentioned, white rice works best for me because the reduced sauce of this Slow Cooked Beef Brisket Recipe compliments well with it. If you decide to make a beef brisket sandwich, I suggest that you use warm soft French bread. Delish!

Try this Slow Cooked Beef Brisket Recipe. Cheers!

Slow Cooked Beef Brisket Recipe

Slow Cooked Beef Brisket Recipe

Ingredients

  • 2 lbs. beef brisket
  • 1 (10 oz. can) beef consomme
  • 2 tablespoons Worcestershire sauce
  • 1 medium onion, minced
  • 2 teaspoons garlic, minced (optional)
  • 1/2 teaspoon ground black pepper
  • 1/2 teaspoon salt

Cooking Procedure

  1. Combine the beef consomme, Worcestershire sauce, salt, and pepper in a bowl. Stir.
  2. Arrange the beef brisket in a crock pot (slow cooker). Add the minced onions and garlic on top.
  3. Pour-in the sauce mixture.
  4. Cover and slow cook the beef brisket for 5 to 6 hours.
  5. Gently remove the beef brisket from the crock pot.
  6. Pour the remaining liquid in a sauce pan and heat over the stove top. Let the sauce reduce to half.
  7. Pour the sauce over the beef brisket.
  8. Serve. Share and enjoy!

Number of servings (yield): 4

Panlasang Pinoy Cookbook

Download the Free Panlasang Pinoy eCookbook


The post Slow Cooked Beef Brisket Recipe appeared first on Panlasang Pinoy.
Breakfast Daing na Bisugo with Sinangag

$
0
0

Daing na Bisugo with Sinangag sounds like a perfect pair for a Filipino breakfast; it will be even better if we add some spicy vinegar dip. This is an amazing treat for breakfast and a cup of brewed coffee or hot chocolate will make your experience more enjoyable.

I know that most of you know how to cook daing. This post is not to teach you how to cook or prepare daing, but rather to introduce or remind everyone of this good breakfast combination that Filipino’s enjoy. As for the sinangag or Filipino garlic fried rice, a link in the recipe below will lead you to our delicious sinangag recipe.

There are many types of salted dried fish available in the Philippines and daing is one of them. To add to this, different types of fish can be salted and sun dried to become daing. What is your favorite fish for daing? I like bisugo maybe because this is the most common variety that I can get from the Filipino store. However, I remember enjoying daing na labahita (surgeon fish) when I was in the Philippines. How about you?

Try this Breakfast Daing na Bisugo with Sinangag. Enjoy!

Breakfast Daing Bisugo with Sinangag

Breakfast Daing Bisugo with Sinangag

Ingredients

  • 3 pieces salted dried bisugo (Threadfin bream)
  • 2 tablespoons cooking oil
  • 1 1/2 cup sinangag
  • 1/2 cup sinamak or pinakurat (spiced vinegar)

Cooking Procedure

  1. Heat the cooking oil in a frying pan.
  2. Once the oil is hot, fry all 3 pieces of daing (salted dried fish) at the same time for 1 minute per side. Make sure to quickly turn the fish over to avoid the first side from being burnt.
  3. Once both sides are fried, remove the fish from the pan. Place it in a plate lined with paper towel to absorbb the oil.
  4. Transfer the fried daing na bisugo in a plate with sinangag.
  5. Serve with spiced vinegar.
  6. Share and enjoy!

Number of servings (yield): 1

Panlasang Pinoy Cookbook

Download the Free Panlasang Pinoy eCookbook


The post Breakfast Daing na Bisugo with Sinangag appeared first on Panlasang Pinoy.

Sauteed Shrimp with String Beans

$
0
0

Sauteed Shrimp with String Beans or Ginisang Hipon at Sitaw is a quick and easy shrimp with vegetable recipe that you can prepare for lunch. This goes well with steamed white rice. I enjoy this dish with a little fish sauce or patis on the side and sometimes with bagoong alamang (shrimp paste) too.

I like to cook Sauteed Shrimp with String Beans when I am always in a hurry and if I have fresh string beans around. This recipe will guide you on how to cook shrimp and make this delicious dish in less than 20 minutes. I make sure that I have shrimp sitting in the freezer so that I can easily defrost it when needed.

Just like any other Filipino Recipes or Filipino Food that requires sauteing, we will need garlic and onion. In addition, we will need a piece of ripe plum tomato for this Sauteed Shrimp with String Beans recipe. All you need to do is sauté the onion, garlic, and tomato then add the shrimp and vegetables along with the seasonings – yummy.

Try this Sauteed Shrimp with String Beans Recipe.

Sauteed Shrimp with String Beans

Sauteed Shrimp with String Beans

Ingredients

  • 1 lb. shrimp, deveined
  • 1 bunch string beans (about 4 cups), sliced in length of 2 inches
  • 1 medium yellow onion, sliced
  • 1 medium ripe tomato, chopped
  • 4 cloves garlic, crushed and chopped
  •  2 tablespoons soy sauce
  • 3 tablespoons canola oil
  • Salt and pepper to taste

Cooking Procedure

  1. Heat the oil in a pan.
  2. Saute the onion, tomato, and garlic.
  3. Sprinkle a dash of ground black pepper.
  4. Once the onion turns soft, put-in the shrimp and stir fry for 2 to 3 minutes.
  5. Add the string beans and soy sauce. Continue to stir fry for 5 minutes.
  6. Add salt and pepper to taste.
  7. Serve. Share and enjoy!

Number of servings (yield): 4

Panlasang Pinoy Cookbook

Download the Free Panlasang Pinoy eCookbook


The post Sauteed Shrimp with String Beans appeared first on Panlasang Pinoy.

Grilled Ahi Tuna Recipe

$
0
0

I like to have Grilled Ahi Tuna for lunch on a sunny day. Having it with mango salsa compliments well with the dish and provides it with a refreshing taste. This Grilled Ahi Tuna Recipe will guide you on how to make a flavorful grilled tuna dish that you will surely enjoy.

If you will ask me, I don’t mind eating my tuna raw – as long as it is fresh. I am a huge fan of tuna sashimi and it only takes soy sauce and Wasabi to seal the deal. However, grilled tuna is also great as long as it is not overcooked. The perfect grilled tuna, as far as I am concerned, is seared and completely cooked in the outside while still fresh and raw in the center. That is just my opinion, and I know that all of us have different preferences. This is only for tuna steaks though, for tuna belly and tuna panga (tuna jaw), everything should be fully cooked including the inside.

The secret to a tasty grilled tuna is in the marinade. This grilled tuna recipe suggests a simple marinade that will make your fish steak taste better.

Try this grilled Ahi Tuna Recipe. Cheers!

Grilled Ahi Tuna

Grilled Ahi Tuna Recipe

Ingredients

  • 1 lb. ahi Tuna
  • 1/2 cup light soy sauce
  • 1 teaspoon granulated white sugar
  • 1/4 teaspoon ground black pepper
  • 1/2 teaspoon garlic powder

Cooking Procedure

  1. Combine the soy sauce, sugar, garlic powder, and ground black pepper in a bowl. Stir to mix.
  2. Place the ahi tuna in a resealable bag. Pour the soy sauce mixture into the bag. Release the air and seal.Refrigerate and Let the tuna marinate for at least 3 hours.
  3. Remove the tuna from the fridge. Spray high heat cooking oil grill spray on the grill and start to grill the ahi tuna for 4 to 5 minutes per side. Use a spatula to turn the tuna over so that the meat will not get damaged.
  4. Arrange in a serving plate. Serve with mango salsa.
  5. Share and enjoy!

Number of servings (yield): 2

Panlasang Pinoy Cookbook

Download the Free Panlasang Pinoy eCookbook


The post Grilled Ahi Tuna Recipe appeared first on Panlasang Pinoy.

Ham and Cheese Quiche Recipe

$
0
0

To me, Ham and Cheese Quiche make a great brunch. This is something that I like to have when I have something going on for lunch while I am pre-occupied with other chores early in the morning. Besides tasting good, ham and cheese quiche is also filing and gives me the energy that I needed for the first half of my day.

Making ham and cheese quiche is not hard. As long as you have a pastry dough ready, all you need is mix all the ingredients and bake. I usually make my own pastry dough from scratch and place it in the freezer for later consumption. The link on the recipe on how to make pastry dough is provided below. If you do not have time to make pastry dough for yourself, then you can always buy it from the grocery.

Any kind of ham can be used for this Ham and Cheese Quiche Recipe. You can use black forest ham, leftover Christmas ham, and even canned hams or luncheon meat.

Try this Ham and Cheese Quiche Recipe.

Ham and Cheese Quiche

Ham and Cheese Quiche Recipe

Ingredients

  • 1 Pastry dough
  • 1/2 lb. ham, cubed
  • 1 cup fresh milk
  • 5 eggs, beaten
  • 1 cup shredded sharp cheddar cheese
  • 1/2 teaspoon salt
  • 1/4 teaspoon ground black pepper

Cooking Procedure

  1. Preheat the oven to 350F.
  2. Arrange the pastry dough on a round baking dish.Blind bake for 12 to 15 minutes.
  3. Meanwhile, combine the beaten egg, salt, pepper, milk, and cheese. Mix well.
  4. Add the cubed ham to the egg mixture and stir.
  5. Remove the baking dish from the oven. Pour the entire mixture in the baking dish.
  6. Place it back in the oven. Bake for 35 to 40 minutes at 350F.
  7. Remove from the oven.
  8. Serve. Share and enjoy!

Number of servings (yield): 6

Panlasang Pinoy Cookbook

Download the Free Panlasang Pinoy eCookbook


The post Ham and Cheese Quiche Recipe appeared first on Panlasang Pinoy.


Easy Chicken Caesar Salad Recipe

$
0
0

Salads make a good entree, but sometimes it is enough to be called a complete meal especially for busy people or for those who wanted something light to eat. This Easy Chicken Caesar Salad is a simple Caesar salad recipe that incorporates grilled chicken to give you extra protein in your meal. Since most of you are busy, this Easy Chicken Caesar Salad recipe suggest ingredients that can be bought directly from the grocery store such as croutons and Caesar salad dressing, so that you will not waste your time making them from scratch. If you will have sometime though in the future, I will be giving you crouton recipes and Caesar salad recipes that you can prepare from scratch. This is something that you can do with your family so that you can have some quality time in the kitchen.

I think that I said enough about this Chicken Caesar Salad. However, let me tell you a little bit more, and this will be quick. The chicken should not be over cooked so that it will remain juicy in the inside. The 5 to7 minutes grilling time below is just an approximate time that I use when grilling chicken breasts that are around 3/4 inch thick. Keep an eye on the chicken while it is on the grill and make sure to adjust the grilling time depending on the situation. Also the peperoncini is a nice to have for this recipe. I got this idea from Olive garden (my family is a huge fan) and I think that it really works great.

Try this Easy Chicken Caesar Salad Recipe. Cheers!

Chicken Caesar Salad

Easy Chicken Caesar Salad Recipe

Ingredients

  • 12 ounces, boneless and skinless chicken breast
  • 3 romaine lettuce hearts, chopped
  • 1 pack croutons (any flavor)
  • 3/4 cup grated or shredded Parmesan cheese
  • 6 pieces peperoncini
  • 1/2 cup lite Caesar salad dressing
  • Salt and pepper

Cooking Procedure

  1. Flatten the chicken breast by pounding using a meat tendering tool. Season the chicken with salt and pepper. Grill for 5 to 7 minutes per side depending on the thickness. Remove from the grill and let the chicken rest for 10 minutes. Chop. Set aside.
  2. Prepare the salad by combining the lettuce hearts, croutons, peperoncini, Parmesan Cheese, Caesar salad dressing, and grilled chicken. Toss.
  3. Transfer to a salad bowl. Serve.
  4. Share and enjoy!

Number of servings (yield): 4

Panlasang Pinoy Cookbook

Download the Free Panlasang Pinoy eCookbook


The post Easy Chicken Caesar Salad Recipe appeared first on Panlasang Pinoy.

Inihaw na Tilapia Recipe

$
0
0

Inihaw na Tilapia or Grilled Tilapia is one of my favorite summer time dishes. There are many ways to prepare inihaw na Tilapia, this recipe will guide you on how to make grilled or inihaw na Tilapia in the simplest way – rubbed with salt and pepper and cooked directly over the grill.

Fish such as Tilapia can be cooked directly over the grill if it has scales on. Yes, it might sound to be a little uncomfortable, but that is how it’s usually done. The reason behind it has something to do with the fish sticking on the grill. You see, the scales prevent it from happening. Don’t worry because this recipe makes use of Tilapia with scales removed. We will use a cooking spray specifically made for grilling (I use Pam cooking spray for grilling) to grease the grill. This will prevent our Tilapia from sticking. It will also be great to use a spatula (or any flat tool) to turn the fish over. Since grilled fish is always soft, using a wide and flat tool to turn the fish over (to grill the other side) will help the fish remain intact.

Inihaw na Tilapia is best eaten with a dip composed of soy sauce and calamansi — squeezed lime or lemon wedges over the fish will also do.
Try this simple Inihaw na Tilapia Recipe. Enjoy!

Inihaw na Tilapia

Inihaw na Tilapia Recipe

Ingredients

  • 2 medium tilapia fish, cleaned (scales, innards, and gills removed)
  • 1 to 1 1/2 teaspoons sea salt
  • A dash of ground black pepper
  • Cooking oil spray (for grilling)

Cooking Procedure

  1. Pat the tilapia dry using a paper towel.
  2. Arrange the tilapia in a plate and rub salt and pepper all over the fish including its cavity.
  3. Spray cooking oil spray on the grill.
  4. Start to heat the grill.
  5. Grill each side of the tilapia for 10 minutes. Note: use a spatula to turn the fish over so that the sides will be intact and clean.
  6. Transfer to a serving plate. Serve with lime or lemon wedges.
  7. Share and enjoy!

Number of servings (yield): 4

Panlasang Pinoy Cookbook

Download the Free Panlasang Pinoy eCookbook


The post Inihaw na Tilapia Recipe appeared first on Panlasang Pinoy.

Flank Steak Marinade

$
0
0

Do you love grilled Flank Steak? Silly me for asking that question – - almost all meat lovers would like to a have sliced of tender juicy flank steak. For one, flank steak is one of the tastiest cuts of steak around, and it is tender as long as you do not overcook it. A great grilled flank steak won’t be that good without a nice tasting marinade – you know, something that will provide the steak more flavor with a little bit of kick into it. This Flank Steak Marinade Recipe is what I am talking about.

Preparing flank steak marinade is very simple. All you need to do is to combine all the ingredients and stir. Make sure that all the ingredients are distributed evenly for best results. I use this flank steak marinade recipe for flank steaks and for pork chops, as well. I ensure that the meat absorbs the marinade, which means marinating the meat for more than 6 hours.

Try this Flank Steak Marinade Recipe. Enjoy!

Flank Steak Marinade

Flank Steak Marinade

Ingredients

  • 3 tablespoons red wine vinegar
  • 5 tablespoons dark soy sauce
  • 2 tablespoons Worcestershire sauce
  • Juice from 1 lemon
  • 1 1/2 tablespoon Dijon mustard
  • 1 /2 teaspoon paprika
  • 1/4 teaspoon cayenne pepper powder
  • 1/2 cup canola oil
  • 2 teaspoons minced garlic
  • 1/2 teaspoon ground black pepper

Cooking Procedure

  1. Prepare the Flank Steak Marinade by combining vinegar, soy sauce, Worcestershire sauce, and lemon juice in a bowl. Stir.
  2. Add Dijon mustard, paprika, cayenne pepper powder, canola oil, garlic, and ground black pepper. Mix well until all the ingredients are well blended.
  3. Pour the flank steak marinade mixture on flank steaks. This can also be used as a marinade for other steak cuts for grilling.
  4. Share and enjoy!

Number of servings (yield): 4

Panlasang Pinoy Cookbook

Download the Free Panlasang Pinoy eCookbook


The post Flank Steak Marinade appeared first on Panlasang Pinoy.

Sausage and Egg Casserole with Hash Browns Recipe

$
0
0

Sausage and Egg Casserole with Hash Browns is perfect as a heavy breakfast. It is delicious and will provide you with all the energy that you need to start-up your day. Another thing that I like about making breakfast casseroles is that I do not to be in front of the stove all the time to prepare the ingredients individually. I mean, making breakfast sausage and frying eggs or making an omelet, and making hash browns for breakfast might sound simple. However, doing all these things at the same time or consecutively requires your constant attention. The next time you realized that you are already tired and hope that everything will be cooked soon — not to mention the mess that you will need to clean-up. Doing breakfast casseroles such as Sausage and Egg Casserole with Hash Browns is less tedious because all the ingredients are combined in one dish and left inside the oven to bake. This also reduces the mess in the kitchen.

I like this Sausage and Egg Casserole with Hash Browns because it is really good. I love to have this with ketchup, and sometimes with Hollandaise. The good thing about this dish is that I can pair it with bread such as Croissant or an ordinary loaf, and I can even it this with Sinangag to give my breakfast a little Filipino twist.

Try this Sausage and Egg Casserole with Hash Browns Recipe. Enjoy!

Sausage and Egg Casserole with Hash Brown

Sausage and Egg Casserole

Ingredients

  • 5 eggs
  • 1 cup milk
  • 1/2 pound bulk pork sausage
  • 1 1/2 cups hash browns
  • 1 cup shredded Monterrey jack cheese
  • 1/4 teaspoon salt
  • 1/8 teaspoon ground black pepper

Cooking Procedure

  1. Cook the sausage in a pan until it turns light to medium brown. Drain the liquid and oil. Set aside.
  2. Beat the eggs in a mixing bowl.
  3. Stir-in the milk, cheese, salt, and pepper. Mix well.
  4. Add the cooked sausage and hash browns. Stir to distribute the ingredients evenly.
  5. Pour the mixture in a baking dish.
  6. Preheat the oven to 350F
  7. Bake for 40 to 45 minutes.
  8. Serve. Share and enjoy!

Number of servings (yield): 6

Panlasang Pinoy Cookbook

Download the Free Panlasang Pinoy eCookbook


The post Sausage and Egg Casserole with Hash Browns Recipe appeared first on Panlasang Pinoy.

Filipino Chicken Macaroni Salad Recipe

$
0
0

To me, Filipino Chicken Macaroni Salad makes a good appetizer and snack. I also love to have this as a main dish (for some reason) especially if I am having stews such as kaldereta or menudo. This dish is typically served during Filipino fiestas and also during family outings and picnic. I remember having this regularly during a quick picnic by the beach and it goes well with Pinoy pork barbecue (skewered pork).

It is easy to make your own Filipino Chicken Macaroni Salad; all you have to do is prepare some of the ingredients beforehand. The elbow macaroni needs to be cooked and drained while the chicken needs to be boiled and shredded. Once the macaroni and chicken are ready, all you have to do is combine all the ingredients and toss. It will also be nice if you serve your Filipino Chicken Macaroni Salad chilled. I do this by mixing all the ingredients in a stainless mixing bowl. I place that same mixing bowl with the Filipino Chicken Macaroni Salad in the fridge. The stainless steel bowl will help the salad get cold faster and this will be beneficial if you are pressed for time.

Aside from macaroni, you can use other types of short cut pasta. Here are some examples: Mostaccioli, Penne, Rigatoni, Cellentani, Rotini, Cavatappi, Fideuà, and Maccheroncelli.

Try this Filipino Chicken Macaroni Salad Recipe. Enjoy!

Filipino Macaroni Salad Recipe

Filipino Chicken Macaroni Salad Recipe

Ingredients

  • 1 lb. elbow macaroni
  • 1 lb. chicken
  • 3/4 cup light mayonnaise
  • 1 (20 oz.) can pineapple tidbits, drained
  • 3/4 cup minced carrots
  • 3/4 cup raisins
  • 1 cup shredded sharp cheddar cheese
  • 1/4 teaspoon garlic powder
  • 4 cups water
  • Salt and pepper to taste

Cooking Procedure

  1. Bring water to a boil. Once the water starts boiling, add 1 teaspoon salt and then put-in the chicken. Boil the chicken for 25 minutes. Drain the water and let the chicken cool.
  2. Discard the bone from the meat and then shred the chicken meat using your clean hands. Set aside.
  3. Cook the elbow macaroni according to package instructions. Drain and then set aside
  4. In a large mixing bowl, combine the mayonnaise, garlic powder, 3 tablespoons of pineapple juice from the canned tidbits, salt, and ground black pepper. Mix well and then taste. Adjust the taste as necessary.
  5. Add the shredded chicken, carrots, macaroni, raisins, and pineapple tidbits in the mixing bowl. Toss thoroughly until the ingredients are well distributed.
  6. Add the cheese. Gently toss.
  7. Cover the mixing bowl with a cling wrap. Refrigerate for at least 1 hour.
  8. Transfer to a serving plate.
  9. Serve. Share and enjoy!

Number of servings (yield): 8

Panlasang Pinoy Cookbook

Download the Free Panlasang Pinoy eCookbook


The post Filipino Chicken Macaroni Salad Recipe appeared first on Panlasang Pinoy.

Viewing all 460 articles
Browse latest View live