Quantcast
Channel: Recipes – Panlasang Pinoy
Viewing all 460 articles
Browse latest View live

Kielbasa Fried Rice

$
0
0

Kielbasa Fried Rice is a type of fried rice with Kielbasa sausage. It is a delicious dish that is very easy to prepare. Although I used Kielbasa, I tried to make this taste more Asian (fried rice is associated to Asian Cuisine anyway :) ) by adding soy sauce and green onions.

Kielbasa Fried Rice Recipe-2

It will be better if the sausage are thinly sliced so that it will cook quickly. Simply slice the sausage crosswise and you are done. I start by melting the butter in a pan. Make sure to adjust your heat to between low to medium so that the butter does not get burnt. Gently add the sliced sausage and cook each side until it turns brown. It is important that you flip the sausage so that the opposite side gets browned too. As for the eggs, I simply pushed the sausage to one side of the pan and crack the eggs on the open area. Make sure to stir the eggs like how you do with scrambled eggs so that the white and yolk gets blended while you are cooking it. Once the eggs are cooked, add the rice and seasonings. The recipe below will give you the detailed steps.

You can eat Kielbasa Fried Rice by itself or with other fried dishes. We had this for breakfast along with a sunny side up egg on top. It was perfect!

Try this Kielbasa Sausage Fried Rice Recipe. Let me know what you think.

Kielbasa Fried Rice
Author: 
Prep time: 
Cook time: 
Total time: 
Serves: 4
 
Ingredients
  • 4 cups cooked white rice (preferably leftovers)
  • 3 tablespoons butter
  • 1 teaspoon garlic powder
  • 2 eggs
  • 1 cup sliced Kielbasa sausage
  • ½ cup green peas
  • ¼ cup chopped green onions
  • 3 tablespoons soy sauce
Instructions
  1. Melt butter in a pan.
  2. Add the Kielbasa sausage. Cook in low to medium heat for 1 minute per side.
  3. Push the Kielbasa on the side. Crack the eggs and stir. Continue to cook until the eggs are formed.
  4. Put the rice in the pan. Gently fold until all the ingredients are well blended.
  5. Add the green peas, garlic powder and soy sauce. Stir fry until blended.
  6. Put the chopped green onions on top. Stir fry for 2 to 3 minutes.
  7. Serve. Share and enjoy!
Nutrition Information
Serving size: 4


Kielbasa Fried Rice

The post Kielbasa Fried Rice appeared first on Panlasang Pinoy.


Crown Roast of Lamb

$
0
0

Crown Roast of Lamb is something that my family must have at least every holidays. I made one for Christmas and it was so good and everyone liked it. My recipe for lamb roast might be simple, but it I can say that you will never regret making it.

Easy Crown Roast Of Lamb Sliced_

The most complex part in making your Crown roast of lamb (or any other crown roast for that matter) is assembling the crown. You will need at least 2 racks to make a crown with 7 ribs in each rack. A kitchen twine will also be useful during the process because you will use this to tie the racks together and form a crown. I detailed the steps on how to make a crown out of 2 racks in  the recipe below. If you think that this is complicated, you can always request your butcher to do it for you.

Delicious Crown Roast Of Lamb_

The lamb by itself tastes good. I just needed to add a little bit of herbs to make it complete. I used thyme and rosemary for this recipe and a little salt and pepper — that’s it. I do not want the seasonings to overpower the taste of the meat and I think that it was a good choice.

Easy Crown Roast Of Lamb_

Before you go ahead and make your Crown Roast of Lamb, please remember to wrap aluminum foil to the exposed area of the ribs (especially the tip). This will prevent the bone from getting burnt. Also, it will be great if you can let the meat stand longer after applying the rub so that the meat can absorb it. Once you are done roasting, letting the meat rest for at least 15 minutes is best because it will be more stable and it will be able to absorb back juices. This makes it tender and juicy.

Easy Crown Roast Of Lamb Rubbed_

Try this Crown Roast of Lamb. Let me know what you think.

Crown Roast of Lamb
 
Prep time
Cook time
Total time
 
Author:
Serves: 6
Ingredients
  • 2 racks lamb
  • 2 teaspoons minced garlic
  • 2 tablespoons minced fresh thyme
  • 1 tablespoon minced fresh rosemary
  • 1½ teaspoons coarse sea salt
  • ½ teaspoons ground black pepper
  • 2 tablespoons olive oil
Instructions
  1. Make a crown out of the racks of lamb by combining both racks sideways using a kitchen twine. Pinch a hole on one end of of both racks before the last rib.
  2. Bring both racks together side by side. The part with the hole should be right by each other. Insert a kitchen twine on one hole (first rack) then secure by tieing around the last rib near it. Insert the other end of the twine in the hole of the other rack (second rack) and then pull until the two racks are connected to each other. Secure the twine. Repeat these steps on the other sides of the racks to create a crown.
  3. Rub salt and pepper all over the meat. Let is stay for 30 minutes.
  4. Meanwhile, combine rosemary, thyme, and olive oil in a bowl. Stir and rub all over the crown of lamb. Let is stand for at least 15 minutes.
  5. Preheat the oven to 370F. While the oven is warming-up, wrap the exposed ribs with aluminum foil.
  6. Arrange the crown of lamb in a baking tray or circular cake pan. Roast for 35 to 40 minutes.
  7. Remove from the oven and let it cool down for 15 minutes. Slice into individual servings and serve. Share and enjoy!
Nutrition Information
Serving size: 6

Crown Roast Of Lamb Sliced

The post Crown Roast of Lamb appeared first on Panlasang Pinoy.

Roasted Pork Belly (Lechon Liempo)

$
0
0

Roasted Pork Belly or Lechon Liempo is one of the dishes that we enjoyed during 2016 New Year’s eve dinner. I have lots of different version that I wanted to share with you, and I thought of starting with this simple foolproof Roasted Pork recipe.

Lechon Belly (Roasted Pork)

This Lechon Pork belly is cooked using the oven; it is different from the traditional way of preparing lechon, which is to roast over a bed of hot charcoal and continuously rotate until the skin gets brown and crunchy. I tried to make it as simple as possible this time.

Filipino Lechon Belly (Roasted Pork)

How to Make Roasted Pork Belly (Lechon Liempo)

I started out by choosing the perfect pork belly slab from my local supermarket. You can request your butcher to remove the ribs from the pork belly, or you can also do it yourself. Next is to rub salt and pepper all over the meat part of the belly. I used coarse sea salt and freshly ground black pepper. The trick is to let the salt and pepper stay for 15 to 30 minutes so that the meat can absorb the flavor better.

The greenish and dark stuff that you see in the middle of the picture are lemongrass, scallions, and red onions respectively. Simply arrange these ingredients on the pork belly and then roll the entire slab until it forms a spiral shaped figure. Once you have done this, it is time to tie the meat so that it can hold its shape. I used kitchen twine to tie the meat. Just to make sure that it will hold it shape, I secured it six times that’s why it kinda looks like the Michelin Man.

Try this Roasted Pork Belly (Lechon Liempo) Recipe. Enjoy!

5.0 from 1 reviews
Roasted Pork Belly (Lechon Liempo)
 
Prep time
Cook time
Total time
 
Author:
Serves: 8
Ingredients
  • 1 slab (5 lbs.) pork belly bones removed
  • 3 stalks lemongrass leaves
  • 3 pieces scallions
  • 1 small red onion, sliced
  • 1 tablespoon salt
  • 2 tablespoons fresh milk
  • ¼ teaspoon ground black pepper
  • 1 tablespoon canola oil
Instructions
  1. Lay the pork belly on a flat surface in a way that the side with the skin is facing down. Rub the salt and pepper all over the top of the pork belly (meat part). Let it stand for 15 minutes.
  2. Arrange the lemongrass, scallions, and onion slices on one one of the belly. Roll the side where you had the lemongrass all the way to the opposite side until a spiral shape is formed. Secure the rolled pork belly by tying it with a kitchen twine. Rub the oil all over the skin.
  3. Preheat oven to 350F. Arrange the pork belly in a roasting pan and roast for 2 hours.
  4. Remove the belly from the oven and brush with fresh milk. Put it back into the oven and continue to roast for 30 minutes or until the skin is brown and crispy.
  5. Remove from the oven. Let it cool down for 15 minutes. Slice the Roasted Pork Belly and serve with homemade lechon sauce.
  6. Share and enjoy!
Nutrition Information
Serving size: 8

Roasted Pork Lechon Belly

The post Roasted Pork Belly (Lechon Liempo) appeared first on Panlasang Pinoy.

Seafood Paella Recipe

$
0
0

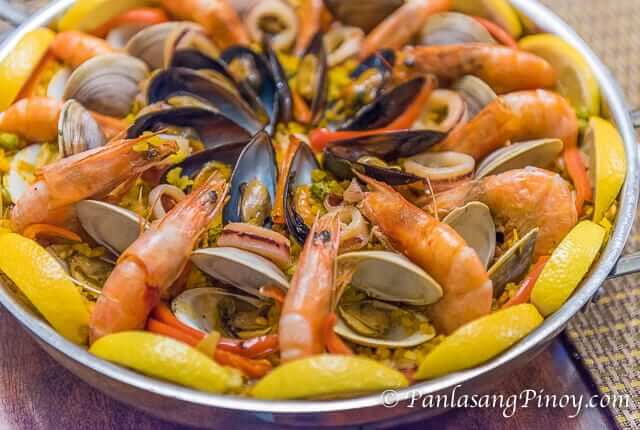
Our family make sure to cook paella during the holidays. This delicious seafood paella was prepared by my wife, Dey. I know that sometimes pictures might be intimidating, but we are confident that with a little practice and having all the ingredients available, you too can create this gastronomic masterpiece.

Seafood Paella Recipe

This seafood paella was served during New Year’s eve along with lechon belly, steamed lobster, morcon, seared bacon wrapped scallops, pancit, and “bibingkang malagkit”. My family likes to cook and eat special dishes during this time because we believe that doing so will bring us happiness, prosperity, and more love in the year to come — of course, enjoying these delicious dishes is the icing on the cake.

I must say that I really love seafood paella with Chardonnay. I think that these two make a perfect pair. Having the entire family around to share our blessings is priceless. I just hope that it will always be this way every year.

How to Cook Seafood Paella

Here is how this yummy seafood paella was made. The first thing that you need to do is prepare the paste. I am talking about the garlic, parsley, and paprika mixture. These are key ingredients because it helps a lot to make the dish taste and look better. Once you have this ready, it’s time to cook.

Seafood Paella Recipe-2

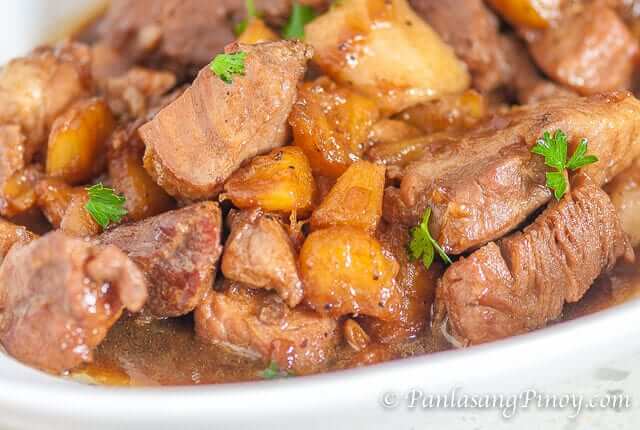
We will need to partially cook the shrimp and squid with oil in order for the oil to absorb the flavor from these ingredient. Simple heat the remaining olive oil in your paella pan and pan fry the shrimp and squid quickly. Remove the seafood once done and set these aside.

Next is to saute the onion and tomato until it gets soft. The green peas gets added after this step along with the garlic and parsley mixture that you prepared initially. I also add the clam juice and water right away and let the entire mixture boil. The clam juice can be purchased in the supermarket. It is usually in the seafood aisle along area where the canned fish are located. These are usually packaged in bottles.

When the mixture starts to boil, this is your indicator to add the saffron and rice. Saffron is a very important ingredient for paella. It will be worth every penny that you spent. I suggest using the best quality saffron that you can get. You will save money if you buy in bulk. Unlike other ingredients, for saffron I consider 1 ounce to be a bulk because of the price. As for the rice, Calasparra rice is what I prefer.

Once the rice in place, cover the pan and cook until the rice gets partially cooked. Arrange the shrimp, squid,  clams, and mussels on top. Cover to let the rice cook completely. Arrange the lemon wedges and you are done with your masterpiece.

As I’ve mentioned, a little practice is all that it takes for anyone who wants to be proficient in something. In this case, you might wing it during your first try or you may not. What’s important is that you know what to adjust so that it will be better next time.

Try this Seafood Paella Recipe. Enjoy!

Seafood Paella Recipe
 
Prep time
Cook time
Total time
 
Author:
Serves: 8
Ingredients
  • 2 cups paella rice
  • 13 pieces cooked little-neck clams
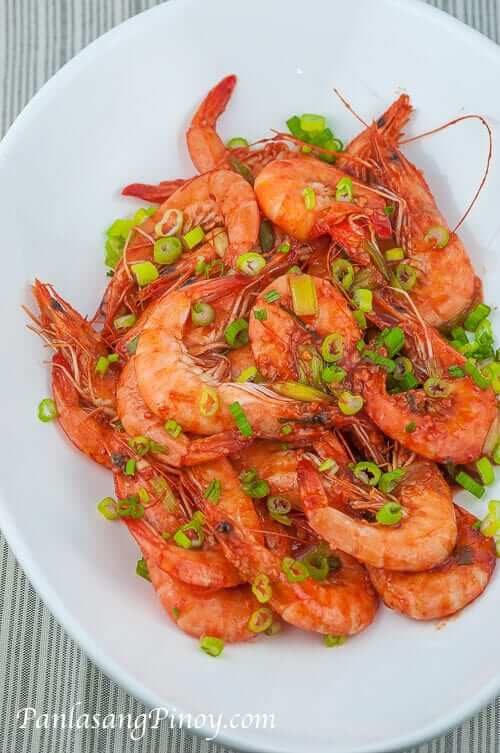
  • 13 pieces large tiger shrimp
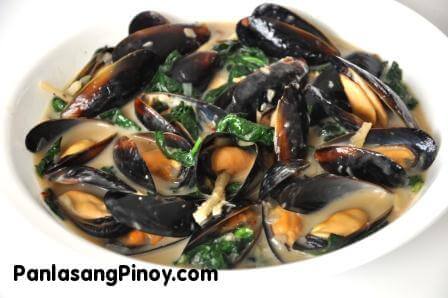
  • 13 pieces cooked mussels
  • 1 large squid, sliced into rings
  • 16 ounces clam juice
  • 1 cup water
  • ¼ cup chopped parsley
  • 1 medium tomato, diced
  • 1 cup green peas
  • 1½ teaspoons saffron
  • 1 medium onion, chopped
  • 1 small red bell pepper, roasted and sliced into strips
  • 1 tablespoon paprika
  • 1½ tablespoons garlic paste
  • 6 tablespoons olive oil
  • 2 teaspoons salt
  • 2 pieces lemon, sliced into wedges
Instructions
  1. Arrange parsley in a mortar. Gently pound using the pestle and grind until the texture becomes smooth similar to a paste.
  2. Combine the parsley, salt, garlic paste, paprika, and 2 tablespoons olive oil in a bowl. Mix well. Set aside.
  3. Heat the pan. Pour the remaining olive oil on the paellera or pan.
  4. Fry the tiger shrimp and shrimp for 1 minute per side. Remove the shrimp and squid and put in a plate.
  5. On the same pan with the remaining oil, saute onion and tomato.
  6. Add the green peas and parsley mixture. Stir.
  7. Pour-in water and clam juice. Let boil.
  8. Add the saffron and paella rice. Cover and adjust the heat to low. Cook for 20 minutes.
  9. Arrange clams, mussels, shrimp, squid, and roasted bell pepper.Cover and continue to cook for 8 minutes or until the rice is done. You can add more water if needed.
  10. Arrange the lemon wedges on the side.
  11. Serve. Share and enjoy!
Nutrition Information
Serving size: 8


The post Seafood Paella Recipe appeared first on Panlasang Pinoy.

Paksiw na Pata with Pineapple

$
0
0

Paksiw na Pata with Pineapple is what we had for lunch. This is a simple dish that I thought of cooking because I was craving for pata paksiw and humba. Instead of making both dishes, I thought of making a single dish that has the properties of both — so, I came-up with this dish.

Paksiw na Pata with Pineapple Recipe

Paksiw na Pata with Pineapple is perfect with warm white rice. I usually measure my rice by the cup and limit myself to one  —  even if the dish is really tasty like this one. I know that it is tempting to eat these kinds of dishes (especially is you see the tender fat that literally melts in your mouth), but we have to measure our intake and control ourselves for our sake.

How to cook Paksiw na Pata

When cooking pata or pork hocks, it is important that you clean it properly. It is also recommended to first prepare the pork hock by boiling it in water before using it in your recipe. This will remove the smell from the and will also extract impurities – which turns into scum. These are the dark stuff that float from nowhere when pork hock is boiled. The meat will be partially cooked during this process and it will just take a little time later on to make it tender.

After boiling the meat, discard (throw away) the water. Remove the meat and place it in a plate. You will need it later on.

PAksiw na Pata with Pineapple

Now that the pata has been prepped, it’s time to make our Paksiw na Pata with Pineapple. Start by heating the cooking oil and saute the garlic. Make sure to add the boiled pork hock once you see the garlic turn light brown because the garlic can get burnt if you don’t act quickly.Once the pork is in the pot, give it a quick stir and then add the seasoning, spices, and water– including the pineapple chunks and the juice that comes with it. Wait for the mixture to boil, then adjust the heat to medium. Cover the cooking pot and let it cook for a while.

The next step involves the dried banana blossoms. This can be bought in Filipino or Asian stores. Take note that you will need to soak these in water before cooking;  otherwise, it can make your entire dish taste bitter. The brown sugar will also be added in the process. I use beef cube or beef powder to enhance the flavor of this dish. You can use beef broth as a substitute too, but you will need to reduce or eliminate water if you will do this. If you need more time to tenderize the pork, make sure to add more water or beef broth.

Lasty, add the vinegar. We are using a small amount for this recipe since the pineapple chunks and juice are already sour and we need to balance the flavor. Use salt if needed. Sometimes the soy sauce is enough.

Try this Paksiw na Pata with Pineapple Recipe. Enjoy!

Paksiw na Pata with Pineapple
 
Prep time
Cook time
Total time
 
Author:
Serves: 5
Ingredients
  • 3 lbs. pork or ham hock (pata), sliced crosswise
  • 1 (8 oz.) can pineapple chunks
  • 2 teaspoons minced garlic
  • 8 cups water
  • 1 tablespoon white vinegar
  • 4 tablespoon brown sugar
  • 1 pack (1 oz.) dried banana blossoms, washed and soaked in water
  • 4 to 6 pieces bay leaves
  • 1 tablespoon whole peppercorn
  • 1 piece beef cube (optional)
  • ¼ cup soy sauce
  • 2 tablespoons cooking oil
  • salt to taste
Instructions
  1. Pour 6 cups water in a cooking pot. Let boil.
  2. Add the pork hocks. Continue to boil for 30 minutes. Discard the water used for boiling and then place the boiled pork hock in a plate. Set aside.
  3. Heat the oil in a clean cooking pot. Once the oil gets hot, sauté the garlic until it turns light brown.
  4. Put the boiled pork hock in the cooking pot. Stir and then add soy sauce, pineapple chunks including the juice, remaining 2 cups water, bay leaves, and peppercorn. Let boil. Continue to cook for 15 minutes.
  5. Add the banana blossom, beef cube and brown sugar. Stir and cook for 10 minutes.
  6. Add the vinegar. Let the liquid reboil and then stir. Continue to cook until the pork becomes tender. The sauce should be reduced at this point. Note that you may add more water if you need extra time to tenderize the pork.
  7. Add salt to taste.
  8. Transfer to a serving plate.
  9. Serve. Share and enjoy!
Nutrition Information
Serving size: 5


The post Paksiw na Pata with Pineapple appeared first on Panlasang Pinoy.

Steamed Lobster with Lemon Butter Sauce

$
0
0

Steamed Lobster is simply delicious. While it is already more than satisfactory, it can be better if served with lemon butter sauce. We had this during New Year’s eve and it was awesome. It was quite a challenge to get the meat of, but our dependable nutcrackers did the trick. I would say that it is best if you dig-in right away while the lobsters are still warm.

Steamed Lobster with Lemon Butter Sauce

Steamed lobster can be eaten with corn on the cob or baked potato — a  nice Asian salad also sounds good. You can also do surf and turf by serving it with steak. Since we had this during New Year’s dinner, it was enjoyed with other yummy dishes such as pork belly lechon and seafood paella.

I think that the lemon butter sauce did really well. However, you can simply eat the lobster by itself if you want to enjoy its natural flavor. If you want to have it the Filipino way, a dipping sauce composed of vinegar and crushed garlic is all that you need — and a cup or two of steamed white rice too.

How to Cook Steamed Lobster

The lobster was steamed with water alone. There are steamed lobster recipes that call for both beer and water, but this is not one of those recipes. I bought the lobsters alive from the Asian store that is why I am confident that these are really fresh.

I started by boiling water in a large multi-purpose steamer. When the water starts to boil, I placed the lobsters in the steamer, covered it, and steamed until the lobsters are fully cooked. The lobsters should be done in around 10 to 14 minutes depending on its size.

The lemon butter sauce can be prepared in less than 5 minutes. I place the butter in a bowl, placed it in the microwave to melt for 20 to 30 seconds, squeezed the lemon juice in and added salt. That’s it!

Steamed Lobster with Lemon Butter Sauce

Try this Steamed Lobster with Lemon Butter Sauce. Let me know what you think.

Steamed Lobster with Lemon Butter Sauce
 
Prep time
Cook time
Total time
 
Author:
Serves: 3
Ingredients
  • 3 fresh lobsters
  • 6 cups water
Lemon Butter Sauce
  • ¼ cup butter
  • juice from 1 lemon
  • a pinch of salt
Instructions
  1. Pour water in a large steamer. Let boil.
  2. Once the water starts to boil, arrange the lobsters in the steamer. Steam for 12 to 14 minutes. Make sure to shake the steamer every 4 minutes.
  3. Meanwhile, prepare the lemon butter sauce by transferring the butter in a bowl. Melt by microwaving for 20 to 30 seconds or until the butter melts completely. Squeeze the lemon juice on the melted butter and add a pinch of salt. Stir until all the ingredients are well blended.
  4. Remove the lobsters from the steamer and transfer to a serving plate. Serve with lemon butter sauce. Share and enjoy!
Nutrition Information
Serving size: 3


The post Steamed Lobster with Lemon Butter Sauce appeared first on Panlasang Pinoy.

How to Make Meatloaf

$
0
0

Do you want to learn how to make meatloaf ?  Meatloaf – when cooked properly – can be a moist, delicious culinary treat. It is usually made from ground beef, but there are variations using pork, lamb and poultry. Use these tips to refine your recipe or learn how to make meatloaf at home from scratch.

How to Make Meatloaf

Choosing Ingredients for Meatloaf

Traditional meatloaf is made using pounds of ground beef. Ground chuck is considered to be a top meat option by both professional and home cooks because of its flavor. It is recommended that you look for beef with moderate fat because it helps it come out moist. You can substitute ground beef with veal, pork or lamb if you prefer.

The flavor of meatloaf can be enhanced in several ways. Some cooks broth, wine and even beer to boost the taste. Others prefer adding a bit of bacon, cheese and breadcrumbs to improve the texture. If you’re not a fan of moist meatloaf, you can make it firmer by running the meat through a grinder before cooking. Meatloaf is a versatile dish and you can add and eliminate ingredients until you find your perfect recipe.

Tips on How to Make Meatloaf at Home

The most important elements to consider when learning how to make meatloaf is texture and moisture. If the amount of meat is too much, you can replace ¼ of ground beef with vegetables like carrots and potatoes. Add about a cup of these vegetables and make sure they are finely grated. If the meatloaf is too dry, add a 1/3 cup of tomato juice or broth to moisten it. Using soft breadcrumbs instead of dry varieties can also increase moisture and enrich texture.

If you’re wondering why you should rub water on top of the loaf, it is simply to prevent it from cracking. Be careful not to pour the water on the loaf. Instead, wet your hands and gently run them on the surface of the loaf before baking.

How to Make Meatloaf at home

Meatloaf offers culinary enthusiasts many flavor possibilities. Once you’ve learned how to make meatloaf using a simple recipe, you can try making loaves with other meats and ingredients. Keep a meat thermometer handy to cook different meats to the right temperatures.


How to Make Meatloaf
 
Prep time
Cook time
Total time
 
Author:
Serves: 5
Ingredients
  • 1 lb. ground beef
  • ½ lb. ground pork
  • ½ cup yellow or white onion, minced
  • 4 teaspoons brown sugar
  • 1 whole egg, beaten
  • 1 can or 8 ounces of tomatoes, diced
  • ¼ cup breadcrumbs or oats
  • 1½ teaspoons salt
  • ¼ teaspoon ground black pepper
Instructions
  1. Heat the oven to 375F while you prepare the meatloaf mixture.
  2. Combine ground beef, ground pork, onions, egg, tomatoes and breadcrumbs or oats, sugar, salt, and pepper in a large bowl. Mix all the ingredients until well blended. If necessary, use hands to make sure all ingredients are mixed well.
  3. Transfer your meatloaf mixture into a bread pan or baking dish to shape like a loaf. Rub a little cool water on the top of the loaf and bake for 50 min. to 1 hour. Meatloaf is ready when it reaches an internal temperature of 170 F. Pork meatloaf is ready at 185F.
  4. Cool and serve.
  5. Share and enjoy!
Nutrition Information
Serving size: 5

Checkout out other meatloaf recipes here.

The post How to Make Meatloaf appeared first on Panlasang Pinoy.

Beef and Baby Corn Stir Fry Recipe

$
0
0

Beef and Baby Corn Stir Fry is a quick and tasty beef and vegetable dish that I always enjoy since I was a kid. This recipe is the simplest that I can come-up so that you can also experience and enjoy  this dish. If you have 30 minutes to make a good lunch then this you must consider this recipe.

Beef and Baby Corn Stir Fry

The best way to enjoy Beef and Baby Corn Stir Fry is to eat it with either fried or steamed white rice. It is recommended that you consume this dish while it is still warm.  If you are not a fan of rice, you can have this with noodles such as lo mein. There are similarities between this and our stir fried beef recipe.

How to Cook Beef and Baby Corn Stir Fry

Here is how to make your own beef and baby corn stir fry. Start  by preparing the beef. Make sure the the beef is the tenderest part that you can get such as sirloin or tenderloin. These parts require less cooking time. Combine the beef slices with ground black pepper, soy sauce, and oyster sauce. Mix well. This step will let the beef absorb the flavor of the other ingredients.

//www.youtube.com/watch?v=sQ52HMArpU0

Add cornstarch to the mixture and use your hands to blend everything together. The cornstarch give the dish its thick texture later on. Meanwhile, stir fry the veggies. Star with the baby corn, then the snap peas, and bell pepper. Add salt, pepper, and cooking wine. Continue to stir fry for a few minutes. Do not completely cook the vegetables because we will still continue to cook these later on. Remove the veggies from the wok and arrange in a plate. Set aside.

Now we’ll cook the beef. Use the remaining cooking oil in the wok. Add a tablespoon of cooking oil if there isn’t enough left. Stir fry the marinated beef. You will realize that the beef gets sticky while you are cooking it — this is just normal because of the cornstarch. Continue to stir fry until the beef is brown and then add the vegetables back. The natural liquid from the vegetables will help to develop sauce and it will get thicker as it is combined with the cornstarch. You will notice that the cornstarch stucked in the pan will slowly disappear. You can also a quarter cup of beef broth or water if you want more sauce.

Beef and Baby Corn Stir Fry Recipe

Try this Beef and Baby Corn Stir Fry Recipe. Let me know what you think.

Beef and Baby Corn Stir Fry Recipe
 
Prep time
Cook time
Total time
 
Author:
Serves: 3
Ingredients
  • ¾ lbs beef sirloin, sliced into thin strips
  • 15 pieces baby corn
  • 1½ cups snap peas
  • 1 small red bell pepper, sliced into strips
  • ¼ cup light soy sauce
  • 3 to 4 tablespoons oyster sauce
  • 1½ tablespoons cornstarch
  • ½ teaspoon ground black pepper
  • ½ teaspoon salt
  • 3 table spoon Shoaxing cooking wine
  • 3 tablespoon cooking oil
Instructions
  1. Arrange beef in a bowl. Add ¼ teaspoon ground black pepper, soy sauce, and oyster sauce. Mix well.
  2. Add the cornstarch. Make sure all the ingredients are well blended. Set aside.
  3. Meanwhile, heat a wok or a pan. Pour-in the cooking oil. Once the oil gets hot, stir-fry the baby corn, snap peas, and red bell pepper for 3 to 5 minutes.
  4. Add salt and remaining pepper. Pour the cooking wine in the wok and stir-fry for 3 minutes.
  5. Transfer the vegetables to a plate. Set aside.
  6. Using the remaining cooking oil (add a tablespoon of cooking oil if needed), stir fry the marinated beef for 3 to 4 minutes. Add the stir-fried vegetables and continue to stir-fry for another 2 to 4 minutes.
  7. Transfer to a serving plate. Serve.
  8. Share and enjoy!
Nutrition Information
Serving size: 3


The post Beef and Baby Corn Stir Fry Recipe appeared first on Panlasang Pinoy.


Simple Bibingkang Malagkit

$
0
0

Simple Bibingkang Malagkit is the same good sticky rice treat enjoyed by Filipinos, except that this version is prepared in a simpler way — and it does not require too much stirring.

Simple Bibingkang Malagkit

As described above, I am sharing another Bibingkang Malagkit recipe that is as good as the first one, but this won’t give your arms a hard time stirring continuously.

I have to say that this is a more convenient way to make Bibingkang Malagkit. I can simply leave this cooking in the oven and do other things such as cooking another dish (I am craving for Mechado today) or doing house chores. Between the two, I like cooking better.

Simple Bibingkang Malagkit Recipe

How to Make Simple Bibingkang Malagkit

Start by cooking the sweet rice or malagkit. I simple combine the rice with water and cook it in a rice cooker. I check it once in a while to see if the rice absorbed all the water. When this happens, it means that I am ready to move to the next process.

At this point, you can now pre-heat your oven so that it will be warm enough soon.

Bibingkang Malagkit Recipe

Grab a mixing bowl and pour-in the coconut milk, coconut cream, salt, sugar — it is basically all the ingredients except the rice and water. Give it a good stir. Once you think that all the ingredients are properly combined, you can do two things. The first is to arrange the rice in a baking pan and pour-in the coconut milk mixture. You can stir it some more once everything is on the baking pan to ensure that all the ingrdients are distributed. The second option is to scoop the cooked rice into the mixing bowl that has the coconut milk mixture and stir everything in there. Simple pour the contents of the mixing bowl to the baking pan when ready and then bake it in the oven.

Try this Simple Bibingkang Malagkit. Let me know what you think.

Simple Bibingkang Malagkit
 
Prep time
Cook time
Total time
 
Author:
Serves: 6
Ingredients
  • 2¼ cups glutinous or sweet rice
  • 2 cups brown sugar
  • 2 cups water
  • 2 cans (4 cups) coconut milk
  • 1 can (2 cups) coconut cream
  • ¼ teaspoon salt
  • 2 teaspoons vanilla extract
Instructions
  1. In a rice cooker or cooking pot, combine water and rice. Cook until the rice fully absorb the water. Note that the rice is not yet fully cooked at this point.
  2. Transfer the rice on a baking tray.
  3. Preheat the oven to 350 F.
  4. Combine the coconut milk, salt, sugar, and vanilla extract in a mixing bowl. Stir until all the ingredients are well blended.
  5. Pour the mixture on the baking tray with rice. Gently stir until all the ingredients are distributed.
  6. Bake for 40 to 60 minutes or until the top turns medium brown.
  7. Remove from the oven. Let it cool down for 30 to 50 minutes.
  8. Serve. Share and enjoy!
Nutrition Information
Serving size: 6


The post Simple Bibingkang Malagkit appeared first on Panlasang Pinoy.

Chicken Halang-halang Recipe

$
0
0

Chicken Halang-halang is a Filipino chicken dish similar to ginataang manok.This dish has a hint of lemongrass, which makes it smell and taste fresh.

Chicken Halang-halang

I like my Chicken Halang-halang spicy, so I use more than enough chili flakes every time I cook one. You can also use bird’s eye chili (“siling labuyo”), Jalapeno, or Cayenne pepper.

This dish is guaranteed to tempt you to increase your rice intake. If you plant to stick with just a cup of rice, make sure that you condition yourself beforehand because chances are that you can give-in to your craving later-on.


How to cook Chicken Halang-halang

//www.youtube.com/watch?v=8_KO3VxCb8o

You will not have a hard time cooking Chicken Halang-halang becaue this is really a simple dish. Start by heatin the cooking oil in a cooking pot — I use canola oil most of the time. Once the oil gets hot, it is time to saute our three commonly used ingredients: garlic, onion, and ginger.

You will know that the chicken is ready to be added once the onion starts to soften. Gently add the chicken pieces and then continue to cook one side until it turns brown. You can use tongs to check on these. Turn the chicken over to cook the other side and then pour the coconut milk. Let it boil and add the lemongrass, papaya, and chili. At this point, cover the cooking pot and set your heat to medium. We will need to cook the chicken further while extracting the flavor from the papaya and lemongrass.

Once the chicken is done, add ground black pepper, fish sauce (you may use salt as an alternative), and more chili, if preferred. Lastly, put the hot pepper leaves in. You can use malunggay leaves or even spinach as alternative ingredients.

Chicken Halang-halang Recipe

Try this Chicken Halang-halang Recipe. Let me know what you think.

Chicken Halang-halang Recipe
 
Prep time
Cook time
Total time
 
Author:
Serves: 4
Ingredients
  • 2 lbs. chicken, cut into serving pieces
  • 1 can (2 cups) coconut milk
  • 1 medium yellow onion, diced
  • 1 teaspoon minced garlic
  • 1 thumb ginger, julienne
  • 2 teaspoons chili flakes
  • 6 to 8 lemongrass blades
  • 1 small green papaya, wedged
  • ¾ to 1 cup hot pepper leaves (or malunggay)
  • 2 tablespoons fish sauce
  • ¼ teaspoon ground black pepper
  • 3 tablespoons cooking oil
Instructions
  1. Heat the oil in a cooking pot.
  2. When the oil gets hot, saute the onion, garlic, and ginger until the onion becomes soft.
  3. Add the chicken pieces. Cook until light to medium brown. Turn over to cook the other side.
  4. Pour-in coconut milk. Let boil. Add chili flakes, lemongrass, and papaya. stir. Cover and the heat to medium. Cook for 18 to 20 minutes or until the chicken is fully cooked.
  5. Remove the cover. Add ground black pepper, fish sauce, and more chili flakes (if desired).
  6. Add the hot pepper leaves. Stir and cook for 2 minutes.
  7. Transfer to a serving plate. Serve.
  8. Share and enjoy!
Nutrition Information
Serving size: 4


The post Chicken Halang-halang Recipe appeared first on Panlasang Pinoy.

Easy Pork Hamonado

$
0
0

Easy Pork Hamonado is a dish made of pork, pineapple, and sugar. By looking at is major ingredients, you will know right away that this dish is has a sweet and sour flavor into it. Warm white rice is the best thing to eat this with.

Pork Hamanonado

I made this dish using fresh pineapple slices. I got a nice sweet pineapple from the grocery and this dish was one of the ideas that popped into my head. Fresh ripe pineapple is recommended, but it is not necessary to have; canned pineapple chunks is a good alternative ingredient for the fresh ones.

The beef broth that I used was store bough. You can also use a cup of water and add  half a beef cube as a substitute for beef broth. As I’ve mentioned in the video below, you may use white sugar or brown sugar for this recipe –whatever is available between the two.

Pork Hamonado Recipe

How to cook Pork Hamonado

Cooking pork hamonado at home is a simple task. All you need to do is prepare all the necessary ingredients (see the recipe below). Start by sautéing the onion and garlic. Add the pork and cook until brown. You will need to also add the pineapple at this time and saute it with the pork for a few minutes. Add soy sauce and beef broth and then wait for the mixture to boil. Cover the cooking pot and simmer until the pork gets tender.

//www.youtube.com/watch?v=dgiII96Ti_U

The last few steps are the easiest. Simply add sugar, salt, and pepper and then let it cook for a few more minutes. Adjust the salt and pepper based on your preference.

Try this Easy Pork Hamonado Recipe. Let me know what you think.

Easy Pork Hamonado
 
Prep time
Cook time
Total time
 
Author:
Serves: 4
Ingredients
  • 1 lb. pork shoulder, sliced into cubes
  • 1½ cups pienapple, cubed
  • 3 tablespoons soy sauce
  • 1 cup beef broth
  • 1 medium yellow onion, chopped
  • 5 cloves garlic, minced
  • 3 tablespoons cooking oil
  • ¼ cup granulated white sugar
  • Salt and pepper to taste
Instructions
  1. Heat the cooking oil in a pan.
  2. Once the oil gets hot, saute the garlic and onion.
  3. Add the pork and cook until the color turns light to medium brown.
  4. Add the pineapple. Stir and cook for 3 minutes.
  5. Pour-in the soy sauce. Stir. Add the beef broth. Let boil. Simmer for 45 to 50 minutes. Add water if needed.
  6. Stir-in the sugar and add salt and pepper. Cook for 3 to 5 minutes more.
  7. Transfer to a serving plate.
  8. Serve. Share and enjoy!
Nutrition Information
Serving size: 4

The post Easy Pork Hamonado appeared first on Panlasang Pinoy.

Ginataang Langka with Malunggay and Daing

$
0
0

Ginataang Langka with Malunggay and Daing or unripe jackfruit with moringa leaves and salted fish flakes cooked in coconut milk is a simple Filipino dish that I enjoy eating with warm white rice. This dish is simply delicious and easy to make.  Feel free to browse the recipe below and refer to the cooking video for more information.

Ginataang Langka with Malunggay and DaingGinataang Langka with Pork is also another version of this dish that I must suggest if you are looking for a pork version of this dish.

How to Cook Ginataang Langka with Malunggay and Daing

Start by sautéing onion, garlic, and chili in a pan. Next is to add the chopped unripe jackfruit. If using canned jackfruit (asI did), make sure to drain the water first and then squeeze the jackfruit until all the liquid goes out before chopping.

//www.youtube.com/watch?v=zSifXFdRpOY

Cook the jackfruit for a few minutes before adding the fish flakes. The fish flakes are the meat of the dried fish separated from the bones and shredded. Cook for a few seconds and pour-in the coconut milk. The coconut milk needs to reduce to around 10%, so you’ll need to cook in medium heat until it evaporates. However, make sure that you stir it once in a while to prevent the ingredients from sticking on the pan.

Lastly, add the malunggay leaves and fish sauce. You can use spinach as an alternative ingredient to malunggay. Enjoy!

Ginataang Langka with Malunggay and Daing
 
Prep time
Cook time
Total time
 
Author:
Serves: 3
Ingredients
  • 2 cups unripe jackfruit, chopped
  • 2 cups coconut milk
  • 1 to 1½ cups malunggay leaves
  • ½ to ¾ cups dried fish (daing)
  • 1 medium yellow onion, chopped
  • 1 teaspoon minced garlic
  • 3 to 5 pieces chili pepper
  • 2 teaspoons fish sauce
  • 3 tablespoons cooking oil
Instructions
  1. Heat the oil in a pan.
  2. Once the oil gets hot, add the onion, chili, and garlic. Saute until the onion becomes soft.
  3. Put in the jackfruit. Stir and cook for 1 minute.
  4. Add the dried fish flakes. Stir. Cook for 30 seconds.
  5. Pour-in the coconut milk. Let boil. Set the heat to medium and continue to cook while stirring once in a while until the coconut milk evaporates.
  6. Add the malunggay leaves and fish sauce. Stir and cook for 3 minutes.
  7. Transfer to a serving plate. Serve.
  8. Share and enjoy!
Nutrition Information
Serving size: 3


Ginataang Langka with Malunggay and Daing Recipe

The post Ginataang Langka with Malunggay and Daing appeared first on Panlasang Pinoy.

Sirloin Beef Steak Tagalog

$
0
0

Sirloin Beef Steak Tagalog is a version of bistek tagalog. This is a marinated beef dish cooked with soy sauce and onion.

Sirloin Beef Steak Tagalog

This version suggests the use of beef sirloin. Sirloin is tender and it is usually used for grilling or broiling. Since it is a tender cut of beef, it only requires less than an hour to cook.

Sirloin beef steak is best eaten with rice. You can have it with regular steamed rice or with garlic fried rice.

How to Cook Sirloin Beef Steak Tagalog

Start by marinating beef sirloin with soy sauce and lime. Do this by combining all three ingredients in a bowl and mix until blended. Let it stay for a minimum of 30 minutes.

//www.youtube.com/watch?v=1GR6bltdvJw

Once the beef absorbs the flavor from the marinade, pan fry it for a couple of minutes per side and then pour-in the remaining marinade along with beef broth (you may also use 2 cups of water and half a beef cube as an alternative for beef broth). Let it boil and then add pepper and garlic powder. Simmer until the beef gets tender — which is around 30 to 35 minutes. The thinner the cut the faster it gets tender.

Add the onion and scallions towards the end. If you want these cooked and soft, cover the pan after adding and cook for 3 to 5 minutes. You will need to add more broth if it starts to dry out. Enjoy!

Sirloin Beef Steak Tagalog
 
Prep time
Cook time
Total time
 
Author:
Serves: 3
Ingredients
  • ¾ to 1 lb beef sirloin, sliced into thin strips
  • 1 medium yellow onion, sliced into rings
  • 4 pieces scallions, sliced (optional)
  • 6 tablespoons soy sauce
  • 1 lime or 2 pieces calamansi
  • ⅛ teaspoon ground black pepper
  • 1 teaspoon garlic powder
  • 1½ cups beef broth
  • 2 tablespoons cooking oil
Instructions
  1. Combine soy sauce, lime, and beef in a bowl, Mix well and let it stay for at least 30 minutes.
  2. Heat oil in a pan and start to pan fry the beef sirloin in medium heat for 1 to 2 minutes per side.
  3. Pour-in the remaining marinade and the beef broth. Add garlic powder and ground black pepper. Stir. Cover and simmer for 20 to 35 minutes. Add more beef broth if necessary.
  4. Remove the cover and add the onion and scallion. Cook for 3 minutes.
  5. Transfer to a serving plate and serve.
  6. Share and enjoy!
Nutrition Information
Serving size: 3

Sirloin Beef Steak Tagalog Recipe

The post Sirloin Beef Steak Tagalog appeared first on Panlasang Pinoy.

Beer Marinated Grilled Chicken Breast Inasal

$
0
0

Beer Marinated Grilled Chicken Breast Inasal is a good way to make the favorite Filipino grilled chicken treat. This recipe makes use of boneless chicken breast along with the regular seasonings and spices for chicken inasal — and beer.

Grilled Chicken Breasts Inasal

I am using pale ale for this recipe as a replacement for lime soda (7-up or Sprite).  It turned out that this is my favorite version among all the chicken inasal recipe that we published. I think that this recipe results in a more flavorful grilled chicken inasal dish. It might be the beer, the time it took to marinate the ingredients, or even the thin cut chicken; whatever the reason is, I am sure that you will find this inasal recipe worth your time.

Tips on how to cook Beer Marinated Grilled Chicken Breast Inasal

  • This chicken inasal recipe makes use of boneless chicken breasts. Make sure that you flatten the chicken breasts properly before marinating. Use a cling wrap to cover the chicken (or place it inside a clear plastic bag) before pounding with a meat tenderizer.
  • It will be best if you marinate it at least overnight or for a couple of days to make it more tasty.
  • Use pale ale or IPA for best results. Pale pilsen of regular beer will work too.
  • The basting sauce is important. Make sure that you follow the recipe below.
  • Grill in low to medium heat. If you grill in high heat, the outer part of the chicken will be cooked quickly, but the inside will still be raw.
  • It is best eaten with papaya atchara and sinamak.

Grilled Chicken Breasts Inasal Recipe

Try this Beer Marinated Grilled Chicken Breast Inasal recipe. Enjoy!

Links:

Beer Marinated Grilled Chicken Breast Inasal
 
Prep time
Cook time
Total time
 
Author:
Serves: 4
Ingredients
  • 2 lbs. boneless chicken breasts
marinade ingredients:
  • ¼ cup vinegar (white or apple cider)
  • 2 teaspoons minced ginger
  • ¼ cup soy sauce
  • 1 cup beer (Lagunitas little sumpin)
  • ½ teaspoon salt
  • ¼ teaspoon ground black pepper
  • 2 limes
  • 1 teaspoon turmeric powder
  • 1 teaspoon annatto powder
basting sauce ingredients:
  • 3 tablespoons soy sauce
  • 2 tablespoons margarine
Instructions
  1. Lay the boneless chicken breasts flat on a chopping board. Cover with a cling wrap. Flatten by pounding with a meat tenderizer tool. Set aside.
  2. Make the marinade by combining the marinade ingredients in a large bowl, Mix well. Add the pounded chicken breasts. Marinate for at least 3 hours (I usually marinate overnight). Don't forget to cover the bowl and place inside the fridge.
  3. Prepare the basting sauce by combining 3 tablespoons of soy sauce, 2 tablespoons of margarine, and the remaining marinade. Mix well and then microwave for 1 minute.
  4. Heat the grill. Start to cook the beer marinated chicken. Baste with the basting sauce and grill one side in medium heat for 3 to 4 minutes. Flip the chicken breast to cook the other side.Baste the top part with the basting sauce, Continue to do this step one more time or more until the chicken breasts are done.
  5. Transfer to a serving plate. Serve with papaya atchara and sinamak.
  6. Share and enjoy!
Nutrition Information
Serving size: 4

The post Beer Marinated Grilled Chicken Breast Inasal appeared first on Panlasang Pinoy.

Asian BBQ Pork Baby Back Ribs

$
0
0

Asian BBQ Pork Baby Back Ribs is a good idea for a family picnic lunch. This recipe is also worthy for your Super Bowl menu, if you are looking for dishes with an Asian twist. This baby back ribs recipe is tasty and so tender. It literally falls-off the bone, so handle with care.
Asian BBQ Pork Baby Back Ribs Recipe

Instead of using traditional barbecue sauce, I tried to make my version of Asian barbecue sauce to make this unique. The taste had a hint of beef pares and pork asado. The meat was super tender and very flavorful.

I enjoyed this without any side dish.  However, I think that this will also go well with fried rice. I am thinking Yang Chow or any regular fried rice.

Asian BBQ Pork Ribs Slow Cooker

How to Cook Asian BBQ Pork Baby Back Ribs

It might take a while to make your own Asian BBQ Pork Baby Back Ribs. However, I think that it is worth the wait because it is good and you will be proud of yourself once you try the result.

Let’s start to revisit the steps that I did this dish. The first thing to do is to clean the baby back ribs. Wash it with running water, pat dry, and lay on a chopping board. Remove the white layer (membrane) located at the back of the slab. Once the ribs are ready, it is time to marinate it in Teriyaki sauce. This will infuse more flavor to the ribs.

You will need a resealable plastic bag for this process. Use Ziploc, Hefty, or any brand that you trust. Place the ribs inside the bag and then pour the Teriyaki sauce in. I am using my homemade Teriyaki sauce for this recipe. Seal the bag and place in the refrigerator to marinate for at least 1 hour (I did it for 3 hours).

Asian Pork Baby Back Ribs_

Once the ribs are ready, lay these flat on a slow cooker and add the ingredients specified in the recipe below. Slow cook for 3 hours. Make sure to set your unit to high. The Asian barbecue sauce can be prepared while waiting for the ribs to be tender. Make the sauce by adding all the sauce ingredients. Mix well and set aside. You will need to apply the sauce before baking the ribs.

Arrange the slow cooked ribs in a baking tray. Line aluminum foil on the tray for easy clean-up. Brush a generous amount of sauce all over the ribs. Make sure that you leave a small amount of sauce for later use. Bake in the oven for around 12 to 15 minutes. Once the ribs are done, brush with the remaining sauce to bring back the nice glaze.

Try this Asian BBQ Pork Baby Back Ribs Recipe. Enjoy!

Asian BBQ Pork Baby Back Ribs
 
Prep time
Cook time
Total time
 
Author:
Serves: 4
Ingredients
  • 1 (2½ to 3 lbs.) slab baby back ribs
  • 1 large red onion, chopped
  • 2 teaspoons minced garlic
  • ¾ cup Teriyaki sauce
  • 1 tablespoon minced ginger
  • 1 teaspoon five spice powder
  • 1 cup chicken broth
Barbecue sauce ingredients:
  • ½ cup hoisin sauce
  • 2½ tablespoons rice vinegar
  • 3 tablespoons brown sugar
  • ½ teaspoon sesame oil
  • ⅛ teaspoon five spice powder
  • 1 tablespoon sesame seeds
  • A pinch of ground black pepper
Instructions
  1. Clean the baby back ribs and remove the layer of white membrane at one side. Slice the slab into 3 to 4 pieces.
  2. Arrange the ribs in a resealable bag and then add the Teriyaki sauce. Remove the air in the bag, seal, and marinate for at least 1 hour.
  3. Arrange the marinated baby back ribs, onion, ginger, garlic, five spice powder, and chicken broth in a slow cooker. Set the cooker to high and slow cook for 3 hours.
  4. Make the asian barbecue sauce by combining the barbecue sauce ingredients. Set aside.
  5. Carefully remove the baby back ribs from the slow cooker. Gently rub-of the onion and other ingredients used in the slow cooker from the ribs. Arrange in a baking tray lined with aluminum foil.
  6. Pre-heat the oven to 350F. Brush the barbecue sauce all over the ribs. Leave some sauce for later use. Bake for 15 minutes.
  7. Remove from the oven and brush the remaining sauce. Serve!
  8. Share and enjoy!
Nutrition Information
Serving size: 4

Asian Barbecue Pork Baby Back Ribs Recipe-2

The post Asian BBQ Pork Baby Back Ribs appeared first on Panlasang Pinoy.


Adobong Pata (Ham Hock Adobo)

$
0
0

Adobo dishes play an important part in Philippine Cuisine. Ham hock adobo or adobong pata is one of these dishes. This is a pata dish cooked using the inadobo method. It is the same simple and easy cooking method that produces an amazing result. It is the same method used to cook our delicious pork adobo.

adobong pata - ham hock adobo recipe

This adobong pata (ham hock) has a mild taste and the result of this recipe is a very tender meat that falls off the bone, literally. I prepared the pork by boiling it in water for an hour. This makes the meat tender and removes all of its impurities; it also eliminates the scums that usually come out floating during the cooking process. To help balance the flavor, I used half a beef cube. You can also use pork cube or 2 cups of beef broth. If you will use beef broth, make sure to use less water.

There is really nothing special about this dish, nor this recipe. The only special that I can think of are the ones that will be preparing this dish in their own kitchen, and that is you. It will be even more special if you share the meal with your family and loved ones.

Happy cooking and thank you for always visiting this Filipino food blog. Cheers!

adobong pata - ham hock adobo

Try this Adobong Pata (Ham Hock Adobo) Recipe. Let me know what you think.

Adobong Pata (Ham Hock Adobo)
 
Prep time
Cook time
Total time
 
Author:
Serves: 5
Ingredients
  • 3 lbs ham hock (pata), sliced into individual servings
  • 5 pieces dried bay leaves
  • 1 tablespoon whole peppercorn
  • 6 cups water
  • 6 tablespoons soy sauce
  • 6 tablespoons white vinegar
  • ½ beef or pork cube
  • 1 head garlic, crushed
  • 1 teaspoon onion powder
  • 1 tablespoon granulated white sugar
  • Salt to taste (optional)
  • 3 tablespoons cooking oil
Instructions
  1. Boil 8 cups of water in a large cooking pot. Add the ham hock (pata). Continue to boil for 60 minutes. Discard the water and set the ham hock aside.
  2. Heat the oil on a large cooking pot. You may use the same pot that you had for the pata.
  3. Add the crushed garlic and cook until brown. Add the peppercorn and bay leaves and cook for 30 seconds.
  4. Put the boiled ham hock in the cooking pot and then pour-in the water. Let boil. Cover and simmer for 15 minutes.
  5. Add the beef cube and soy sauce. Cook for 40 minutes in low heat. Add more water if needed.
  6. Add the onion powder, vinegar, and sugar. Let the mixture boil. Stir and cover the cooking pot. Continue to simmer for 20 minutes. Add more water if necessary. Make sure that there is enough sauce left.
  7. Add salt (optional). Serve.
  8. Share and enjoy!
Nutrition Information
Serving size: 5

The post Adobong Pata (Ham Hock Adobo) appeared first on Panlasang Pinoy.

Ginisang Kalabasa at Sitaw with Daing Recipe

$
0
0

If you are looking for a Filipino vegetable and fish recipe to try, ginisang kalabasa at sitaw with daing can be a good choice. This dish does not contain red or white meat (which is ideal during lent) and has that delicious Filipino food taste that you might have been craving for.

ginisang kalabasa at sitaw with daing

This dish is quick and easy to make. The entire process takes less than 30 minutes and the steps can easily be performed even by beginners.

Note that the dried fish that I used for this recipe is the meaty kind. These are larger dried fish that are somewhat hard to find if you are outside of the Philippines. For your convenience, you can use the regular dried fish sold in Filipino stores. However, make sure to remove the fish bones first before cooking. You may also want to try our other ginisa recipe involving sitaw.

How to cook ginisang kalabasa at sitaw with daing

Start to cook this ginisang kalabasa dish by sautéing the garlic and onion. Once done, add the shredded dried fish and cook for a few seconds before adding the kalabasa (squash). Stir fry for 1 to 2 minutes and then add water. The water will help soften the squash. Make sure to cover the pan and cook in medium heat until the water evaporates almost completely.
Add the string beans and stir fry for 1 to 2 minutes. The water should have completely evaporated at this point. Pour-in the fish sauce, which is our seasoning for this dish, and then sprinkle some ground black pepper. Serve this dish with warm white rice.

ginisang kalabasa at sitaw with daing recipe

Try this Ginisang Kalabasa at Sitaw with Daing Recipe. Let me know what you think.

Ginisang Kalabasa at Sitaw with Daing Recipe
 
Prep time
Cook time
Total time
 
Author:
Serves: 4
Ingredients
  • 1 lb calabaza squash (kalabasa), sliced into cubes
  • 8 pieces string beans (sitaw), cut into 2 inch pieces
  • ¾ cup salted dried fish (daing), shredded or chopped
  • ½ cup water
  • 1 medium yellow onion, chopped
  • 5 cloves garlic, crushed
  • ⅛ teaspoon ground black pepper
  • 2 to 2½ tablespoons fish sauce
  • 3 tablespoons cooking oil
Instructions
  1. Heat the oil in a pan.
  2. Saute the garlic and onion.
  3. Once the onion starts to get soft, add the dried fish. Stir.
  4. Put-in the calabaza squash. Continue to stir fry for 1 minute.
  5. Pour-in water and bring to a boil. Cover and cook for 5 to 6 minutes or until the water evaporates.
  6. Stir in the string beans.Cook for 2 minutes in medium heat.
  7. Add fish sauce and ground black pepper. Cook for 1 to 3 minutes more.
  8. Tranfer to a serving plate. Share and enjoy!
Nutrition Information
Serving size: 4

The post Ginisang Kalabasa at Sitaw with Daing Recipe appeared first on Panlasang Pinoy.

Lemon Garlic Butter Salmon Recipe

$
0
0

A simple salmon dinner such as lemon garlic butter salmon is all I needed to be able to relax and bring back all the energy that were consumed during the day. This butter salmon recipe is so easy and quick to make; cooking this dish did not tire me at all.

lemon garlic butter salmon

I am using store bough frozen wild salmon fillet. These are already pre sliced, so no need for a knife. If you are using fresh salmon fillet, you have the advantage to slice it into your desired portions. I prefer wild salmon over farmed salmon because there is a possibility that the latter has higher mercury content.

It just took me a few minutes to make this simple dish for dinner. That means that I had more time doing other things, like cleaning the house or editing some cooking videos that I should have published weeks ago. I told myself to work harder and smarter this year. There is a bit of a struggle, but no major issues.

How to Cook Lemon Garlic Butter Salmon

Start by making the rub. We will use a simple rub for this fish recipe. It is composed of salt, pepper, and garlic powder. Combine all three ingredients and rub all over the salmon fillet. Give it a few minutes to sit so that the fish can absorb the flavor.
Melt the butter in a pan. Make sure to apply low heat to melt the butter because it can get burnt easily. Butter has low smoke point, unlike other oils. This is the reason why there is canola oil in the ingredient list below. The smoke point of butter can be extended a bit when mixed with canola oil. Add the canola oil when the butter melts completely.

Let the oils heat-up a little bit and then gently add all the salmon fillets and fresh thyme sprigs in the pan. We are not expecting any splatter at this point because the butter is not that hot yet. Continue to cook using the same amount of heat until the butter starts to make a soft sound and when bubbles appear. This means that the oils are getting hotter and that the fish is starting to cook. Let the fish cook until it turns light brown and then turn it over using a spatula. Cook the other side the same way.

lemon garlic butter salmon recipe

You might be asking why we are frying the thyme. It simply releases its odor and flavor when applied with heat and any liquid. The oils tend to absorb the aroma and flavor from the thyme and transfers it to the fish during the cooking process. So, the thyme makes our salmon dish smell and taste better.

Remove the salmon from the pan and then top over rice. Scoop a teaspoon of butter from the pan and pour over the salmon and squeeze lemon over it. You might also like to try our super easy bake salmon recipe.

Try this Lemon Garlic Butter Salmon Recipe. Cheers!

Lemon Garlic Butter Salmon with spring salad Recipe
 
Prep time
Cook time
Total time
 
Author:
Serves: 4
Ingredients
  • 4 pieces salmon fillet
  • ¾ cup salted butter
  • 4 sprigs thyme
  • 2 teaspoons garlic powder
  • 1 teaspoon salt
  • ⅛ teaspoons ground black pepper
  • 2 tablespoons canola oil
  • 1 fresh lemon
Instructions
  1. Combine salt, ground black pepper, and garlic powder in a small bowl mix well.
  2. Arrange the salmon fillet in a plate. Rub the garlic powder mixture all over the salmon. Let it stay for 10 to 15 minutes.
  3. Melt the butter in a pan. Add the oil. Set the heat between low and medium.
  4. Gently add the salmon fillet and thyme in the pan. Do not use high heat when cooking with butter because it has a tendency to get burnt quickly. Cook each side of the salmon fillet for 7 to 10 minutes (in low to medium heat) or until the fish starts to brown.
  5. Remove from the frying pan. Arrange in individual plates. Squeeze lemon juice on top.
  6. Serve with white or brown rice and salad.
  7. Share and enjoy!
Nutrition Information
Serving size: 4

The post Lemon Garlic Butter Salmon Recipe appeared first on Panlasang Pinoy.

Steamed Snow Crab Legs Recipe

$
0
0

Steamed snow crab legs are tasty and easy to prepare. It can be dipped in lemon butter sauce and eaten with potato and corn, or you can do it the Filipino way by dipping it in vinegar with garlic and eat it with white rice. Both of these choices will give you a good tasting crab legs to enjoy.

steamed snow crab legs recipe

Snow crab legs are quick to cook because these are sold pre-cooked most of the time. You will know that it was cooked beforehand if the color is already orangey. Crabs and similar seafoods are prepared this way to prevent it from getting spoiled quickly. I got these crabs packaged in bags, each weighing 2 pounds. These come out frozen, so I needed to thaw it first before steaming.

Aside from snow crab legs, you can do this simple crab recipe to king crab legs, Maryland blue crabs, and dungeness crab. Make sure to adjust the steaming time depending on the weight of the crab and its state (pre-cooked or fresh).

How to Cook Steamed Snow Crab Legs with Vinegar Dip

Snow crab legs are so quick to steam. When you are using pre-cooked crab legs, it will only take a maximum of 5 minutes to steam it. I used a multi-purpose cooker for this dish because it is tall enough to accommodate the long crab legs.

Start by boiling water in the steamer. Add lemon rinds or lemon zest to the boiling water. This will make the crab smell fresh and have that hint of lemon when done. As I’ve mentioned, steam the crab for no longer than 5 minutes and the transfer it on a large plate.

Make the vinegar dip by combining vinegar and crushed garlic. I used apple cider vinegar for this recipe. You can use white vinegar, cane, or even white wine vinegar as alternatives.

Serve the snow crab legs with the vinegar dip. I enjoyed this with white rice while eating using my hands.

The traditional Filipino way of doing this is called “pinasingaw”. Halabos is also another method similar to steaming, but it cooks the crab with a small amount of water. See this halabos na alimasag recipe for more details.

steamed snow crab legs with spiced vinegar

Try this Steamed Snow Crab Legs Recipe. Enjoy!

Steamed Snow Crab Legs Recipe
 
Prep time
Cook time
Total time
 
Author:
Serves: 3
Ingredients
  • 2 lbs snow crab legs, cleaned
  • rind from 1 lemon
  • 1 tablespoon
  • 6 cups water
  • ½ cup apple cider or white vinegar
  • 4 to 6 pieces crushed garlic
Instructions
  1. Pour water on a tall steamer. Let boil.
  2. Using a grater, grate the skin of the lemon to produce lemon rinds and then add these in boiling water.
  3. Arrange the crab legs in the steamer. Steam for 4 to 5 minutes.
  4. Prepare the vinegar dip by combining vinegar and crushed garlic in a small bowl.
  5. Arrange the snow crab legs in a plate and serve with vinegar dip.
  6. Share and enjoy!
Nutrition Information
Serving size: 3

The post Steamed Snow Crab Legs Recipe appeared first on Panlasang Pinoy.

Shrimp Alfredo Pasta with Scallops

$
0
0

Shrimp Alfredo Pasta with Scallops can be made using spaghetti or fettuccine. It will depend on your preference or on the availability of the ingredient in your pantry at the moment. This Alfredo pasta is easy and simple. It makes use of our thick Alfredo sauce recipe that uses heavy cream.

seafood shrimp alfredo with scallops pasta

I like rich and thick pasta sauces. If you do not feel the same, you can use half and half as an alternative to heavy cream in making the sauce. The Parmesan cheese is good enough for me. However, you can also add grated Romano cheese if you feel that there is a need for it.

The shrimp and scallop combination works well for this pasta dish. Make sure that the shrimp is pan fried and the scallops are seared before adding the sauce for best results.

How to Make Shrimp Alfredo Pasta

Start by cooking the pasta. Whether you are using spaghetti or fettuccine, always follow the package instructions.

It won’t take long for the sauce and seafood to be cooked. Pan fry the shrimp separately and the  sear the scallops. Both ingredients needs to be removed from the pan before making the Alfredo sauce. Melt the butter in the pan and then start to brown the garlic. Add the cream and stir until well blended. Cook for a few minutes until it is about to reach boiling point. Your queue to add the shrimp and scallop is when the cream starts to move on its own. Make sure to stir once in a while. Add the cheese last.

Top it with the pasta or put the pasta in the pan and toss to distribute. Top with chopped parsley to make it look more appetizing.

seafood shrimp alfredo with scallops pasta recipe

Try this Shrimp Alfredo Pasta with Scallops. Let me know what you think!

Shrimp Alfredo Pasta with Scallops
 
Prep time
Cook time
Total time
 
Author:
Serves: 3
Ingredients
  • 1 lb spaghetti or fettuccine
  • ½ lb scallops
  • 1 lb large shrimp, deveined and shell removed
  • 6 tablespoons butter
  • 2 cups heavy cream
  • 1 cup grated Parmesan cheese
  • 3 tablespoons olive oil
  • ½ teaspoon minced garlic
  • salt and pepper to taste
Instructions
  1. Cook spaghetti or fetuccine according to package instructions. Set aside.
  2. Heat the oil in a pan. Once the oil starts to heat-up, pan fry the shrimp for 1 minute per side. Remove the shrimp from the pan and set aside.
  3. Sear the scallops in medium heat for 2 minutes per side.Remove from the pan including the liquid that comes from it.
  4. On the same pan, melt the butter, and then cook the garlic until light brown.
  5. Pour the heavy cream in the pan and then stir. Cook between low to medium heat for 5 minutes.
  6. Add the shrimp and scallops. Stir and cook for 3 minutes more.
  7. Add the Parmesan cheese and turn off the heat. Add salt and pepper if needed.Stir.
  8. Top the sauce over the spaghetti or you can add the spaghetti on the pan and then give and toss.
  9. Serve. Share and enjoy!
Nutrition Information
Serving size: 3

The post Shrimp Alfredo Pasta with Scallops appeared first on Panlasang Pinoy.

Viewing all 460 articles
Browse latest View live