Quantcast
Channel: Recipes – Panlasang Pinoy
Viewing all 460 articles
Browse latest View live

Ginisang Ampalaya with Shrimp (Sauteed Bitter Gourd)

$
0
0

Ginisang Ampalaya with Shrimp (or sautéed bitter gourd) is a simple yet nutritious dish that you can prepare for lunch. This recipe involves bitter gourd (also called bitter melon), which is a type of vegetable that is known to have a lot of nutritional value. It also makes use of shrimp.

Ginisang Ampalaya

Bitter gourds are really bitter. I am sure that there is a reason why this vegetable was named that way. However, it is packed with nutrients and it is said that this vegetable can help cleanse the blood. To me, eating bitter gourd was an acquired taste. I needed to force myself to finish a serving during my younger years, and then I immediately got used to it. However, I still think that some varieties are really bitter for me — so I rub some salt to get the bitter taste out before cooking.

Ginisang Ampalaya with Shrimp is best served with warm white rice. This dish can be enhanced by adding fish sauce (and spicy chili) while eating.

Ginisang Ampalaya Recipe

Try this Ginisang Ampalaya with Shrimp (Sauteed Bitter Gourd). Let me know what you think.

Ginisang Ampalaya with Shrimp (Sauteed Bitter Gourd)
 
Author: 
Nutrition Information
  • Serves: 3
  • Serving size: 3
Prep time: 
Cook time: 
Total time: 
Ingredients
  • 1 medium ampalaya (bitter gourd), cut in half lengthwise, cored, and sliced into thin pieces
  • 8 to 10 pieces shrimp
  • 2 eggs, beaten
  • 1 medium tomato, cut into cubes
  • 1 small onion, sliced
  • 4 cloves garlic, crushed and chopped
  • 3 tablespoons cooking oil
  • Salt and pepper to taste
Instructions
  1. Combine ampalaya and 1 tablespoon salt. Mix well. Let it stay for 15 minutes. Rinse with water.
  2. Heat the cooking oil in a pan.
  3. Once the oil gets hot, add the garlic. Saute until the color turns light brown.
  4. Add the onion and tomato. Sauce until the texture turns soft.
  5. Add the shrimp. Stir and cook for 2 minutes.
  6. Stir-in the ampalaya. Cook for 3 to 5 minutes. Add salt and pepper to taste.
  7. Make extra room in the pan by pushing the mixture on the side. Pour the beaten eggs in the pan. Continue to cook the eggs while trying to stir around.
  8. Mix the cooked egg with the rest of the ingredients. Cook for a minute.
  9. Transfer to a serving plate. Serve.
  10. Share and enjoy!

Watch the cooking video:

The post Ginisang Ampalaya with Shrimp (Sauteed Bitter Gourd) appeared first on Panlasang Pinoy.


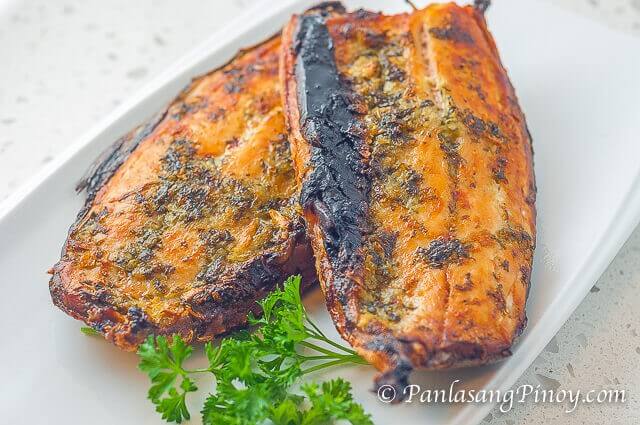
Baked Garlic Milkfish

$
0
0

I love to eat milkfish because it is tasty. The only thing that I dislike about it is the fact that it contains too many fish bones. I needed to carefully remove each bone when eating milkfish. This takes an extra step (and time too) — although I must admit that it also builds excitement because I am anticipating something good and tasty anytime soon. Good thing that there are deboned milkfish available in the Asian supermarket these days. It makes eating milkfish convenient.

Baked Garlic Bangus_

This Baked Garlic Milkfish recipe is really simple. The fish just needs to marinate for at least 3 hours in order to absorb the flavor of the marinade. I do this longer (usually overnight) for better results. I wrap the fish in a plastic wrapper and keep it inside the refrigerator.

Baking the fish is the easiest part. Simply preheat the oven and arrange the fish in a baking tray. Do not forget to line the tray with a sheet of aluminum foil so that you can clean-up easily later. Wait until the fish gets light to golden brown, then you know that it is done.

It is best eaten with a cup of white rice along with a vinegar dip. I usually crush 3 garlic cloves and mix it with vinegar along with whole peppercorns.

Try this Baked Garlic Milkfish Recipe. Send us your feedback.

5.0 from 1 reviews
Baked Garlic Milkfish
 
Prep time
Cook time
Total time
 
Author:
Serves: 2
Ingredients
  • 1 large milkfish, deboned
  • ½ cup chopped parsley
  • 1 head garlic, crushed
  • 3 tablespoons olive oil
  • 1 teaspoon coarse sea salt
  • ¼ teaspoon ground black pepper
Instructions
  1. Combine the chopped parsley and crushed garlic in a mortar. Pound the mixture using a pestle.
  2. Add salt, ground black pepper, and olive oil. Grind the ingredients using the pestle.
  3. Arrange the milkfish in a plate in a position wherein the open cavity faces upwards. Rub the garlic and parsley mixture over the milkfish. Let it stay for 3 hours.
  4. Cut the head and tail off the milkfish. Slice into serving pieces. Arrange in a baking tray lined with aluminum foil.
  5. Preheat the oven to 370F. Once the oven gets hot, bake the milkfish for 45 minutes or until the top turns light brown.
  6. Remove from the oven and transfer to a serving plate. Serve.
  7. Share and enjoy!
Nutrition Information
Serving size: 2

Baked Garlic Bangus Recipe

The post Baked Garlic Milkfish appeared first on Panlasang Pinoy.

Breakfast Sausage Hash

$
0
0

Breakfast Sausage Hash is a cheesy way to make sausage and hashbrown casserole. This recipe makes use of 2 kinds of cheeses: salsa con queso and shredded cheese. Having a little kick is best for this dish, but the amount of hot sauce that you will use should depend on your heat tolerance. To be in the middle, I used 1 tablespoon of hot sauce for this recipe.

Breakfast Sausage Hash

The recipe below calls for sharp cheddar cheese. Having this type of cheese (along with salsa con queso) is more than enough. However, I added some Mexican cheese to add variety. You can do it as I did by combining your preferred shredded cheeses, but cheddar (sharp or mild) is the safest bet.

I enjoyed this Breakfast Sausage Hash with some tomato ketchup. I also ate this with Croissant — the combination was superb. I think that I will do this combination again in the future.

Try this yummy Breakfast Sausage Hash. Let me know what you think.

Breakfast Sausage Hash
 
Prep time
Cook time
Total time
 
Author:
Serves: 5
Ingredients
  • 1 package (1 lb.) frozen shredded potatoes, thawed
  • 6 pieces sausage links
  • 3 tablespoons butter
  • 1 tablespoon canola oil
  • 10 oz. salsa con queso (use your favorite brand)
  • 1 cup shredded cheddar cheese
  • 1 tablespoon hot sauce (Cayenne pepper sauce)
  • 3 tablespoons chopped green onions
  • 1½ cups beef broth
  • ½ teaspoon salt
  • ½ teaspoon onion powder
Instructions
  1. Heat a pan, pour-in the beef broth, bring to a boil. Add the sausage links and butter. Parboil the sausage links until the beef broth evaporates.
  2. Once the broth completely evaporates, continue to fry the sausage links using the remaining butter in low to medium heat for 5 minutes.
  3. Remove the sausage links from the pan, let it cool down. Slice into thin pieces.
  4. Combine the remaining butter and add the canola oil, apply heat. Once the mixture heats-up, put the sliced sausages in. Cook for 1 minute.
  5. Add the shredded potatoes. Stir and cook for 5 to 7 minutes.
  6. Transfer the cooked potato and sausage in a mixing bowl. Add the salsa con queso, shredded cheese, hot sauce, salt, and onion powder. Fold until the ingredients are well blended.
  7. Preheat oven to 400F. Arrange the mixture in a baking plate. Top with chopped green onions Bake for 35 minutes.
  8. Remove from the oven. Serve for breakfast.
  9. Share and enjoy!
Nutrition Information
Serving size: 5

Breakfast Sausage Hash Recipe

The post Breakfast Sausage Hash appeared first on Panlasang Pinoy.

Squid Ball Pancit Canton Recipe (Chow Mein)

$
0
0

Squid Ball Pancit Canton Recipe or Chow Mein with Squid Balls is an easy-to-prepare dish that you can make within 30 minutes. Pancit Canton is a dish that is usually served during special occasions such as birthday parties because it symbolizes long life.

Squid Ball Pancit Canton

Squid Ball Pancit Canton (Chow Mein) or Pancit Canton in general is also served for lunch or mid-afternoon snack. This can also be ordered in  canteens and restaurants and it is part of  the short order menu because it only takes a few minutes to cook.

When having pancit for “meryenda”, I like eating it with lots of calamansi or lime and a few pieces of pandesal. I open the pandesal using my hands and scoop the pancit using it. I then eat pancit and pandesal as a sandwich. It might sound weird, but I am sure that some of you are doing (or might have done) the same thing.

Try this Squid Ball Pancit Canton Recipe (Chow Mein). Let me know what you think.

Squid Ball Pancit Canton Recipe
 
Prep time
Cook time
Total time
 
Author:
Serves: 4
Ingredients
  • ½ lb (~250g) pancit canton noodles (flour noodles)
  • 1 medium yellow onion, sliced
  • 4 cloves garlic, crushed
  • ½ cup chopped parsley
  • 3 tablespoons cooking oil
  • 12 pieces squid balls, sliced into quarters
  • 4 pieces lobster balls, sliced (optional)
  • ½ cup carrots, julienne
  • ½ small cabbage, chopped
  • 1½ cup chicken stock or broth
  • 3 to 4 tablespoons soy sauce
  • ¼ teaspoon ground black pepper
Instructions
  1. Heat the cooking oil in a wok. Saute the garlic, onion, and parsley. Add the ground black pepper.
  2. Add the squid and lobster balls. Stir fry for 2 to 3 minutes.
  3. Add the chopped cabbage and carrots. Toss. Cook for 5 minutes or until the vegetables starts to soften.
  4. Pour-in the soy sauce and chicken broth. Let boil.
  5. Lay the flour noodles over. Cover the wok. Let it stay for 1 to 2 minutes. This will let the flour noodles absorb the steam, which will make it soft and easy to handle.
  6. Remove the cover and gently toss the noodles. Makes sure that all the ingredients are well incorporated. Cook until the liquid dries up.
  7. Squeeze some lime, and then toss some more.
  8. Serve. Share and enjoy!
Nutrition Information
Serving size: 4

Squid Ball Pancit Canton Recipe

The post Squid Ball Pancit Canton Recipe (Chow Mein) appeared first on Panlasang Pinoy.

Caramelized Butternut Squash

$
0
0

Caramelized Butternut Squash is a simple dessert that you can meet this autumn or anytime of the year. It is easy to make and simply delicious. I enjoy this as a dessert. Sometimes, I make this dish to snack on.

Caramelized Butternut SquashButternut Squash is an amazing ingredient. There are lots of dishes that you can make using this and it blends well to almost any ingredient, may it be veggies or meat.

There are more ways to cook butternut squash. Click here to check it out.

Try this Simple Caramelized Butternut Squash Recipe. Enjoy!

Caramelized Butternut Squash
 
Prep time
Cook time
Total time
 
Author:
Serves: 3
Ingredients
  • 1 lb. butternut squash, peeled, seeds removed, and cut into cubes
  • 2½ tablespoons melted butter
  • 4 tablespoons dark brown sugar
  • ¼ teaspoon salt
Instructions
  1. Preheat oven to 410F
  2. Combine squash, brown sugar, salt, and butter in a bowl. Toss to coat the squash with the rest of the ingredients.
  3. Arrange the coated butternut squash on a baking tray lined with an aluminum sheet. Bake for 35 to 45 minutes.
  4. Remove from the oven and transfer to a serving bowl.
  5. Serve. Share and enjoy!
Nutrition Information
Serving size: 3


Caramelized Butternut Squash Recipe

The post Caramelized Butternut Squash appeared first on Panlasang Pinoy.

Pork Giniling Croquette Recipe

$
0
0

Pork Giniling Croquette is a simple appetizer dish made from pork giniling and mashed potato.

Pork Giniling Croquette Recipe

I like to eat this croquette version simply with ketchup. I also tried it with homemade ranch dip and it was also a perfect combination.

The cooking video below will show you exactly how I prepared this dish from scratch. I made use of leftover pork giniling and some homemade mashed potato. The links for these recipes are provided below in the recipe section.

As I mentioned, this is an appetizer dish. However, it can also be eaten for breakfast. You can also treat this as some sort of bar food such as fried mozzarella sticks that you can have while drinking beer or any other beverage. On a side note, thinking about mozzarella sticks just reminded me  about the Filipino Cheese Sticks that I used to make. I really have to make one this Halloween weekend.

Pork Giniling Croquette

Try this Pork Giniling Croquette Recipe. Enjoy!

5.0 from 1 reviews
Pork Giniling Croquette
 
Prep time
Cook time
Total time
 
Author:
Serves: 5
Ingredients
  • 2 cups mashed potato (get recipe here)
  • 2 cups pork giniling (get recipe here)
  • 3 eggs
  • 1½ cups Panko breadcrumb
  • ¼ cup all-purpose flour or bread crumb
  • ½ teaspoon salt
  • ⅛ teaspoon ground black pepper
  • 2 cups cooking oil
Instructions
  1. Combine mashed potato and pork giniling in a bowl. Mix well.
  2. Add one egg and all-purpose flour. Mix well.
  3. Beat 2 eggs in a bowl. Arrange the panko breadcrumb in a separate bowl. Scoop around 2 tablespoons of mashed potato and pork giniling mixture and then form a ball-shaped figure using your hand. Dip in beaten egg then dredge or roll on the Panko breadcrumb. Make sure that the ball mixture is coated properly.
  4. Heat the cooking oil in a cooking pot. Once the oil gets hot, fry the pork giniling croquettes in medium heat until the color turns golden brown. Turn the croquettes over to cook the opposite side.
  5. Remove from the cooking pot and arrange in a plate lined with paper towel. This will absorb the oil.
  6. Remove the paper towel from the plate leaving the perfectly cooked pork giniling croquettes in the plate.
  7. Serve. Share and enjoy!
Nutrition Information
Serving size: 5

Watch the cooking video:

//www.youtube.com/watch?v=kve0mlahI2Y

The post Pork Giniling Croquette Recipe appeared first on Panlasang Pinoy.

Beer and Cilantro Marinated Prawn

$
0
0

Beer and Cilantro Marinated Prawn is an easy and hassle-free way to make lunch. For extra flavor , the prawn are marinated in a mixture of ale beer and cilantro before grilling.

Beer and Cilantro Marinated Prawns

I also made some garlic butter basting sauce to make this Beer and Cilantro Marinated Prawn dish more interesting. The result was a delicious tasty dish that you can pair with white wine.

The recipe below tells you to marinate it for at least 3 hours, but it will be best if you keep it in the fridge o marinate for 6 hours or more. This will let optimal absorption of the flavors from the marinade.

Try this Beer and Cilantro Marinated Prawn Recipe. Enjoy!

Beer and Cilantro Marinated Prawn
 
Prep time
Cook time
Total time
 
Author:
Serves: 3
Ingredients
  • 8 pieces prawn
  • ½ cup chopped cilantro
  • 1½ cups beer
  • ¼ cup melted butter
  • ½ teaspoon sea salt
  • 1 teaspoon garlic powder
Instructions
  1. Combine beer and cilantro in a bowl. Stir and then add the prawn. Let it stay for at least 3 hours.
  2. Make the basting sauce by combining butter, salt, and garlic powder. Mix well.
  3. Heat-up the grill. Put the marinated prawn on the grill and then continue to grill one side for 4 minutes. Baste the opposite side with the butter mixture. Turn the prawn over to grill the other side. Do not forget to apply the basting sauce.
  4. Transfer the grilled prawn in a serving plate. Serve with lemon wedges.
  5. Share and enjoy!
Nutrition Information
Serving size: 3

Beer and Cilantro Marinated Prawns Recipe

The post Beer and Cilantro Marinated Prawn appeared first on Panlasang Pinoy.

Yellow Arroz Caldo Recipe

$
0
0

Yellow Arroz Caldo is another version that I have for you. This recipe makes use of packaged yellow rice, which is better known as arroz amarillo. The yellow rice is not literally yellow. The package includes herbs and spices that makes the rice turn yellow when cooked.

Yellow Arroz Caldo Recipe

Yellow Arroz Caldo or any congee in general is best eaten during cold weather. I like to have it when it is very hot because it keeps me warm. It works better for me if I have it with a dip of chili flakes and fish sauce. Squeezing lime or calamansi (and even lemon) on your arroz caldo will make it more enjoyable to eat.

Some of you might know how to cook this dish, or at least have tried to do so. This recipe post is a simple reminder for those of you who have not tried cooking this, and wanted to give it try. If you are new to cooking, go ahead and try this recipe. All you need are the proper cooking equipments and the ingredients. The steps are detailed in the recipe below.

Try this Yellow Arroz Caldo Recipe. Enjoy!

Yellow Arroz Caldo Recipe
Author: 
Prep time: 
Cook time: 
Total time: 
Serves: 5
 
Ingredients
  • 1 lb. chicken, chopped into serving pieces
  • 6 cups chicken broth
  • 2 cups water
  • 1 package (8oz.) Arroz Amarillo (yellow rice)
  • 6 cloves garlic, crushed
  • 1 medium yellow onion, chopped
  • 1 Onion powder
  • ¼ cup chopped green onions
  • 1 teaspoon Garlic powder
  • 1 teaspoon Paprika
  • ¼ teaspoon Ground black pepper
  • 2 teaspoons salt
Instructions
  1. Heat the cooking oil in a cooking pot. Once the oil gets hot, put the garlic in and then cook in low to medium heat until the garlic turns light brown.
  2. Stir-in the onion. Continue to cook until the onion gets soft.
  3. Add the chicken. Stir and then cook for 3 to 5 minutes.
  4. Gradually add the yellow rice. Stir. Cook for 2 minutes.
  5. Pour-in the chicken broth and water. Stir.
  6. Add the onion powder, garlic powder, paprika, ground black pepper, and salt. Continue to cook in medium heat for 20 to 30 minutes. Cover the cooking pot and stir every 5 minutes or if needed. You can add more water or chicken broth if the liquid gets absorbed quickly by the rice. Add more salt only if needed.
  7. Transfer to a serving bowl. Top with green onions. Serve with lime or calamansi.
  8. Share and enjoy!
Nutrition Information
Serving size: 5

Yellow Arroz Caldo-2

The post Yellow Arroz Caldo Recipe appeared first on Panlasang Pinoy.


Pork and Kangkong Guisado

$
0
0

Pork and Kangkong Guisado is a simple dish that you can serve during ordinary days. I like this because it is delicious, easy to prepare, and budget friendly. I enjoy eating this dish with a cup of white rice — oh, I mean 2 cups.

Pork and Water Spinach Guisado Recipe

I used pork shoulders because it contains some fat that can be extracted during the cooking process. I sprayed the wok with some cooking oil spray to grease it and make sure that the meat won’t stick on it. You can also use a tablespoon of cooking oil if you do not have cooking oil spray. Simply swirl the wok to distribute the oil over it while heating it up.

The pork needs to go first. Once the oil is hot, gently add the pork and brown one side. Turn it over to brown the opposite side. During this process, the fat from the pork gets extracted and turns into oil. We will used this extra oil to cook the garlic an onion.

The kangkong was segregated into 2 parts: the stalk and leaves (I used Chinese kangkong or Ongchoy for this recipe). Simply prepare it by manually segregating the leaves and stalk. Chop the stalk into short pieces. The stalks go first in the cooking process, while the leaves are added towards the end.

Soy sauce was the only seasoning that I added, but it will help if you use beef broth (instead of water) for extra flavor.

Pork and Water Spinach Guisado

Try this Pork and Kangkong Guisado Recipe. Let me know what your think.

Pork and Kangkong Guisado
Author: 
Prep time: 
Cook time: 
Total time: 
Serves: 2
 
Ingredients
  • ¼ lb. pork, sliced into thin pieces
  • 1 bunch water spinach (kangkong), leaves separated from the stalk and stalk chopped
  • 1 medium yellow onion, sliced
  • 1½ teaspoon minced garlic
  • 3 tablespoons soy sauce
  • ½ to ¾ cup beef broth
  • 1 tablespoon cooking oil
  • ¼ teaspoon ground black pepper
Instructions
  1. Heat the oil in a wok or pan.
  2. Once the oil gets hot, add the pork Cook until both sides of the pork are brown. Also make sure that oil is extracted out of the pork.
  3. Add garlic. Stir and cook for 20 seconds.
  4. Add onion, stir and cook until the onion gets soft.
  5. Stir-in the chopped kangkong stalk. Cook for 2 minutes.
  6. Pour-in soy sauce. Add the ground black pepper. Continue to cook for 2 minutes.
  7. Add the kangkong leaves. Cover the wok or pan for 1 minute.
  8. Remove the cover, stir. Add the beef broth. Let boil. Stir and cook for 1 minute.
  9. Transfer to a serving bowl. Serve.
  10. Share and enjoy!
Nutrition Information
Serving size: 2

Watch the cooking video:

//www.youtube.com/watch?v=MHWM2GGPVko

The post Pork and Kangkong Guisado appeared first on Panlasang Pinoy.

Pork Ginataan with Squash and String Beans

$
0
0

Pork Ginataan with Squash and String Beans is a rich and delicious Filipino dish that makes use of pork, coconut milk, and vegetables such as squash and string beans. This recipe has many variations. You can do this with other types of meat and even with seafood such as crab. In fact, Ginataang Sitaw at Kalabasa with Crab is one version that I enjoy eating.

Pork Ginataan with Sitaw and Kalabasa Recipe-2

I love this dish because it is very tasty and delicious. The only thing that bothers me is the certainty that I will always overeat when this dish is served because it’s richness and flavor do not deserve just a cup of rice — maybe 2 or just a little bit over it.

There are many ways to cook Pork Ginataan with Squash and String Beans. I used shrimp paste or  bagoong as the main source of flavor. Fish sauce or even salt can be used as alternatives. You will notice that I always use butternut squash these days. Well, the family learned to love this squash variety because it tastes simply delish, and the kids love it too. In addition, it is healthy and has a lot of benefits. Here are some of the benefits of butternut squash.

Pork Ginataan with Sitaw and Kalabasa

Try this Pork Ginataang with Squash and String Beans Recipe. Let me know what you think.

Pork Ginataan with Squash and String Beans
Author: 
Prep time: 
Cook time: 
Total time: 
Serves: 4
 
Ingredients
  • 1½ lbs. pork, cubed
  • 1½ cup beef broth
  • 2 cups coconut milk
  • ¼ cup shrimp paste (bagoong)
  • 1 small butternut squash, cubed
  • 1 small bundle of string beans, cut into 2 inch pieces
  • 1 medium yellow onion, sliced
  • 1½ teaspoons minced garlic
  • 3 tablespoons cooking oil
  • ¼ teaspoon ground black pepper
  • Salt to taste (optional)
Instructions
  1. Heat the cooking oil in a cooking pot.
  2. Once the oil gets hot, saute the garlic and onion.
  3. Add the ground black pepper. Stir and then add the pork. Cook the pork until the color turns light brown.
  4. Pour the beef broth in the cooking pot. Let it boil.
  5. Add the coconut milk. Stir and allow to boil once more. Cover and cook in low to medium heat until the pork gets tender.
  6. Add the squash. Stir, cover and cook for 8 to 10 minutes.
  7. Add the shrimp paste. Stir.
  8. Add the string beans. Cover and cook for 3 to 5 minutes. Add salt only if needed.
  9. Transfer to a serving plate. Serve.
  10. Share and enjoy!
Nutrition Information
Serving size: 4

Watch the cooking video:

//www.youtube.com/watch?v=hTWpJJbdeFA

The post Pork Ginataan with Squash and String Beans appeared first on Panlasang Pinoy.

Pinoy Chicken Noodle Soup

$
0
0

Pinoy Chicken Noodle Soup is something that I make when the weather starts getting chilly. I like it because it is delicious and keeps me feel warm and cozy. I also like it because I get to enjoy two of my favorite noodle dishes in just one dish since this is somewhat a crossover between chicken mami and lomi.

Filipino Chicken Noodle Soup Recipe_

I used bone-in chicken thighs for this recipe. I figured that using this ingredient costs less than using boneless chicken breasts, and the bone also helps make the dish more flavorful. I also added chicken liver and bacon for extra flavor. These ingredients are already tasty, but it makes it even better if seasoned with fish sauce, in my opinion.

Pinoy Chicken Noodle Soup is good to have for lunch or early dinner. It also makes a good heavy snack during mid-afternoon. On rainy days or snowy days, I can finish 2 bowls. the first bowl will have everything in it, while the second will just be all broth. It keeps me stay warm the entire day.

Filipino Chicken Noodle Soup

Try this delicious Pinoy Chicken Noodle Soup Recipe. Enjoy!

Pinoy Chicken Noodle Soup
Author: 
Prep time: 
Cook time: 
Total time: 
Serves: 3
 
Ingredients
  • 1 lb. chicken, cut into small pieces
  • ½ small cabbage, core removed and chopped
  • 1 lb. round miki noodles
  • ½ cup chopped chicken liver
  • 4 pieces crumbled bacon
  • 1 medium carrot, julienne
  • ¼ cup chopped green onions
  • 1 medium yellow onion, diced
  • 4 cloves garlic, crushed
  • 4 cups chicken broth
  • 2 cups water
  • 2 tablespoons fish sauce (patis)
  • 2 tablespoons cooking oil
Instructions
  1. Heat the in a cooking pot.
  2. Once the oil gets hot, saute the garlic and onion. Continue until the onion gets soft.
  3. Add the chicken, cook for 3 to 5 minutes or until it turns light brown.
  4. Add the chicken liver. Stir and cook for 2 minutes.
  5. Pour-in water and chicken broth. Let boil. Cover and simmer for 30 minutes.
  6. Add the bacon, carrots, and cabbage. Stir and cook for 5 to 8 minutes.
  7. Pour-in the fish sauce. Stir.
  8. Stir-in the noodles. Cook for 5 to 7 minutes. Add chicken broth or water if needed.
  9. Add the green onions.
  10. Transfer to a serving bowl. Serve.
  11. Share and enjoy!
Nutrition Information
Serving size: 3

Watch the cooking video:

//www.youtube.com/watch?v=ox6hbOlXoSw

The post Pinoy Chicken Noodle Soup appeared first on Panlasang Pinoy.

Loaded Breakfast Potato

$
0
0

Your day should start with a good and filling breakfast in order to gain strength to face all the challenges ahead. Loaded Breakfast Potato is  a perfect dish that you can make to help you get ready for your day. It is packed with energy and tastes really good.

Loaded Breakfast Potato Recipe

You can use any variety of baking potato for this recipe. The recipe below should be able to guide you in all the steps necessary to complete this dish.

There is step below that tells you to scrape the potato. This step will need you to scoop the contents of the potato to make it hollow. This space will be later used to hold the egg and veggies. Simply use a small spoon to scrape the potato out.

Try this Loaded Breakfast Potato Recipe. Enjoy!

5.0 from 1 reviews
Loaded Breakfast Potato
Author: 
Prep time: 
Cook time: 
Total time: 
Serves: 4
 
Ingredients
  • 4 baking potatoes
  • 3 tablespoons butter
  • 1 medium sweet onion, chopped
  • 1 small red bell pepper, cubed
  • 1 cup chopped white mushrooms
  • 1 cup sour cream
  • 1 cup shredded sharp cheddar cheese
  • 4 eggs, beaten
  • ¼ cup sliced green onions
  • 6 bacon strips, crumbled
  • Salt and pepper to taste.
Instructions
  1. Wash the potato in running water and make sure to scrub the surface thoroughly. Punch some holes around the potato using a fork. Place it in a plate and then microwave for 15 minutes.
  2. Let the potato cool down. Slice a portion of the top part then scape the potato from the sliced portion. Make the potato as hollow as possible. Set aside.
  3. Melt butter in a pan.
  4. Saute the onion, mushrooms, and bell pepper until the onion and mushroom becomes soft. Add a pinch of salt and ground black pepper.
  5. Push the sautéed vegetables on the side and then pour-in the beaten egg. Continue to cook the while gently stirring similar to the way you cook scrambled eggs. When the eggs gets half cooked, blend with the vegetables. Make sure that the eggs and veggies are well blended.
  6. Add the shredded cheese and stir-in ¼ cup of sour cream. Turn the heat off and then continue to stir the sour cream and cheese o mix with the rest of the ingredients.
  7. Preheat oven to 350F. Fill the cavity of the potato with the cooked egg mixture and add more mixture on top. Bake for 11 to 14 minutes.
  8. Remove from the oven and let cool. Top with crumbled bacon,remaining sour cream, and green onion.
  9. Transfer to a serving plate.Serve.
  10. Share and enjoy!
Nutrition Information
Serving size: 4


Loaded Breakfast Potato

The post Loaded Breakfast Potato appeared first on Panlasang Pinoy.

Spicy Chicken in Coconut Milk (Ginataang Manok)

$
0
0

Spicy Chicken in Coconut Milk or Spicy Ginataang Manok is a Filipino Chicken dish that makes use of coconut cream or coconut milk and lots of spicy chili. This simple yet rich dish is easy to prepare and can be eaten along with rice for lunch or dinner.

Chicken in Coconut Milk Recipe

I tried to make this dish as simple as possible so that you will find it easy to follow. If you have tried to make laing using one of our laing recipes, you’ll notice that we did not use cooking oil in the recipe; the ginger, garlic, and onion were initially cooked by boiling in coconut milk and the other ingredients were added sequentially.

Use any chili pepper that you prefer: the spicier, the better. You can also use cracked red chili or even cayenne pepper powder. As for the coconut cream, I prefer using it instead of coconut milk for this recipe because it is thicker and richer. However, coconut milk works well too.

You can substitute spinach if maluggay leaves are not available; adding wedged green papaya is also a good idea.

Chicken in Coconut Milk_

Try this rich Spicy Chicken in Coconut Milk (Ginataang Manok) recipe. Enjoy!

Spicy Chicken in Coconut Milk (Ginataang Manok)
Author: 
Prep time: 
Cook time: 
Total time: 
Serves: 4
 
Ingredients
  • 1½ lb. chicken cut into serving pieces
  • 10 pieces spicy red chili
  • 2 pieces spicy green pepper
  • 14 ounces coconut cream
  • 2 teaspoons turmeric powder
  • 1 cup mooring (malunggay) leaves
  • 1 thumb ginger, julienne
  • 4 cloves garlic, crushed
  • 1 medium red onion, sliced
  • ½ chicken cube
  • 2 tablespoons fish sauce
Instructions
  1. Heat a cooking pot and then pour-in the coconut cream.
  2. Add ginger, garlic, and onion. Stir and let boil.
  3. Put-in the chicken. Let the liquid reboil.
  4. Add the chili and turmeric powder. Stir. Cover and simmer for 35 minutes.
  5. Add the mooring leaves (malunggay). Stir and cook for 5 minutes.
  6. Add the fish sauce. Stir and cook for 2 to 3 minutes.
  7. Transfer to a serving bowl. Serve.
  8. Share and enjoy!
Nutrition Information
Serving size: 4

Watch the cooking video:

//www.youtube.com/watch?v=KsAgYl5Npv8

The post Spicy Chicken in Coconut Milk (Ginataang Manok) appeared first on Panlasang Pinoy.

Sausage, Liver, and Pork Stew

$
0
0

Sausage, Liver, and Pork Stew is perfect for all occasions;  it can also be served during regular days when you feel like preparing something nice and special. This dish is similar to pork menudo and can be enjoyed anytime of the day.

Sausage, Liver, and Pork Stew Recipe

I used Kielbasa sausage for this recipe because there is a nice flavor to it that makes this dish stand out. The pork and pig liver also contributes to make the this dish taste delightful. You can use chorizo or even beef franks and hotdogs as an alternative to sausage; either way, it will still be great.

I thought that the bell pepper contributed in the success of this dish. It also has certain health benefits that we can take advantage of (see this article). The potato, green peas, and carrots blended well with the rest of the ingredients, as expected.

Sausage, Liver, and Pork Stew

Try this Sausage, Liver, and Pork Stew Recipe. Let me know what you think.

Sausage, Liver, and Pork Stew
Author: 
Prep time: 
Cook time: 
Total time: 
Serves: 5
 
Ingredients
  • 1 large Kielbasa sausage, sliced
  • 1½ lb pork, cubed
  • ¼ lb. pig liver, cubed
  • 1 large baking potato, cubed
  • 1 small red bell pepper, chopped
  • ¾ cup frozen green peas
  • ½ cup carrot, cubed
  • 1 medium yellow onion, diced
  • 1 teaspoon minced garlic
  • 3 tablespoons cooking oil
  • 1 can tomato paste
  • 2½ cups beef broth
  • Salt and pepper to taste
Instructions
  1. Heat the oil in a cooking pot.
  2. Once the oil gets hot, brown the pork.
  3. Add the onion and garlic. Saute until the onion gets soft.
  4. Stir-in the sausage. Cook for 3 minutes.
  5. Add the pig liver. Cook for 3 to 4 minutes.
  6. Add the tomato paste. Stir. Pour-in the beef broth. Let boil. Cover and simmer until the pork is tender (around 40 to 60 minutes). You can add more beef broth if needed.
  7. Add the potato, green peas, carrots, and ref bell pepper. Stir and cook for 10 to 12 minutes.
  8. Add salt and pepper to taste. Cook for 2 minutes more.
  9. Transfer to a serving bowl.Serve.
  10. Share and enjoy!
Nutrition Information
Serving size: 5

Watch the cooking video:

//www.youtube.com/watch?v=32b4T5HQvC4

The post Sausage, Liver, and Pork Stew appeared first on Panlasang Pinoy.

Tuna Sandwich Spread

$
0
0

Tuna Sandwich Spread makes any bread tastes better. In my case, it goes best with pandesal and loaf bread (it is also known as tasty bread).  This Tuna Spread Recipe is simple and straightforward.

Tuna Sandwich Spread-2

I like this tuna sandwich spread version because it is basic. It has this good taste into it that most people will love, while it still be modified to taste according to someone else preference.

For example, sometimes I want my tuna spread to be rich, so I add shredded cheese. I can also add sour cream or even cream cheese depending on my mood.

I remember tuna sandwich spread whenever there are outings or excursions that involves the entire family or clan. The grown-ups back then will make tuna sandwiches using a mixture of tuna and mayonnaise. They will make individual sandwiches using loaves of tasty bread. Each sandwich is wrapped in a table napkin and re-packaged altogether using the same plastic bag of the loaf — oh, and sometimes there were huge jugs of orange juice too. Maybe some of you can relate to it.

Try this quick and easy Tuna Sandwich Spread Recipe. Enjoy!

Tuna Sandwich Spread
Author: 
Prep time: 
Cook time: 
Total time: 
Serves: 6
 
Ingredients
  • 1 (12 oz.) can tuna, drained
  • 1 small yellow onion, chopped
  • 2 tablespoons sweet pickle relish
  • 1 cup cup mayonnaise
  • 1 teaspoon granulated white sugar
  • ¼ teaspoon salt
  • ¼ teaspoon garlic powder
  • ⅛ teaspoon ground black pepper
Instructions
  1. Arrange the onion in a bowl. Microwave for 30 seconds.
  2. Add the remaining ingredients in the same bowl.
  3. Fold the ingredients until well blended.
  4. Use as a sandwich spread for Pandesal. Enjoy!
Nutrition Information
Serving size: 6


Tuna Sandwich Spread

The post Tuna Sandwich Spread appeared first on Panlasang Pinoy.


Turkey and Ham Sopas

$
0
0

Turkey and Ham Sopas Recipe

Turkey and Ham Sopas
Author: 
Prep time: 
Cook time: 
Total time: 
Serves: 6
 
Ingredients
  • 1 lb. chopped leftover turkey
  • 3 ounces chopped ham
  • 2 small carrots, sliced
  • 3 celery stems chopped
  • 1 medium yellow onion, chopped
  • 4 cups chicken broth
  • 2 cups fresh milk
  • 3 tablespoons butter
  • 1½ cups Farfalle (bow tie pasta) or macaroni
  • ¼ cup French fried onion (optional)
  • 3 tablespoons roasted garlic (optional)
  • Salt and pepper to taste
Instructions
  1. Melt butter in a cooking pot. Continue to heat the butter until it gets hot enough to cook the veggies.
  2. Saute the onion, carrots, and celery for 3 minutes.
  3. Add the turkey and ham. Saute for 3 to 5 minutes.
  4. Pour-in the chicken broth. Let boil. Add the pasta. Cover and cook in low to medium heat for 20 minutes.
  5. Pour-in milk. Stir and let the liquid re-boil.
  6. Add salt and pepper to taste.
  7. Transfer to individual bowls. You can top it with French fried onions or roasted garlic.
  8. Serve hot. Share and enjoy!
Nutrition Information
Serving size: 6


Turkey and Ham Sopas with Onion and GarlicTurkey and Ham Sopas_

The post Turkey and Ham Sopas appeared first on Panlasang Pinoy.

Teriyaki Chicken Thighs

$
0
0

Teriyaki Chicken Thighs is a version of Chicken Teriyaki using our homemade teriyaki sauce with garlic powder, salt, and ground black pepper. This is a delicious dish that I always enjoy to eat. I also like it because I can prepare it on the stovetop using a grill plate. This means that I do not need to brave the cold and snow in the deck during wintertime.

Teriyaki Chicken Recipe

It is easy to prepare chicken teriyaki thighs; all we need to do is make teriyaki sauce using our own recipe (the recipe link is provided below). I just combined the chicken with the teriyaki sauce and garlic powder, salt, and pepper. I always do this if I feel like having a nice meal the next day. I like to keep the chicken longer with the marinade because it turns out more flavorful.

When grilling the marinated chicken with skin-on, expect the skin to get a bit burnt afterwards. You can avoid it by removing the skin before grilling the chicken, or remove it at the middle of the grilling process. While I usually leave the skin intact on other similar recipes, in this recipe, I removed the chicken skin after a few minutes. I did this so that the chicken meat can still absorb some oil from the skin which helps keep it moist.

This can be enjoyed with regular white rice, I also think that it is best with old school warm white rice with “Pandan” leaves — you know — the type of rice that our grandmother used to prepare in the Philippines.

Try this Teriyaki Chicken Thighs Recipe. Let me know what you think.

Teriyaki Chicken Thighs
Author: 
Prep time: 
Cook time: 
Total time: 
Serves: 3
 
Ingredients
  • 1 lb. chicken thighs, cut into serving pieces
  • 1 serving Teriyaki Sauce (get the recipe here)
  • ⅛ teaspoon ground black pepper
  • ½ teaspoon Garlic powder
  • A pinch of salt
  • 1 tablespoon roasted sesame seeds
Instructions
  1. Arrange the chicken in a mixing bowl. Pour the teriyaki sauce in the bowl and add garlic powder, salt, and ground black pepper. Mix well. Cover the mixing bowl. Marinate the chicken overnight. Make sure to place the chicken inside the refrigerator.
  2. Grill the chicken. You can use any type of grill. I am using a grill plate (on a stovetop). Grill one side of the chicken for 5 minutes and then flip it over and grill the other side for 5 minutes.
  3. Remove the skin from the chicken. Continue to grill both sides for 7 to 10 minutes per side or until the chicken is fully cooked. Make sure to baste the chicken with the leftover marinade every 3 minutes to keep it moist.
  4. Transfer to a serving plate. Sprinkle sesame seeds on top. Share and enjoy!
Nutrition Information
Serving size: 3

Teriyaki Chicken-2

The post Teriyaki Chicken Thighs appeared first on Panlasang Pinoy.

Inabraw Recipe (Boiled Vegetables with Fried Fish in Anchovy Sauce)

$
0
0

Inabraw is a Filipino dish composed of different kinds of vegetables and fish. It is also known as dinengdeng. The vegetables used are usually the common veggies that can be grown in one’s Philippine backyard; these are string beans, bitter melon, tomato, okra, moringa (malunggay), jute leaves (saluyot), and eggplant. There are other vegetables that can be used aside from what I have mentioned. The fish can either be grilled or fried.

Inabraw Recipe

I made this version of inabraw using fried tilapia. I haven’t had fried fish in weeks, so I thought that this is a good opportunity for me to cook one. As for the vegetables, I went to the nearby grocery store to select the best veggies that are appropriate for this dish. Instead of bagoong Monamon,  I used bagoong Balayan.

This dish is simple and easy to make. All you need to do is fry the fish and boil the veggies. My wife and I enjoy this with lime or calamansi. I top my warm white rice with inabraw along with a portion of the fried fish and then I squeeze a piece of lime on top. Yummy!

Inabraw_

Try this Inabraw Recipe (Boiled Vegetables with Fried Fish in Anchovy Sauce). Enjoy!

Inabraw Recipe (Boiled Vegetables with Fried Fish)
Author: 
Prep time: 
Cook time: 
Total time: 
Serves: 4
 
Ingredients
  • 1 whole tilapia, fried (get the recipe here)
  • 2 large plum tomato,wedged
  • 1 large yellow onion, wedged
  • 2 thumbs ginger, sliced
  • 12 pieces string beans, cut into 2 inch. length
  • 3 to 4 pieces Indian eggplant, halved
  • 6 to 8 pieces okra
  • 1 cup jute leaves
  • 1 medium bitter melon, cored and sliced
  • 2 cups water
  • ¼ cup bagoong balayan or bagoong monamon (anchovy sauce)
Instructions
  1. Pour water in a pan or cooking pot. Let boil.
  2. Add the ginger, onion, and tomato. Cover and boil in medium heat for 10 to 12 minutes.
  3. Pour-in the anchovy sauce. Stir. Add the bitter melon, string beans, okra, and eggplant. Cover and cook for 8 to 12 minutes.
  4. Add the jute leaves. Stir and then add the fried fish on top. Cook for 3 minutes.
  5. Transfer to a serving plate. Serve with warm white rice and calamansi or lime.
  6. Share and enjoy!
Nutrition Information
Serving size: 4

Watch the cooking video:

//www.youtube.com/watch?v=7-O8UxTLhxk

The post Inabraw Recipe (Boiled Vegetables with Fried Fish in Anchovy Sauce) appeared first on Panlasang Pinoy.

Lumpiang Gulay (Vegetable Egg Roll Recipe)

$
0
0

Lumpiang Gulay or Vegetable Egg Roll is a simple fried appetizer dish made from vegetables and fried tofu. These are wrapped in egg roll wrappers and then fried until crispy.

Vegetable Egg Roll Recipe

This dish is known as vegetable spring rolls in Asia. I think that the concept of egg roll vs. spring roll has something to do with location. In America, dishes such as these are usually referred to as egg rolls, but it it is can be referred to differently in other places. As far as I am concerned, these are all lumpia and all I care about is how good it taste.

The process of cooking the vegetables is straightforward. When it comes to the type of wrapper, I will leave that to your preference. In my opinion, thinner wrapper works best for this recipe. I use  TYJ brand most of the time, but the regular wrapper that are usually available in the Philippines work best for this particular dish. The brand that I used for this recipe is Simex.

Try this Lumpiang Gulay (Vegetable Egg Roll Recipe). Enjoy!

Lumpiang Gulay (Vegetable Egg Roll Recipe)
Author: 
Prep time: 
Cook time: 
Total time: 
Serves: 6
 
Ingredients
  • 1 lb. mung bean sprouts, cleaned
  • 6 ounces fried extra firm tofu, cut into cubes
  • 2 cups shredded cabbage
  • 1 medium yellow onion, sliced
  • 1 teaspoon minced garlic
  • 2 teaspoons coarse sea salt
  • ¼ teaspoon ground black pepper
  • Egg roll (or sprig roll) wrapper
  • 1½ cups cooking oil
Instructions
  1. Heat 3 tablespoons of cooking oil. Once the oil gets hot, saute garlic and onion.
  2. When the onion gets soft, add tomato and tofu. Stir fry for 2 minutes.
  3. Put some salt and ground black pepper. Stir.
  4. Add the cabbage and then cook for 3 minutes.
  5. Stir-in the bean sprouts and cook for 5 minutes.
  6. Transfer the cooked vegetable in a plate. Drain the excess liquid.
  7. Once the vegetable cools-off, start to wrap it using the egg roll wrappers. Lay the wrapper flat on a big plate. Place around 2 to 2½ tablespoon of vegetable on one end of the wrapper. Fold the opposite edges of the wrapper and then roll until the vegetables are secured. Seal the end of the wrapper by dipping your finger in water and run it over the end of the wrapper; gently press the wet loose end towards the egg roll.
  8. Heat the remaining cooking oil in a cooking pot. Once the oil gets hot, fry one side of the egg rolls in medium heat until the color of the wrapper turns golden brown. Flip the egg roll to cook the opposite side.
  9. Remove the egg rolls from the cooking pot and arrange in a plate lined with paper towel.
  10. Serve warm with spiced vinegar.
  11. Share and enjoy!
Nutrition Information
Serving size: 6

Vegetable Egg Roll

The post Lumpiang Gulay (Vegetable Egg Roll Recipe) appeared first on Panlasang Pinoy.

Beef Sinigang sa Kamias with Gabi (Beef in Sour Broth with Taro)

$
0
0

Beef Sinigang sa Kamias with Gabi or Beef in Sour Broth with Taro is a Filipino soup dish commonly consumed on regular days. Bilimbi (locally known as kamias) serves as the souring agent. This delicous soup has a mild amount of sourness and an extra load of “deliciousness” brought about by all of its components.

Beef Sinigang sa Kamias with Gabi Recipe_

The beef is so flavorful and tender, while the taro root adds a nice thick texture to the soup. I like how the “kamias” and tomato work together to bring out that nice sour flavor. Adding a piece of Jalapeno also gave a hint of spice which made the overall experience enjoyable.

This dish is simple to prepare. All we need is extra time to make the beef tender. I also love the idea of blanching the vegetables and placing these on the side because it maintains the texture and color. The preparation (having the vegetable on the side and adding them with the soup when its time to eat) is perfect if you have guests around or if you plan to consume it later on within the day because there no risk for the vegetables to get overcooked.

Sinigang Balanched Vegetables - Spinach, Okra, Eggplant, String Beans

Here are the general steps on how we cooked this dish. We started by boiling the water and beef broth. The beef along with the kamias, tomatoes, and onions, were added once the liquid boils. I had the taro root (gabi) in the middle of the boiling process. I gave it a good hour and half to boil (in low to medium heat) to make sure that the beef is tender enough (and it was perfect). While cooking the beef, we prepared the veggies using a second cooking pot. Simply boil water and add the vegetables. Cook the vegetables for a few minutes then quickly scoop it out of the cooking pot and place it in a large bowl filled with cold water (its better if the bowl has ice in it). The cold water will stop the cooking process in each piece of veggies because you are taking off residual heat. In the process, the color and texture of the vegetable are maintained.

Try this Beef Sinigang sa Kamias with Gabi Recipe (Beef in Sour Broth with Taro). Enjoy!

Beef Sinigang sa Kamias with Gabi (Beef in Sour Broth with Taro)
Author: 
Prep time: 
Cook time: 
Total time: 
Serves: 5
 
Ingredients
  • 2 lbs. beef chuck, sliced into cibes
  • 2 medium tomato, wedged
  • 1 medium yellow onion, wedged
  • 10 to 12 pieces fresh or dried bilimbi (kamias)
  • 7 to 10 pieces okra
  • 4 pieces Indian eggplant (sliced in half)
  • 12 pieces string beans, cut into 2 inch. length
  • 2 to 3 cups spinach (or kangkong)
  • 2 to 3 tablespoons fish sauce
  • 4 to 5 pieces taro root, (gabi), peeled and cleaned
  • 9 cups water
  • 2 cups beef broth
Instructions
  1. Pour the 5 cups water and beef broth in a cooking pot. Let boil.
  2. Add the tomato, onion, and kamias.Cook for 5 to 8 minutes.
  3. Add the beef continue to boil in low to medium heat for 45 minutes.
  4. Put the taro roots in the boiling mixture. Cook for another 45 minutes or until the beef gets tender.
  5. Meanwhile, boil the remaining 4 cups of water in a second cooking pot.
  6. Once the water starts to boil, blanch the vegetables for 3 minutes (45 seconds for the spinach). (Blanching means cooking the vegetables in boiling water and then removing these quickly and place in a bowl with cold water.) Drain water and arrange the vegetables in a plate.
  7. Once the beef gets tender, add the fish sauce and stir. Note: you can add more water if needed.
  8. Transfer the beef, taro, and soup to individual bowls and arrange blanched vegetables on top.
  9. Serve warm. Share and enjoy!
Nutrition Information
Serving size: 5

Beef Sinigang sa Kamias with Gabi_

The post Beef Sinigang sa Kamias with Gabi (Beef in Sour Broth with Taro) appeared first on Panlasang Pinoy.

Viewing all 460 articles
Browse latest View live