Quantcast
Channel: Recipes – Panlasang Pinoy
Viewing all 460 articles
Browse latest View live

Filipino Style Spaghetti

$
0
0

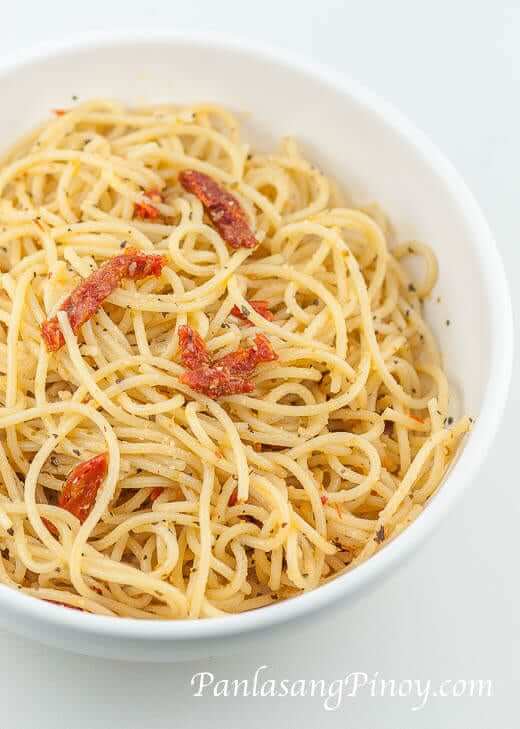
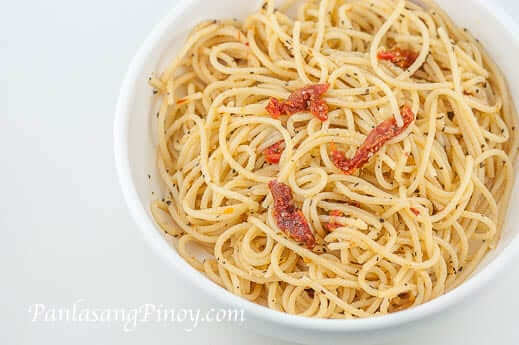
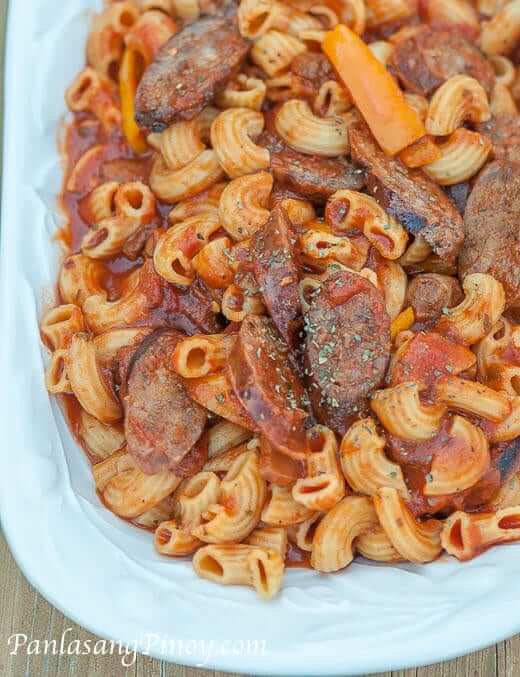
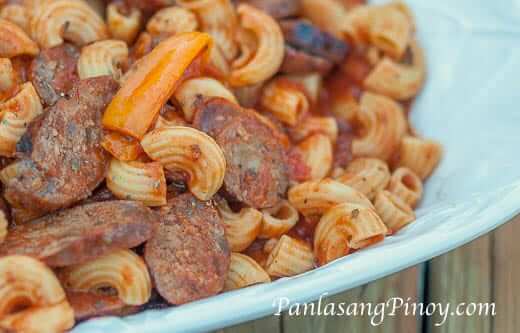
Filipino Style Spaghetti is the Pinoy version of Spaghetti with meat sauce. This version has a sweet tomato based sauce with lots of meat ingredients such as ground pork, luncheon meat, and hotdogs. It is often served during kid’s birthday parties along with some yummy fried chicken and cake.

Filipino Style Spaghetti_

This Filipino Style spaghetti version makes us of store-bought Filipino Style spaghetti sauce (this is also sometimes labeled as Filipino Style Tomato Sauce), instead of making one from scratch. I think that the sauce that I used was good because it has the flavors that I was expecting. It also helped me saved a little time because I do not need to make my Filipino Spaghetti Sauce from ground-up.

Do you like Filipino Style Spaghetti? I love it for sure, and I think that will even be better if eaten with toast and butter. This is what I always order every time I go to Jollibee. I enjoy eating my Jollibee Spaghetti with Chicken joy.

Try this delicious Filipino Style Spaghetti. Let me know what you think.

Filipino Style Spaghetti
 
Author: 
Nutrition Information
  • Serves: 6
  • Serving size: 6
Prep time: 
Cook time: 
Total time: 
Ingredients
  • 2 lbs. Spaghetti noodles
  • 1 lb. ground pork
  • 6 ounces luncheon meat, minced
  • 4 pieces hotdogs or beef franks
  • 35 ounces Filipino Style Spaghetti Sauce
  • ½ cup shredded cheddar cheese
  • 1½ cups beef broth
  • 1 medium onion, minced
  • 1 teaspoon minced garlic
  • Salt and pepper to taste
  • 3 tablespoons cooking oil
Instructions
  1. Cook the Spaghetti noodles according to package instructions. Once cooked, transfer to a bowl. Set aside.
  2. Heat the oil in a Pan.
  3. Saute the onion and garlic.
  4. Once the onions becomes soft, add the ground pork. Cook until the color turns light brown.
  5. Add the luncheon meat and hotdog. Stir and cook for 2 to 3 minutes.
  6. Pour-in the Spaghetti sauce and beef broth. Stir and let boil. Cover and simmer for 30 minutes.
  7. Try to taste the sauce and add salt and pepper if needed.
  8. Pour the Filipino Style Spaghetti sauce over the Spaghetti. Top with shredded cheese.
  9. Serve. Share and enjoy!


Filipino Style Spaghetti Recipe

Want to start your own blog?

We can help. Click this link to view the tutorial on How to Create a Food Blog .

The post Filipino Style Spaghetti appeared first on Panlasang Pinoy.


Grilled Pork Belly

$
0
0

Grilled Pork Belly is a simple dish that you can make with pork. As the name of the dish suggest, pork belly is recommended for this recipe because it is perfect for grilling and it has a good enough fat content that keeps the meat moist and flavorful.

Grilled Pork Belly Liempo

I will not talk anything about being healthy today. I am assuming that we all know what is best for ourselves and that everything in moderation is acceptable. No matter how good this Grilled Pork Belly tastes, try to control yourself and eat in moderation – I know, it is easier said than done. Well, just pretend that you tried – okay?

The good thing about this Grilled Pork Belly recipe is that it is still tasty even if marinated for only 1 hour. The key here (aside from the tasty marinade) is the way the meat is marinated. I think that sealing the meat and marinade in an air-tight bag helped the meat to get covered by the marinade completely which allowed quick absorption of flavors. The powdered spices also played a role in the process.

Grilled Pork Belly on the Grill

What do you eat Grilled Pork Belly or Inihaw na Liempo with, aside from rice? For me, I like it with atcharang papaya (pickled papaya), and sometimes with cucumber salad or Atcharang Labanos (pickled daikon).

There are times wherein you will have leftovers. In this case, try to make sinuglaw out of them or even kilawing baboy (pork kilawin).

Try this Grilled Pork Belly Recipe. Let me know what you think.

Grilled Pork Belly
 
Author: 
Nutrition Information
  • Serves: 6
  • Serving size: 6
    Prep time: 
    Cook time: 
    Total time: 
    Ingredients
    • 3 lbs. pork belly
    • ¾ cup soy sauce
    • Juice of 5 pieces lime
    • 1 tablespoon garlic powder
    • ¼ tablespoon ground black pepper
    • 1 teaspoon sriracha sauce or hot sauce
    Instructions
    1. In a large bowl, combine the soy sauce, lime juice, ground black pepper, garlic powder, and hot sauce. Mix well.
    2. Put the cleaned pork belly in a large resealable bag. You can slice the pork belly thinner so that it can quickly absorb the marinade.
    3. Pour the soy sauce mixture in the resealable bag. Let all the air out then seal. Let the pork belly marinate for at least 1 hour. You can place the bag in the refrigerator during the process.
    4. Heat-up the grill. Start to grill the marinated pork belly for 3 minutes per side. Baste the pork belly with the remaining marinade. Note: Do this process at least 3 times. This means that each side of the pork belly is grilled for a minimum of 9 minutes (3 minutes x 3 times). This will prevent the pork from getting burnt quickly. Make sure that you baste it every time you flip it over. Grill longer if the pork belly is not cooked enough.
    5. Remove the pork belly from the grill. Let cool. Slice into serving pieces.
    6. Serve with spicy vinegar. Share and enjoy!


    Grilled Pork Belly Liempo Recipe

    Want to start your own blog?

    We can help. Click this link to view the tutorial on How to Create a Food Blog .

    The post Grilled Pork Belly appeared first on Panlasang Pinoy.

    Ensaladang Filipino Recipe

    $
    0
    0

    Ensaladang Filipino is a type of salad composed of eggplant, onion, and tomato. It has a simple vinaigrette dressing and is sometimes served with shrimp paste. Ensaladang Filipino is also known as ensaladang talong.

    Ensaladang Filipino_

    This simple salad recipe makes use of semi-grilled onion and tomato. The eggplants were also grilled longer to completely cook the inside. I used a simple vinaigretter composed of cane vinegar, sugar, salt, and ground black pepper.

    Ensaladang Filipino on the Grill

    Try this Ensaladang Filipino Recipe. Let me know what you think.

    Ensaladang Filipino Recipe
     
    Author: 
    Nutrition Information
    • Serves: 2
    • Serving size: 2
      Prep time: 
      Cook time: 
      Total time: 
      Ingredients
      • 2 medium chinese eggplant
      • 1 medium plum tomato, sliced and half
      • 1 medium yellow onion, peeled and sliced in half
      • ½ cup cane or white vinegar
      • ¼ teaspoon ground black pepper
      • ½ teaspoon sugar
      • ¼ teaspoon salt
      • ¼ cup shrimp paste
      Instructions
      1. Heat-up the grill. Grill the eggplant, onion, and tomato. The onion and tomato should only be grilled for 3 minutes per side, while the eggplant should be grilled longer until the inner part is fully cooked and soft. This should take around 10 to 12 minutes per side or more.
      2. Once the eggplant, tomato, and onion are done, peel the skin from the eggplant and slice. Slice the tomato and onion, as well. Arrange in a serving plate.
      3. Combine vinegar, sugar, salt, and ground black pepper in a bowl. Stir. Make sure that the salt and sugar dissolves completely. Pour over the tomato, eggplant, and onion.
      4. Serve with shrimp paste on the side.
      5. Share and enjoy


      Ensaladang Filipino Recipe

      Want to start your own blog?

      We can help. Click this link to view the tutorial on How to Create a Food Blog .

      The post Ensaladang Filipino Recipe appeared first on Panlasang Pinoy.

      Laing with Shrimp Recipe

      $
      0
      0

      Laing with Shrimp is not your typical laing recipe because it makes use of shrimp as an additional ingredient. It might have been common to use shrimp and other seafood ingredients in some version of laing, but the original laing version rarely use shrimp.

      Laing with Shrimp Recipe

      I have been experimenting with many versions of laing this past few years, and I can say that nothing beats the original version because it is simple and straight forward. However, we need to keep pace with the rest of the world and understand that each of us has a different preference when it comes to food. This laing with shrimp recipe does not intend replace the original version (which I really like). Instead, consider this as an additional option that you can enjoy along with the previous versions that I have shared.

      Aside from using shrimp, you can also try using crawfish. You can also do lobster (only if you are from the East coast or if you can get lobster at a reasonable price). I understand that most of us are busy (In fact, I was cooking this while trying to do my pending office tasks at home), so we should lean mostly on readily available ingredients, for convenience. I used ready to eat bottle shrimp paste (bagoong). You can purchase your favorite brand. I also made use of coconut milk in can and Sriracha sauce. The shrimp, on the other hand, were frozen for 3 days. I got them  from the Filipino store. I was there not to shop for food, but to buy the pink liquid that they use for manicure/pedicure. I cannot complain because the command came from a higher authority (it’s from my wife). I don’t want to go home empty handed, so I grabbed the frozen shrimp and a pack of dried taro leaves. Good thing I still have around 10 cans of coconut milk in the pantry.

      Laing with Shrimp-2

      Try this Laing with Shrimp Recipe. Let me know what you think.

      Laing with Shrimp Recipe
       
      Author: 
      Nutrition Information
      • Serves: 8
      • Serving size: 8
        Prep time: 
        Cook time: 
        Total time: 
        Ingredients
        • 1 lb. shrimp
        • ¼ lb. sliced pork (optional)
        • 1 pack (3.5 oz) dried taro leaves
        • 4 cans (8 cups) coconut milk
        • ½ cup shrimp paste (bagoong)
        • 1 tablespoons red chili flakes or 1 tablespoon Sriracha sauce
        • 1 medium yellow onion, sliced
        • ½ cup sliced ginger
        • 8 to 10 cloves crushed garlic
        Instructions
        1. In a large cooking pot, combine the 8 cups coconut milk, pork, onion, shrimp paste, ginger, and garlic. Turn the heat on and then place the cooking pot over the stove and start to boil the mixture.
        2. Once you see that the coconut milk starts to boil, gently stir. Let it boil completely and cover. Simmer (cook near boiling temp) for 18 minutes.
        3. Add the dried taro leaves (gabi leaves). Let it stay for 10 to 12 minutes in low to medium heat. Do not stir, but you can try to push the taro leaves so that it gets coated with coconut milk.
        4. After 15 minutes or when the leaves absorbed the coconut milk, you can start to stir the mixture. Cook for 8 to 10 minutes.
        5. Add the chili flakes (or Sriracha sauce) and shrimp. Stir and cook for 8 to 10 minutes. Transfer to a serving plate. Serve. Share and enjoy!


        Laing with Shrimp

        Want to start your own blog?

        We can help. Click this link to view the tutorial on How to Create a Food Blog .

        The post Laing with Shrimp Recipe appeared first on Panlasang Pinoy.

        Crock Pot Pork Adobo

        $
        0
        0

        Crock Pot Pork Adobo or Slow Cooked Pork Adobo is the most tender adobo dish that I’ve ever had. Imagine slow cooking pork adobo for 5 hours or more — It’s tasty, super tender, and worth the wait. I could not ask for more, but then I had hard boiled eggs to go with it. I feel like the luckiest man on earth (wink).

        Pork Adobo with Egg-2

        I started out by combining the pork with all the seasonings and quickly marinated it for around 30 minutes. I did this to make sure that the pork absorbs more flavor. I had the crock pot going in the morning,and my crock pot pork adobo was ready for lunch. You would think that I will eat tons of rice with this dish, but I did not. The pork was so tender and I was reminded of the best pulled pork sandwich that I really like. I thought that having my slow cooked pork adobo with French roll will be a good choice — and it was. I had the hard boiled egg as a side though.

        Pork Adobo with Egg Marinade

        This crock pot pork adobo recipe is best for those who love good food, but are having a hard time chewing the meat. If you get to try this recipe, you will experience how the pork literally melts in your mouth (as long as you use pork shoulders and slow cook it for 5 to 8 hours). The fat from the pork shoulder keeps it moist the entire time and helps it taste better.

        Try this Crock Pot Pork Adobo Recipe. Let me know what you think.


        Crock Pot Pork Adobo
         
        Author: 
        Nutrition Information
        • Serves: 8
        • Serving size: 8
          Prep time: 
          Cook time: 
          Total time: 
          Ingredients
          • 4 lbs. pork shoulder, sliced into cubes
          • ½ cup soy sauce
          • 1 tablespoon minced garlic
          • 1½ cup beef broth
          • 6 pieces dried bay leaves
          • 1 tablespoon oyster sauce
          • 2 teaspoons whole peppercorn
          • 6 pieces hard boiled eggs, peeled
          • ¼ cup cane or apple cider vinegar
          • 1 teaspoon granulated white sugar
          • Salt to taste
          Instructions
          1. Combine the pork shoulder, soy sauce, garlic, bay leaves, sugar, oyster sauce, and whole peppercorn in a bowl. Mix well. Let it stay for at least 30 minutes so that the pork can absorb the flavors.
          2. Transfer the content of the bowl to a slow cooker or crock pot. Pour-in the beef broth. Set the level to high, cover, and slow cook for 5 hours.
          3. Add the vinegar and salt. Continue to slow cook for 30 minutes to 1 hour.
          4. Add the boiled eggs. Transfer to a serving bowl.
          5. Serve. Share and enjoy!


          Pork Adobo with Egg

          Want to start your own blog?

          We can help. Click this link to view the tutorial on How to Create a Food Blog .

          The post Crock Pot Pork Adobo appeared first on Panlasang Pinoy.

          Ginataang Alimasag with Malunggay

          $
          0
          0

          Ginataang alimasag with Malunggay was perfect for dinner tonight. Although the name of the dish did not include the butternut squash, this ingredient is still as important as the main ingredients. I thought that this dish was successful even if the preparation was really simple.

          Ginataang Alimasag with Malunggay Recipe

          Preparing Ginataang alimasag with Malunggay is like cooking your traditional laing. You do not need to sauté the ingredients and there are no extra steps needed to complete the dish. All you have to do is combine most of ingredients with coconut mil and cream as it boils, and then add the rest one after the other – that’s all.

          Ginataang Alimasag with Malunggay

          I used frozen small crabs, which I got, from the Korean store. I think that this recipe is worthy of Dungeness crabs, and I plan to use this ingredient one of these days. If you are fond of dishes cooked in coconut milk (especially crab) and you are on a diet, you can ignore me for a while. I don’t intend to tempt you, but I am sure that it will be hard for you to resist it.

          Try this Ginataang alimasag with Malunggay Recipe. Let me know what you think.

          Ginataang Alimasag with Malunggay
           
          Author: 
          Nutrition Information
          • Serves: 6
          • Serving size: 6
            Prep time: 
            Cook time: 
            Total time: 
            Ingredients
            • 2 lbs. medium crab, cleaned and sliced in half
            • 1½ cup malunggay leaves
            • ½ medium butternut squash, cubed
            • 2 cups (1can) coconut cream
            • 2 cups (1 can) coconut cream
            • ¼ cup ginger, sliced into thick strips
            • 4 cloves garlic, crushed
            • 1 medium yellow onion, sliced
            • ¼ cup shrimp paste (bagoong)
            • 1 tablespoon fish sauce (patis), optional
            • ¼ teaspoon ground black pepper
            Instructions
            1. Combine the coconut cream, coconut milk, onion, ginger, and garlic in a cooking pot. Let boil. cover and simmer for 15 to 20 minutes.
            2. Add the shrimp paste. Stir. Cover and cook for 5 minutes.
            3. Add the butternut squash. Stir, cover, and continue to cook for 12 minutes in low to medium heat.
            4. Put-in the ground black pepper. Stir.
            5. Add the malunggay leaves. Cook for 5 minutes.
            6. Put-in the crabs and long green chili. Stir and continue to cook for 12 to 15 minutes or until the sauce thickens. Add fish sauce, if needed.


            Ginataang Alimasag with Malunggay Recipe 2

            Want to start your own blog?

            We can help. Click this link to view the tutorial on How to Create a Food Blog .

            The post Ginataang Alimasag with Malunggay appeared first on Panlasang Pinoy.

            Pork Adobo Paksiw with Jeprox and Shrimp Fried Rice

            $
            0
            0

            Pork Adobo Paksiw with Jeprox and Shrimp Fried Rice is more than complete for breakfast or even brunch. It is the ideal Pinoy Breakfast, if you have a big day ahead. The combination of all the dishes blended well. I enjoyed this meal and I had enough energy for more than half of the day. I even skipped lunch since I still was not hungry and just had a light snack in the afternoon. I guess that eating like a king during breakfast really pays well.

            Pork Paksiw with Jeprox and Fried Rice Breakfast

            I first tried the pork adobo paksiw and the fried rice. By the way, the pork was really tender and the dish was magnificent — eating it with fried rice makes me eat more, so  I had to control myself. The crispy fried daing (jeprox) gave the entire meal that nice crispy texture. It was some kind of intermission for me because I had it after every spoonful of pork adobo paksiw and rice. Imagine enjoying the mild flavor of the jeprox that was made spicy because of the vinegar slowly spreading in your mouth as you indulge in it — and how can we forget the nice crispy texture that literally creates a sound in every bite. This has been an awesome Pinoy breakfast for me.

            Let us not take the the hard boiled egg out of the picture. I finished off the entire Pinoy breakfast meal with a piece of perfectly boiled egg. This helps balance the flavor and all the excitement that is going-on in my palate. I also had an extra boost of protein and energy. Some of you prefer to eat dishes with sauces. I like too, but I tend to eat more rice though. If you want to make the hard boiled egg taste even better, I recommend that you turn it to a dish called Sarciadong Itlog (boiled egg with sauce). It is quick to prepare, easy and yummy. By the way, you can do the same thing with daing (dried fish), the recipe is called sarciadong daing or fried dried fish with sauce.

            Pork Paksiw with Jeprox and Fried Rice Breakfast Meal

            Try to have this meal composed of Pork Adobo Paksiw with Jeprox and Shrimp Fried Rice. Let me know how you liked it.

            Pork Adobo Paksiw with Jeprox and Shrimp Fried Rice
             
            Author: 
            Nutrition Information
            • Serves: 4
            • Serving size: 4
            Prep time: 
            Cook time: 
            Total time: 
            Instructions
            1. Prepare the Pork Adobo Paksiw, crisp fried jeprox, and shrimp fried rice. See the recipe for each dish in the link provided above.
            2. In a single serve plate, arrange 1 cup of shrimp fried rice along with some yummy pork adobo paksiw and crispy fried jeprox.
            3. Serve with a piece of hard boiled egg.
            4. Share and enjoy!


            Yummy Pork Paksiw with Jeprox and Fried Rice Breakfast Meal

            Want to start your own blog?

            We can help. Click this link to view the tutorial on How to Create a Food Blog .

            The post Pork Adobo Paksiw with Jeprox and Shrimp Fried Rice appeared first on Panlasang Pinoy.

            Grilled Liempo Sisig Recipe

            $
            0
            0

            There are hundreds of ways to make sisig, and Grilled Liempo Sisig is just one of the ways. This delicious sisig version (which is very tasty, by the way) makes use of grilled pork belly. I am referring to the Filipino style inihaw na liempo which is an awesome dish by itself. Can you imagine a dish better than that? This Grilled Liempo sisig might be the leveled-up version – something like grilled liempo in super saiyan mode. I’m sure that you get what I am saying. If you don’t, just jump ahead to the recipe below and start cooking to experience what I am saying (see, it even rhymes) :).

            Grilled Liempo Sisig

            Try this Grilled Liempo Sisig Recipe. Let me know what you think.

            Grilled Liempo Sisig Recipe
             
            Author: 
            Nutrition Information
            • Serves: 4
            • Serving size: 4
            Prep time: 
            Cook time: 
            Total time: 
            Ingredients
            • 1 lb. Filipino style grilled pork belly, sliced into serving pieces
            • 2 ounces chicken liver
            • 1 large yellow onion
            • 1 teaspoon garlic powder
            • 3½ tablespoons margarine
            • 1 tablespoon mayonnaise
            • Salt and ground black pepper to taste
            • 1 teaspoon chopped green onion
            • 1 piece egg
            Instructions
            1. Sprinkle ½ teaspoon garlic powder, some salt and ground black pepper all over the chicken liver. Let it stand for 10 minutes.
            2. Meanwhile, melt 1 tablespoon margarine on pan.
            3. Once the margarine start to melt and gets hot, pan fry the chicken liver in medium heat for 3 to 4 minutes per side. It will be best if you do not slice the chicken liver yet so that it will be easier to pan-fry. Remove the chicken liver from the pan. Set aside.
            4. Place the sliced grilled liempo in a food processor. Grind the pork and then place in a bowl. Set aside.
            5. Using the same food processor, chop the onion until it is cut into very small pieces (minced). Set the onion aside.
            6. Put the fried chicken liver in the food processor and then add the mayonnaise. Grind until the texture of the mixture becomes soft. set aside.
            7. Melt the remaining margarine using the pan that you used to fry the chicken liver. Once the margarine becomes hot, saute the minced onion until it becomes soft.
            8. Add the minced grilled liempo.Stir and cook for 10 to 12 minutes while stirring once in a while.
            9. Put-in the chicken liver mixture. Stir to blend with the other ingredients. Cook for 8 to 12 minutes or until the mixture almost dries-up. Add the remaining garlic powder and some salt and pepper.
            10. Heat a sizzling plate (fajita plate) then melt the remaining ½ tablespoon margarine. Transfer the cooked sisig on the sizzling plate. Top with egg and green onions.
            11. Serve with sriracha sauce, soy sauce, and lemon. don't forget the rice.
            12. Share and enjoy!

            Grilled Liempo Sisig Recipe

            Want to start your own blog?

            We can help. Click this link to view the tutorial on How to Create a Food Blog .

            The post Grilled Liempo Sisig Recipe appeared first on Panlasang Pinoy.


            Deviled Egg Recipe

            $
            0
            0

            I had this Deviled Eggs for a snack and it was satisfying. This Simple Deviled Egg recipe will help you make your own with ease. If you are tired of just having boiled eggs, give it a little taste and style by making something like this.

            Devilled-Egg-3

            This deviled egg recipe is very straightforward. Expect nothing fancy, only a simple and good tasting dish that will satisfy your palate and tummy. I know that you are an expert in boiling eggs, but in case you want to learn a few more tips about it, there is a link in the recipe that shows you how to boil eggs properly.

            I recommend that you sprinkle your deviled eggs with paprika to make it taste better and give it a mild spice. You can also try to make an egg salad out of it if you prefer.

            Deviled Eggs with Salmon also sound nice. Here is the recipe just for you.

            Try this Deviled Eggs recipe. Let me know what you think.

            Deviled Egg Recipe
             
            Author: 
            Nutrition Information
            • Serves: 2
            • Serving size: 2
            Prep time: 
            Cook time: 
            Total time: 
            Ingredients
            Instructions
            1. Slice the eggs in half lengthwise. Remove the egg yolk and put it in a bowl.
            2. Mash the egg yolks using a fork.
            3. Add the mayonnaise and Dijon mustard. Mix well.
            4. Arrange the egg whites in a plate. Scoop equal amounts of the mixture into the center of each sliced eggs. Sprinkle some paprika on top.
            5. Garnish with chopped dill.
            6. Serve. Share and enjoy!

            Devilled-Egg

            Want to start your own blog?

            We can help. Click this link to view the tutorial on How to Create a Food Blog .

            The post Deviled Egg Recipe appeared first on Panlasang Pinoy.

            Simple Pancit Palabok Recipe

            $
            0
            0

            Palabok Recipe


            Simple Pancit Palabok Recipe
             
            Author: 
            Nutrition Information
            • Serves: 6
            • Serving size: 6
            Prep time: 
            Cook time: 
            Total time: 
            Ingredients
            • 1 pack (500g) Palabok noodles also called cornstarch sticks
            • ½ lb. pork shoulder or belly, sliced into small pieces
            • 4 cups beef broth
            • ¼ cup annatto seeds, soaked in ½ cup water
            • 1 piece shrimp cube or 1 tsp. shrimp powder
            • 6 ½ tablespoons all-purpose flour, diluted in ½ cup water
            • ½ cups tinapa fakes
            • 3 pieces hard boiled eggs, sliced
            • 10 pieces medium shrimp, head and shell removed
            • 1 cup chopped Napa cabbage, blanched
            • ½ cup crushed pork rinds (chicharon)
            • ½ cup chopped scallions
            • 3 tablespoons cooking oil
            • Salt and pepper to taste
            Instructions
            1. Heat the oil in a cooking pot.
            2. Once the oil gets hot, quickly pan-fry the shrimp for around 30 seconds per side. Remove the shrimp and set aside.
            3. Put-in the pork, Saute until the color turns light brown
            4. Pour-in the beef broth and add the shrimp cube (or powder). Let boil. Cover and simmer until the pork gets tender.
            5. Add the water from the soaked annatto seeds. Stir.
            6. Add the flour diluted in water. Stir the mixture and ensure that all ingredients are distributed properly. (Note: this means that the flour and water are combined and stirred thoroughly until well blended. ) Continue to cook in low to medium heat until the sauce thickens.
            7. Add 2 tablespoons tilapia flakes and some salt and pepper to taste. Stir and set aside.
            8. Now that the sauce is ready, you can start to assemble your simple pancit palabok. Arrange the noodles in a serving plate, pour the sauce over the noodles. Gently toss the noodles so that it gets coated with sauce. Top with Napa cabbage, scallions, pork rinds, shrimp, more tilapia flakes and egg.
            9. Serve. Share and enjoy!


            Palabok

            Want to start your own blog?

            We can help. Click this link to view the tutorial on How to Create a Food Blog .

            The post Simple Pancit Palabok Recipe appeared first on Panlasang Pinoy.

            Oriental Lomi Recipe

            $
            0
            0


            Lomi Recipe


            Oriental Lomi Recipe
             
            Author: 
            Nutrition Information
            • Serves: 6
            • Serving size: 6
            Prep time: 
            Cook time: 
            Total time: 
            Ingredients
            • 15 oz. fresh lomi noodles
            • 1 medium carrot chopped
            • 1 cup chopped Savoy cabbage
            • 2 pieces chinese sausage, sliced diagonally
            • ½ lb pork, thinly sliced
            • ½ cup chopped scallions
            • 1 medium onion, minced
            • 3 cloves crushed garlic
            • 3 cups chicken broth
            • 2 cups water
            • 3 tablespoons all-purpose flour diluted in ½ cup water
            • 3 tablespoons cooking oil
            • 1 egg
            • Salt and pepper to taste
            Instructions
            1. Heat the oil in a cooking pot.
            2. Once the oil gets hot, saute the onion and garlic. Make sure that the garlic do not get burnt.
            3. When the onion gets soft, add the pork. Cook until the color turns light brown.
            4. Put-in the Chinese sausage. Cook for 1 minute.
            5. Pour-in the chicken broth and water. Let boil. Cover and simmer for 30 minutes.
            6. Put-in the lomi noodles. Cook for 15 to 18 minutes. Note: the fresh lomi noodle that I got from the Asian store is labelled "Miki" although it is really lomi. You might encounter the same if you are in the US.
            7. Add the carrot. Cook for 5 minutes.
            8. Put-in the savoy cabbage and scallions. Stir. Cook for 3 minutes.
            9. Add the flour diluted in water. Yes, this is flour that we are using this time, although I know that most of us are used to cornstarch. Cook while stirring until the sauce thickens a bit.
            10. Add salt and pepper to taste.
            11. Transfer to a serving plate. Serve.
            12. Share and enjoy!


            Lomi

            Want to start your own blog?

            We can help. Click this link to view the tutorial on How to Create a Food Blog .

            The post Oriental Lomi Recipe appeared first on Panlasang Pinoy.

            Simple Sun-Dried Tomato and Basil Spaghetti

            $
            0
            0

            Pasta dishes are fast and easy to prepare. Simple Sun-Dried Tomato and Basil Spaghetti is no exception. This delicious and simple spaghetti can be done in less than 30 minutes. It is also budget friendly. I find it perfect when paired with white wine such as Chardonnay or Pinot grigio.

            Spaghetti with Sun-Dried Tomato and Basil

            I am using uncooked spaghetti for this recipe. Simply follow the package instructions  to cook your pasta. Once the pasta is cooked al dente and the water is drained, all you need to do is throw-in the rest of the ingredients, toss, and enjoy.

            I also had a similar version which I call Frugal Spaghetti. It is similar in a way because it also makes use of tomato and basil, although these are fresh, not sun-dried.

            Try this Simple Sun-Dried Recipe. Let me know what you think.

            Simple Sun-Dried Tomato and Basil Spaghetti
             
            Author: 
            Nutrition Information
            • Serves: 4
            • Serving size: 4
            Prep time: 
            Cook time: 
            Total time: 
            Ingredients
            • 1 lb. spaghetti noodles
            • 3/4 cup chopped sun-dried tomato (bottled with oil)
            • 1 tablespoon dried (chopped) basil
            • 2 tablespoons extra virgin olive oil
            • 1/2 cup grated Parmesan cheese
            Instructions
            1. Cook the spaghetti according to package instructions. Arrange in a large mixing bowl.
            2. Drizzle the olive oil. Toss.
            3. Add the tomato and basil. Toss and make sure that all the ingredients are well blended. Note: you can also use chopped fresh basil. If you are using fresh basil, use at least 8 leaves.
            4. Mix-in the Parmesan cheese. Transfer to a pasta bowl.
            5. Serve. Share and enjoy!


            Spaghetti with Sun-Dried Tomato and Basil Recipe

            Want to start your own blog?

            We can help. Click this link to view the tutorial on How to Create a Food Blog .

            The post Simple Sun-Dried Tomato and Basil Spaghetti appeared first on Panlasang Pinoy.

            Sweet Pepper Relyeno Recipe

            $
            0
            0

            Sweet Pepper Relyeno or Stuffed Sweet Peppers is an appetizer or main dish consisting of mini sweet peppers and ground pork. The ground pork was combined with spices and seasonings (which is somewhat similar to the mix in Lumpiang Shanghai), topped over the sweet pepper, pan-fried, and finished-up by baking.

            Sweet Pepper Relyeno


            Please do not confuse this with Stuffed Mussels. Both look the same because the peppers have the same shape as the shells. I like this dish because of the nice overall blend of flavors. The pork tasted really good, while having it with sweet peppers made it even better. You might want to have this with ketchup, but I think that having this dish without any condiment will suffice.

            Try this Sweet Pepper Relyeno Recipe. Let me know what you think.

            Sweet Pepper Relyeno Recipe
             
            Author: 
            Nutrition Information
            • Serves: 6
            • Serving size: 6
            Prep time: 
            Cook time: 
            Total time: 
            Ingredients
            • 10 pieces sweet peppers, sliced into half lengthwise and seeds removed
            • 1 lb. ground pork
            • 1/2 cup plain breadcrumbs
            • 3 pieces eggs
            • 3/4 cup Panko breadcrumbs
            • 1 medium yellow onion, minced
            • 1/2 cup minced carrot
            • 1 teaspoon garlic powder
            • Salt and ground black pepper to taste
            • 1/4 cup cooking oil
            Instructions
            1. Prepare the stuffing by combining the ground pork, 1 piece egg, minced onion and carrot, salt, ground black pepper, and garlic powder in a bowl. Mix well.
            2. Scoop around 1 1/2 tablespoons (or more) of the mixture and arrange it over the sliced sweet pepper. Gently press the mixture to keep it intact.
            3. Meanwhile, heat the cooking oil in a pan.
            4. While the oil is heating, beat the remaining 2 eggs. Dip the sweet pepper with ground pork in the egg and roll it over the Panko bread crumbs. Make sure that the top is fully coated with the bread crumbs.
            5. Pan fry the sweet pepper with breadcrumbs in medium heat until the breadcrumbs turns light to medium brown. Turn it over and cook the other side (side without the stuffing) for 2 minutes. Remove from the pan. Arrange in a baking tray lined with Aluminum foil.
            6. Preheat the oven to 350F.
            7. Bake the pan fried sweet peppers for 25 minutes.
            8. Remove from the oven. Arrange in a plate lined with paper towels.
            9. Serve with ketchup. Share and enjoy!


            Sweet Pepper Relyeno Recipe

            Want to start your own blog?

            We can help. Click this link to view the tutorial on How to Create a Food Blog .

            The post Sweet Pepper Relyeno Recipe appeared first on Panlasang Pinoy.

            Dutch Oven Pork Stew Recipe

            $
            0
            0

            I enjoyed having this Dutch Oven Pork Stew for dinner. It is delicious and the meat is very tender. Another good thing about this stew dish is that I do not need to keep an eye on it while cooking. I had extra time doing household chores while waiting for my dinner to be ready.

            Dutch Oven Pork Stew

            I made use of pork belly for this recipe. You can also use pork shoulder or other parts with fat. The fat helps keep the pork moist and flavorful. You do not need to eat the fat, but if you try then you’ll be surprised how the fat literally melts in your mouth. I had this with rice and it was a blast.

            Dutch Oven Pork

            It was really easy to cook Dutch Oven Pork Stew. I simply used the stovetop for the first few minutes to saute the onion and garlic, and to partially cook the pork. Once done, I place the remaining ingredients in the Dutch oven and put it in the conventional oven to cook. That’s it. I just noticed that the color of my Dutch oven and the inside of my conventional oven were the same. I thought that it was neat.

            You can also refer to this dish as pork afritada, just add potato if you want. You can also convert it to pork kaldereta by adding some liver spread or liver pate, green olives, carrots, and potato.

            Try this Dutch Oven Pork Stew Recipe. Let me know what you think.

            Dutch Oven Pork Stew Recipe
             
            Author: 
            Nutrition Information
            • Serves: 6
            • Serving size: 6
            Prep time: 
            Cook time: 
            Total time: 
            Ingredients
            • 2 lbs. pork belly, sliced
            • 1 1/2 cup frozen green peas
            • 5 pieces sweet pepper, sliced in half and seeds removed
            • 1 (8 oz.) can tomato sauce
            • 2 cups beef broth
            • 1 medium onion, minced
            • 4 cloves garlic, crushed
            • 3 tablespoons cooking oil
            • Salt and pepper to taste
            Instructions
            1. Preheat the oven (conventional oven) to 350F.
            2. Heat a Dutch oven in a stovetop.
            3. Pour-in the cooking oil.
            4. Once the oil gets hot, saute the onion and garlic.
            5. Add the pork belly slices. Cook until the pork turns light brown. Turn-off the fire or heat from the stovetop.
            6. Pour the tomato sauce and beef broth in the Dutch oven. Add the peppers and peas. Cover and place inside the conventional oven. Let it stay inside the oven for 2 hours at 350F.
            7. Remove from the oven, add salt and pepper to taste.
            8. Serve. Share and enjoy!


            Dutch Oven Pork Stew Recipe

            Want to start your own blog?

            We can help. Click this link to view the tutorial on How to Create a Food Blog .

            The post Dutch Oven Pork Stew Recipe appeared first on Panlasang Pinoy.

            Mongolian Beef

            $
            0
            0

            Cooking Mongolian Beef is easier than what you might be expecting. Okay, it looks delicious and complicated, I assure you that this tastes good, but it is very easy to prepare. If you are new to cooking or about to try your first dish, this Mongolian Beef Recipe is perfect for you. If you insist, You can thank me later by sharing this post to your social group.

            Mongolian Beef

            Mongolian Beef Reminds me of Beijing Beef from Panda Express. It also makes me think of Stir Fry Ginger Beef and Pepper Steak. All of these dishes that I mentioned are great with fried rice.

            Try this Mongolian Beef Recipe.Let me know what you think.

            Mongolian Beef
             
            Author: 
            Nutrition Information
            • Serves: 3
            • Serving size: 3
            Prep time: 
            Cook time: 
            Total time: 
            Ingredients
            • 1 lb. sirloin or flank steak thinly sliced and cut into serving pieces
            • 1 thumb minced ginger
            • 2 teaspoons garlic, minced
            • 3/4 cup chopped scallions
            • 2 tablespoons soy sauce
            • 1 teaspoon brown sugar
            • 3 teaspoons cornstarch
            • 1 tablespoon Chinese cooking wine or sherry
            • 1 tablespoon hoisin sauce
            • 1 1/2 teaspoon vinegar (white, rice, or cane)
            • A bit of Sriracha sauce (optional)
            • 1/4 teaspoon sesame oil (optional)
            • 1/2 teaspoon salt
            • 1/4 teaspoon white pepper powder
            • 3 tablespoons cooking oil
            Instructions
            1. Season the beef with 1/4 teaspoon salt and 1/8 teaspoon white pepper. Let it stay for 10 minutes.
            2. Heat the oil in a frying pan.
            3. Dust the beef in 2 teaspoon cornstarch. I do this by combining the beef and cornstarch in a resealable bag, seal the bag with some air inside, and shake the bag until the beef is coated.
            4. Pan-fry the beef in medium heat for 1 minute per side. Do this in batches so that the beef gets cooked properly and the pan does not get over crowded. Remove the pan-fried beef from the pan. Set aside.
            5. Combine soy sauce, sugar,1 teaspoon cornstarch, cooking wine, hoisin sauce, vinegar, Sriracha, sesame oil, and remaining salt and pepper in a bowl.Mix well and set aside.
            6. On the same pan with remaining oil, add the garlic and ginger. Stir and cook until the garlic turns light brown.
            7. Put-in the beef. Stir.
            8. Pour-in the soy sauce mixture. Quickly stir and cook until the sauce gets thick.
            9. Add the scallions. Cook for 1 minute.
            10. Transfer to a serving plate.
            11. Serve with white rice. Share and enjoy!


            Mongolian Beef Recipe

            Want to start your own blog?

            We can help. Click this link to view the tutorial on How to Create a Food Blog .

            The post Mongolian Beef appeared first on Panlasang Pinoy.


            Chicken Liver and Gizzard Adobo

            $
            0
            0

            Chicken Liver and Gizzard Adobo is known locally in the Philippines as Adobong Atay at Balun-balunan. This is a traditional Filipino dish cooked inadobo style. This is a simple and budget friendly Filipino recipe that is worth trying.

            Chicken Liver and Gizzard Adobo_

            This recipe has a little deviation from the original recipe because I dredged the liver in flour and pan-fried it first before making it into an adobo dish. The traditional recipe do not do it this way. I deviated in order to give the liver a better texture and to thicken the sauce of this adobo dish. I also love the flavor of fried chicken liver and I thought that it helped improved the overall taste of the dish.

            You see, chicken liver is full of flavor; it is the reason why Sisig recipes always call for it. Imagine how flavorful this dish is, and that is why I had my rice consumption doubled when I had it.

            Try this Chicken Liver and Gizzard Adobo Recipe (Adobong Atay at Balun-balunan). Let me know what you think.

            5.0 from 1 reviews
            Chicken Liver and Gizzard Adobo
             
            Author: 
            Nutrition Information
            • Serves: 6
            • Serving size: 6
              Prep time: 
              Cook time: 
              Total time: 
              Ingredients
              • 1 lb. chicken gizzard
              • 1 lb. chicken liver
              • 1/2 cup all-purpose flour
              • 1/2 cup soy sauce
              • 1/4 cup white vinegar
              • 1 teaspoon garlic powder
              • 4 to 6 pieces dried bay leaves
              • 1 teaspoon whole peppercorn
              • 4 to 5 cloves crushed garlic
              • 3/4 cup water
              • Salt to taste
              • 2 tablespoons chopped green onion
              • 4 tablespoons cooking oil
              Instructions
              1. Boil the chicken gizzard in 4 cups of water (covered) for 60 to 90 minutes. Drain the water and set aside.
              2. Sprinkle 1 teaspoon garlic powder and 1/4 teaspoon salt all over the chicken liver. Let it stay for 10 minutes.
              3. Heat the cooking oil in a frying pan.
              4. Dredge the chicken liver in all-purpose flour. Pan fry for 2 minutes per side. Remove the pan-fried chicken liver. Set aside.
              5. On the same pan using the remaining oil, add the garlic, Cook until the color turns light brown.
              6. Put-in the gizzard and pan-fried liver. Stir.
              7. Add the soy sauce and water. Let boil.
              8. Add the bay leaves and whole peppercorn. Cover and simmer for 15 to 20 minutes.
              9. Add the vinegar. Let the liquid re-boil. Stir and cook for 5 minutes.
              10. Turn the heat off. Transfer to a serving plate.
              11. Serve. Share and enjoy!


              Chicken Liver and Gizzard Adobo Recipe

              Want to start your own blog?

              We can help. Click this link to view the tutorial on How to Create a Food Blog .

              The post Chicken Liver and Gizzard Adobo appeared first on Panlasang Pinoy.

              Simple Ube Halaya Recipe

              $
              0
              0

              Ube Halaya is a type of Filipino Dessert made from purple yam. There are quite a few ways of preparing this dish. Some Ube halaya version makes use of condensed milk to cook the yam with, while others depend on coconut milk. This version only uses 3 major ingredients: purple yam, coconut milk, and sugar. Although it sounds really simple to prepare (which is true), the outcome is something that you should look forward to.

              Ube Halaya Recipe


              Ube Halaya can be eaten as it is for dessert. It is sweet and has a thick sticky texture. It is also one of the ingredients of a favorite Filipino Summer Dessert called Halo-halo.  I enjoy ube halaya either by itself, with halo-halo (its perfect during warm weather), and sometime I eat it as a spread. I top it on saltine crackers and snack on it. How about you, how do you eat your ube halaya?

              If you will refer to the recipe below, you’ll notice how easy it is to make your own Ube Halaya dish. However, I need to advise you to be a little patient when it comes to stirring the mixture until it gets thick. It took around 25 minutes to get the texture that I wanted. This means that I have to stir every minute to prevent the mixture from sticking on the bottom of the pot.

              I just remembered how I liked this with cold leche flan. I eat this by combining both the halaya and leche flan in a spoon (and it is really a spoon full) and munch on it. It’s really yummy!!!

              Ube Halaya in Llanera

              Try this Simple Ube Halaya Recipe. Let me know what you think

              4.0 from 2 reviews
              Simple Ube Halaya Recipe
               
              Author: 
              Nutrition Information
              • Serves: 4
              • Serving size: 4
                Prep time: 
                Cook time: 
                Total time: 
                Ingredients
                • 1 lb. grated purple yam
                • 2 cups coconut milk
                • 3/4 cup granulated white sugar
                • 1 teaspoon cooking oil
                Instructions
                1. Pour the coconut milk in a cooking pot. Bring to a boil.
                2. Once the coconut milk start to boil, add the sugar. Stir until the sugar dilutes completely.
                3. Put-in the grated purple yam. Continue to cook while stirring (using low to medium heat) until the texture gets thick. Note: It will take around 20 to 30 minutes. Please be patient.
                4. Grease the llanera with cooking oil. Transfer the ube halaya to the greased llanera to mold it into shape.
                5. Let it cool down to room temperature. You can serve it immediately of place it in the refrigerator (covered with cling sap).
                6. Share and enjoy!

                Ube Halaya_

                Want to start your own blog?

                We can help. Click this link to view the tutorial on How to Create a Food Blog .

                The post Simple Ube Halaya Recipe appeared first on Panlasang Pinoy.

                Teriyaki Chicken Lettuce Wrap

                $
                0
                0

                One of the best appetizers that I had is Teriyaki Chicken Lettuce Wrap. It is flavorful and delicious, and easy to make. This is something that you should include in your meal plan especially this spring and summer.

                Teriyaki Chicken Lettuce Wrap

                This chicken lettuce wrap recipe makes use of our tried and tested chicken teriyaki. We are also making our own teriyaki sauce, but you can always get bottled teriyaki sauce from the supermarket if you want to save time.

                Butter lettuce is my preferred lettuce variety in all my lettuce wraps because I love its crisp texture and taste. It is up to you to choose the type of lettuce that you will use.

                Try this Teriyaki Chicken Lettuce Wrap Recipe. Let me know what you think.

                Teriyaki Chicken Lettuce Wrap
                 
                Author: 
                Nutrition Information
                • Serves: 6
                • Serving size: 6
                  Prep time: 
                  Cook time: 
                  Total time: 
                  Ingredients
                  • 1 serving chicken teriyaki (click here for the recipe)
                  • 1 whole butter leaf lettuce or iceberg lettuce, cleaned and leaves separated
                  • 1/2 serving teriyaki sauce (click here for the recipe) Note: use only half the amount indicated in the recipe.
                  • 1/2 cup carrots, julienne
                  • 1 teaspoon sesame seeds
                  • 1/4 cup chopped scallions
                  • 1/2 teaspoon minced ginger
                  • 1 tablespoon cooking oil
                  Instructions
                  1. Prepare the teriyaki chicken using the recipe link above. Chop the teriyaki chicken breasts into cubes. Set aside.
                  2. Heat the cooking oil in a pan.
                  3. Add the ginger. Saute for 20 seconds.
                  4. Add the chopped chicken teriyaki, carrot, 1/2 teaspoon sesame seeds, and teriyaki sauce. Stir. Cook for 1 to 3 minutes. Remove from the pan and transfer to a plate.Let it cool.
                  5. Scoop the chicken mixture and place on a piece of lettuce. Arrange the lettuce in a serving plate. Top with remaining sesame seeds and chopped scallions.
                  6. Serve as an appetizer.


                  Teriyaki Chicken Lettuce Wrap Recipe

                  Want to start your own blog?

                  We can help. Click this link to view the tutorial on How to Create a Food Blog .

                  The post Teriyaki Chicken Lettuce Wrap appeared first on Panlasang Pinoy.

                  Sausage Macaroni Pasta

                  $
                  0
                  0

                  Sausage Macaroni Pasta is a delicious dish that you can make over the weekend. Since it is almost summer and the weather is almost perfect here in the midwest, I had time to grill almost all day long. Grilled Italian sausage was on my list because I really wanted to have Sausage Macaroni Pasta for dinner. I like this dish and I planned ahead to make it, so here it is.

                  Sausage Macaroni Pasta

                  Preparing sausage macaroni pasta is easier than making spaghetti with meatball. Although I made my own marinara sauce, you can skip this step by buying it from the supermarket. It can save you time and a bit of effort. As for the sausage, I got it ready-made from my local grocery store. I thought that is is more practical to buy it than to make it from scratch.

                  I had a great time grilling the sausage while my entire family helped me with the macaroni and marinara sauce. It is really fun to cook with your loved ones and it makes your meal more memorable and enjoyable. I think that since they love pasta, we can do a quick tuna casserole next time.

                  Grilled Sausage

                  Try this Sausage Macaroni Pasta Recipe. Let me know what you think.

                  Sausage Macaroni Pasta
                   
                  Author: 
                  Nutrition Information
                  • Serves: 4
                  • Serving size: 4
                  Prep time: 
                  Cook time: 
                  Total time: 

                  Ingredients
                  • 5 pieces grilled Italian sausage, sliced diagonally
                  • 1 serving (3 1/2 cups) marinara sauce (see recipe here)
                  • 1 lb elbow macaroni
                  • 2 tablespoons butter
                  • 1/2 teaspoon dried basil
                  • 1/4 cup Parmesan cheese
                  Instructions
                  1. Cook the macaroni according to package instructions. Separate the cooked macaroni from the liquid, but do not discard the liquid.
                  2. Heat the butter in a pan.
                  3. Once the butter melts and starts to heat-up, add the sausage. Cook in medium heat for 1 minute.
                  4. Pour-in the marinara sauce and add the dried basil. Stir and cook for 3 minutes. Turn off the heat.
                  5. Meanwhile, prepare individual servings by scooping around 3/4 cups of sauce in a pan. Heat-up the pan. Once the sauce starts to boil, add around 1 1/2 cups of macaroni. Stir. Pour-in around 2 to 3 tablespoons of liquid that you used to boil the pasta. Stir and continue to cook for 2 minutes.
                  6. Transfer in a serving plate. Top with grated Parmesan cheese.
                  7. Serve. Share and enjoy!


                  Sausage Macaroni Pasta Recipe


                  Want to start your own blog?

                  We can help. Click this link to view the tutorial on How to Create a Food Blog .

                  The post Sausage Macaroni Pasta appeared first on Panlasang Pinoy.

                  Lo Mein with Beef and Broccoli

                  $
                  0
                  0

                  Lo Mein with Beef and Broccoli

                  Lo Mein with Beef and Broccoli
                   
                  Author: 
                  Nutrition Information
                  • Serves: 4
                  • Serving size: 4
                  Prep time: 
                  Cook time: 
                  Total time: 

                  Ingredients
                  • 8 oz. dried egg noodles cooked according to package instructions
                  • 1/2 lb beef sirloin, thinly sliced
                  • 1/2 teaspoon minced ginger
                  • 1 1/2 cups broccoli florets
                  • 5 tablespoons light soy sauce
                  • 1 tablespoon oyster sauce
                  • 1/4 teaspoon garlic powder
                  • 1 tablespoon cornstarch
                  • 1 teaspoon brown sugar
                  • 2 tablespoons sherry cooking wine
                  • Salt and pepper to taste
                  • 2 tablespoons cooking oil
                  Instructions
                  1. Combine soy sauce, sherry, and garlic powder in bowl. Mix well. Put-in the beef. Let it stay for 15 minutes.
                  2. Add the cornstarch in the bowl with the beef. Mix well.
                  3. Meanwhile, cook the egg noodles according to package instructions. Set aside.
                  4. Heat the cooking oil in a pan. Once the oil gets hot, saute the marinated beef. Cook for 3 to 5 minutes.
                  5. Add the broccoli. Cook for 2 minutes.
                  6. Add the cooked egg noodles. Toss and cook for 2 to 5 minutes.
                  7. Mix the oyster sauce, remaining soy sauce, sugar, ginger, salt and pepper in a bowl.
                  8. Pour the mixture on the noodles with beef. Cook for 5 to 7 minutes in medium heat while tossing once in a while.
                  9. Transfer to a serving plate.
                  10. Serve. Share and enjoy!


                  Lo Mein with Beef and Broccoli Recipe

                  Want to start your own blog?

                  We can help. Click this link to view the tutorial on How to Create a Food Blog .

                  The post Lo Mein with Beef and Broccoli appeared first on Panlasang Pinoy.

                  Viewing all 460 articles
                  Browse latest View live