Quantcast
Channel: Recipes – Panlasang Pinoy
Viewing all 460 articles
Browse latest View live

Pork Adobo Flakes

$
0
0

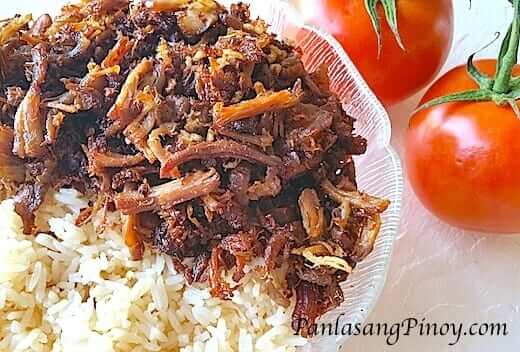
I like to have Pork Adobo Flakes for breakfast. It is perfect with garlic fried rice and a cup of coffee. It is also a good way to recycle leftover pork adobo. Some like it crispy, while other like the texture to be just right. This pork adobo flakes recipe is neither crispy nor soft; it is somewhat in the middle.

pork adobo flakes recipe

This pork adobo flakes was not made in my kitchen. We had a vacation a couple of weeks back at Disney World. My mom came to visit us and the kids wanted to see Elsa and Ana, so we made the trip. I had the chance to cook adobo in the villa. . I do this all the time when in these types of places because it is good to have something that you can eat anytime to get hungry, and adobo does not spoil fast. It is also a good way to save some money because you don’t often need to go out to restaurants to eat.

I was able to enjoy my pork adobo flakes with a couple of over easy eggs on the side. I used apple cider vinegar with chili flakes for the dip, and it was better than I expected.

When preparing your pork adobo flakes, make sure that you clean your hands properly before shredding the meat. It will also help if your pork adobo is tender enough. That way, you won’t have a hard time to manually shred the meat.

If you have questions or clarifications, send me a message by commenting below.

Try this Crispy Adobo Flakes Recipe. Let me know what you think.
 

Pork Adobo Flakes
 
Author: 
Nutrition Information
  • Serves: 4
  • Serving size: 4
Prep time: 
Cook time: 
Total time: 
Ingredients
  • 1½ lb. Pork Adobo, sauce removed
  • 1 teaspoon minced garlic
  • 2 tablespoons cooking oil
  • a dash of ground black pepper
  • 1 tablespoon soy sauce or Worcestershire sauce
  • 4 cups garlic fried rice
Instructions
  1. Shred the pork adobo meat. You can do this with your hands. Simply pull the threads of the pork slices until all the pork are consumed. Set aside.
  2. Meanwhile, heat the oil in a pan.
  3. Once the oil starts to gets hot, put-in the minced garlic. Make sure that the oil is not too hot yet so that the garlic won't burn easily. Continue to cook the garlic until the color turns light brown. Remove the garlic and set aside.
  4. Using the remaining cooking oil, start to cook the adobo threads or by putting it in the pan. Cook for 1 minute while tossing once in a while.
  5. Add the soy sauce or worcestershire sauce and ground black pepper. Stir fry for 3 minutes.
  6. Transfer the cooked pork adobo flakes in a a serving bowl and top with fried garlic.
  7. Serve with garlic fried rice. Share and enjoy!
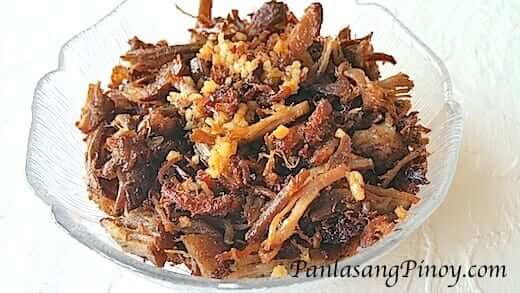
pork adobo flakes

Want to start your own blog?

We can help. Click this link to view the tutorial on How to Create a Food Blog .

The post Pork Adobo Flakes appeared first on Panlasang Pinoy.


Salisbury Steak with Beef and Mushroom Gravy

$
0
0

This is my version of Salisbury steak: easy, quick, and tasty. It might not be your common Salisbury steak and can be more of a burger steak , but what’s important is how the dish tastes. For me, this Salisbury steak with beef and mushroom gravy is really yummy.

Salisbury Steak Recipe

If you have not tried cooking anything before, or if you are just starting, this is something that you should try. It might just look intimidating, but it is really quick and easy to prepare. Enjoy your own Salisbury steak with steamed white rice of mashed potato. Sometimes, I add fried eggs on top. I know that it might sound unusual – well, that is just probably me. However, I think that it is good, and you should not limit yourself to this recipe too. Try what you think might work – who knows, your Salisbury steak version might be a hit.

Try this Salisbury steak with beef and mushroom gravy recipe. Let me know what you think.

Salisbury Steak with Beef and Mushroom Gravy
 
Author: 
Nutrition Information
  • Serves: 6
  • Serving size: 6
Prep time: 
Cook time: 
Total time: 
Ingredients
  • 2 lbs. ground beef
  • ¾ cups breadcrumbs
  • 3 tablespoons mustard powder
  • 2½ teaspoon onion powder
  • ½ teaspoon garlic powder
  • ⅛ teaspoon ground black pepper
  • ½ teaspoon salt
  • 6 tablespoons salted butter
  • ¾ cup chopped mushroom
  • ¼ cup all-purpose flour
  • 1 to 1½ cup water
  • 3 tablespoons cooking oil
Instructions
  1. Prepare the patty by combining the ground beef, breadcrumbs, mustard powder, 1 teaspoon beef bowser, onion powder, garlic powder, ⅛ teaspoon ground black pepper, and ½ teaspoon salt in a bowl. Mix all the ingredients together. Form the meat mixture into patties.
  2. Heat the cooking oil in a pan.
  3. Once the oil becomes hot, pan-fry the burger patties in medium heat for 3 to 5 minutes per side depending on the thickness. Set aside.
  4. Prepare the gravy by melting the butter in a clean saucepan.
  5. Once the butter becomes hot, put-in the sliced mushrooms. Cook for 1 minute.
  6. Add the flour. Stir until the flour absorbs the butter and a lump is formed.
  7. Pour-in the water and 1½ teaspoons beef powder. Stir well to distribute the distribute the ingredients well. Continue to cook until the gravy reaches the desired thickness. Add more water if the gravy is too thick. Add salt and pepper to taste.
  8. Arrange the cooked patties in a serving plate. Pour the beef and mushroom gravy on top.
  9. Serve. Share and enjoy!

Salisbury Steak

Want to start your own blog?

We can help. Click this link to view the tutorial on How to Create a Food Blog .
  
facebooktwittergoogle_plusredditmail

The post Salisbury Steak with Beef and Mushroom Gravy appeared first on Panlasang Pinoy.

Misua and Meatball Soup

$
0
0

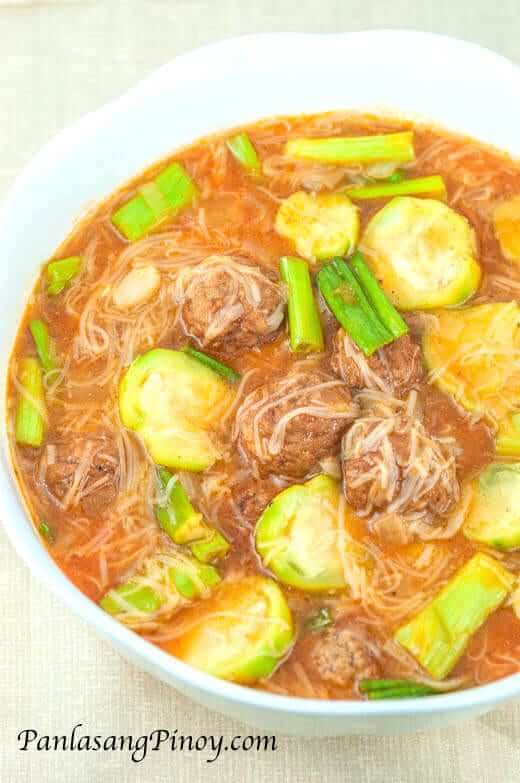
Misua and Meatball Soup is my version of albondigas. I am using thin flour noodles called misua or miswa and I also added loofah gourd, which is known as “patola” in the Philippines. This is delicious treat that you will enjoy either for lunch or dinner.

Misua Soup with Meatballs

I also like having misua with sardines in can. It works with both Spanish style sardines and the one in tomato sauce. I find it best when I use lots of garlic and if I add a bit of lemon or lime.

When I am busy, I purchase ready to cook meatballs in the supermarket or in Ikea. This saves me some time in preparing this meatball soup. I can also do quick dishes such as spaghetti and meatballs or sweet and sour meatballs.

Are you ready to cook your Misua and Meatball soup? I know that you can do it easily because this is just a simple process. You should remember though that the flour noodles quickly absorb liquid. You might need to add more water at some point.

It is not likely that there will be leftovers, but if there will be some, you need to chill it quickly in the fridge so that it wont spoil. A cup or two of water or beef broth needs to be added when you reheat it so that it will have the same soup constancy again.

Try this Misua and Meatball Soup Recipe. Let me know what you think.

Misua Soup with Meatballs
 
Author: 
Nutrition Information
  • Serves: 4
  • Serving size: 4
Prep time: 
Cook time: 
Total time: 
Ingredients
  • 1 lb. ground pork
  • 1 egg
  • ¾ cup bread crumbs
  • 1 large patola (loofah), peeled and sliced
  • 2 ounces misua noodles
  • 1 (4 ounces) can tomato sauce
  • 1 bunch spring onions, chopped
  • 6 cloves garlic, crushed
  • 1 medium yellow onion, minced
  • 1 teaspoon salt
  • 2 tablespoons fish sauce
  • ¼ teaspoon ground black pepper
  • 6 cups water
  • 1 piece beef cube
  • 6 tablespoons cooking oil
Instructions
  1. Make the meatballs by combining the ground pork, bread crumbs, egg, salt, and pepper in a bowl. Mix well.
  2. Scoop about a tablespoon of the mixture and roll it into a ball shaped figure. Do this step until all the ground pork mixture is consumed.
  3. Heat 4 tablespoons of cooking oil in a pan. Pan fry the meatballs in low to medium heat until the color of the outer part turns medium brown. Remove the fried meatballs and set aside.
  4. Meanwhile, start to prepare the soup by pouring the remaining 2 tablespoons of cooking oil in a clean cooking pot.
  5. Saute the onion and garlic. Once the onion becomes soft, put-in the cooked meatballs.
  6. Pour-in the water. Let boil.
  7. Add the beef broth and tomato sauce. Let boil and simmer for 10 minutes.
  8. Pour-in the fish sauce then add the loofah and spring onions. Stir and cook for 3 minutes.
  9. Put-in the misua noodles. Cook for 2 minutes (add more water if needed).
  10. Tranfer to a serving bowl. Serve.
  11. Share and enjoy!

Misua Soup with meatballs Recipe

Want to start your own blog?

We can help. Click this link to view the tutorial on How to Create a Food Blog .

The post Misua and Meatball Soup appeared first on Panlasang Pinoy.

Crispy Spam Steak Recipe

$
0
0

Luncheon meat such as Spam is good to have for breakfast. I like mine crispy so that I can enjoy it with better with either bread or fried rice. Sometimes I eat my crispy spam steak with Filipino pandesal, and there are times when I eat it with sinangag (Filipino garlic fried rice) with banana ketchup and fried egg (I call it Spamsilog). Yum yum or shall I say #nomnomnom and #happytummy.

Crispy Spam Steak Recipe

Making your Spam steak or any kind of canned luncheon meat crispy is easy; all you need is cornstarch and some flour; you will also need some egg to act as an initial coating. This lets the cornstarch and flour stick to the Spam steak and it also improves its texture and consistency.

Crispy Spam Steak is also perfect to have with scrambles eggs. Having the Spam with eggs balances the flavor, since luncheon meat can be too salty sometimes. It will also be great to have with a cup of coffee or hot chocolate.

Try this quick and easy Crispy Spam Steak Recipe. Let me know what your think.

Crispy Spam Steak Recipe
 
Author: 
Nutrition Information
  • Serves: 4
  • Serving size: 4
Prep time: 
Cook time: 
Total time: 
Ingredients
  • 1 (12 oz.) can Spam light
  • 2 pieces eggs
  • ½ cup cornstarch
  • 2 tablespoons all-purpose flour
  • ¼ teaspoon garlic powder
  • ½ cup cooking oil
Instructions
  1. Remove the Spam luncheon meat from the can and slice into serving pieces.
  2. Meanwhile, heat the cooking oil in a deep frying pan.
  3. Combine the garlic powder and egg. Beat until both ingredients are well incorporated. Set aside.
  4. Combine flour and cornstarch. Mix well and set aside.
  5. Dip each sliced Spam in the beaten egg then dredge in flour. Do this step twice to make the coat thicker.
  6. Fry the Spam coated with flour and cornstarch 3 to 4 slices at a time. The number of slices to cook at a given time will depend on the size of your pan: the wider the pan, the more slices you can cook at the same time. Cook one side in medium heat until the color turns medium brown and the texture becomes crispy. Turn the Spam slice over to cook the other side.
  7. Remove the Crispy fried Spam steaks from then pan. Place in a plate lined with paper towel.
  8. Serve with ketchup. Share and enjoy!

Crispy Spam Steak

Want to start your own blog?

We can help. Click this link to view the tutorial on How to Create a Food Blog .

The post Crispy Spam Steak Recipe appeared first on Panlasang Pinoy.

Mahi-Mahi Paksiw Recipe

$
0
0

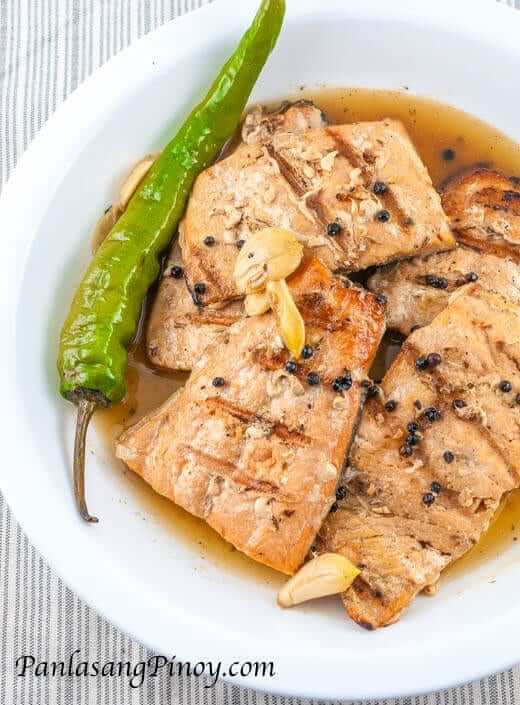
Mahi-mahi paksiw is a dish wherein fish such as mahi-mahi (which is also known as dolphin fish – don’t worry, this is not our friendly dolphin flipper) is cooked in vinegar with some spices. This is a simple Filipino recipe and it is consumed best with warm rice. Other names of this dish are paksiw na isda or pinangat na isda (not to be confused with Bicol’s version of pinangat because the latter makes use of coconut milk).

Mahi-mahi Paksiw

This version of paksiw na isda is different from the traditional recipe because the fish was first grilled before cooked in vinegar. I like to do this sometimes because I thought that grilling makes the fish tastes better — there is a smoky component into this dish, which I really liked.

I made use of mahi-mahi fillets to cook this dish. You can do the same or you can also use other fish variety whether fillet or whole, just make sure to clean the fish well and remove the scales before cooking. I find coconut vinegar best for this recipe. However, you can also use whatever type of vinegar is available in your area. White vinegar and apple cider vinegar will work too.

Try this Mahi-mahi Paksiw Recipe. Let me know what you think.

Mahi-Mahi Paksiw Recipe
 
Author: 
Nutrition Information
  • Serves: 3
  • Serving size: 3
Prep time: 
Cook time: 
Total time: 
Ingredients
  • 1 lb. Mahi-mahi fillet
  • 1 teaspoons salt
  • 1 teaspoon whole peppercorn
  • 2 pieces long green chili
  • 4 cloves garlic, crushed
  • ½ to ¾ cup coconut vinegar
  • ¾ to 1 cup water
  • ½ teaspoon sugar
Instructions
  1. Rub salt all over the mahi-mahi fillet.
  2. Heat-up the grill then grill each side for 3 minutes.
  3. Meanwhile, combine water, vinegar, whole peppercorn, garlic, and sugar in a cooking pot. Let boil. Adjust the heat to low.
  4. Put-in the grilled mahi-mahi and long green chili then continue to cook (covered) for 12 to15 minutes. Add more water if needed.
  5. Transfer to a serving plate.
  6. Serve. Share and enjoy!

Mahi-mahi Paksiw Recipe

Want to start your own blog?

We can help. Click this link to view the tutorial on How to Create a Food Blog .

The post Mahi-Mahi Paksiw Recipe appeared first on Panlasang Pinoy.

Slow Cook Pork Hock Stew

$
0
0

Slow Cook Pork Hock Stew or Slow Cooked Pata is something that I look forward to during weekends, especially on chilly days. This dish is simply pork pata (or pork legs) that are slow cooked with potatoes, carrots, tomato sauce and spices. It is a perfect lunch treat that I like to have with rice or crackers.

Slow Cook Pork Hock

I know that Slow Cook Pork Hock Stew tastes delicious. What really made me love this dish is its awesome texture. The pork literally melts in my mouth. Although the taste and texture are both superb, there is still this guilt feeling within me because I know that this is not the healthiest food around, but I thought that it will be okay as long as I do not eat this often. After all, I iwas able to do my afternoon jog today. I wll just run and exercise more often then.

Try this Slow Cook Pork Hock Stew. Enjoy!

Slow Cook Pork Hock Stew
 
Author: 
Nutrition Information
  • Serves: 6
  • Serving size: 6
Prep time: 
Cook time: 
Total time: 
Ingredients
  • 3 lbs. pork hock (pata), sliced
  • 1 (8 oz. can) tomato sauce
  • 2 large potatoes, cubed
  • 1 large green bell pepper, sliced
  • 2 medium carrots. sliced
  • 1 piece beef cube
  • 1 cup water
  • 1 teaspoon granulated white sugar.
  • ¼ teaspoon ground black pepper
  • 1½ teaspoons garlic powder
  • 1 medium yellow onion, minced
  • 3 pieces dried bay leaves
  • salt to taste
Instructions
  1. Combine all the ingredients in a slow cooker. Start with the pork hocks, toato sauce, bell pepper, tomato, carrots, and the rest of the ingredients.
  2. Cook in a slow cooker of crock pot for at least 8 hours,
  3. Remove from the slow cooker. Transfer to a serving bowl.
  4. Serve with warm white rice.
  5. Share and enjoy!

Slow Cook Pork Hock stew recipe

Want to start your own blog?

We can help. Click this link to view the tutorial on How to Create a Food Blog .

The post Slow Cook Pork Hock Stew appeared first on Panlasang Pinoy.

Slow Cooked Beef Nilaga Soup Recipe

$
0
0

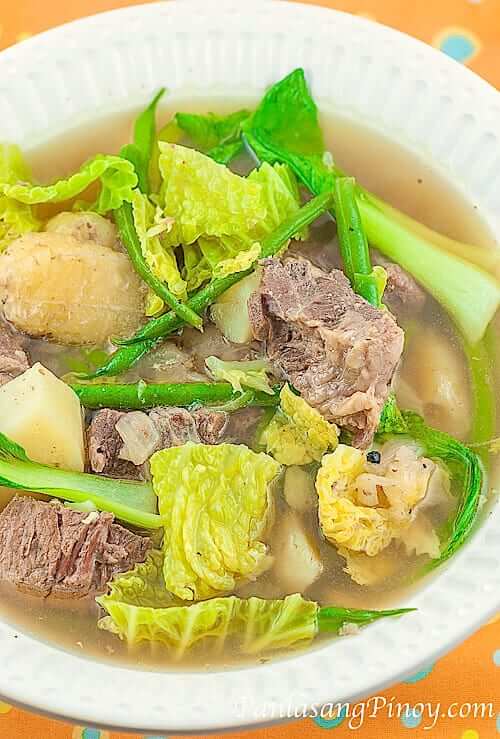
Slow Cooked Beef Nilaga Soup is the tastiest and the most tender beef nilaga that I ever had. It is quite obvious that 8 to 10 hours of slow cooking would extract the flavors from the beef and make it very tender to the point that it literally melts in your mouth. Although I know that slow cooking beef can make it tender, I did not expect that it could be perfectly tender and flavorful. As a result, I try to make my beef nilaga this way, if possible.

Beef Lauya Recipe

The thing that I like most about slow cooked beef or any slow cooked meat is that I get a tender meat and the sauce that comes out of it is really tasteful: slow cooked pork chop and slow cooked pata stew are some of my favorites. I also like the idea that everyone in the family like it because tender and tasty dishes is really something to be thankful for. That means no leftovers as far as my family is concerned.

For this slow cooked beef nilaga soup recipe, I added the potato and saba bananas along with the beef in the process. The result was an extremely tasty and awesome slow cooked beef dish that we all enjoyed. The green leafy vegetables and green beans were added during the last 10 to 12 minutes of cooking to keep them crisp.

How do you cook your beef nilaga or nilagang baka? Do you also like slow cooked dishes?

Try this Slow Cooked Beef Nilaga Soup Recipe. Enjoy!

Slow Cooked Beef Nilaga Soup Recipe
 
Author: 
Nutrition Information
  • Serves: 5
  • Serving size: 5
Prep time: 
Cook time: 
Total time: 

Ingredients
  • 3 lbs. beef chuck, cubed
  • 6 cups water
  • 4 pieces saba bananas, sliced
  • 2 medium potatoes, cubed
  • 1½ teaspoons whole peppercorn
  • 1 medium yellow onion, minced
  • 2 tablespoons fish sauce
  • 2 cups Napa cabbage, chopped
  • 1 bunch baby bok choy
  • 1 cup sliced long green beans
Instructions
  1. Combine water, beef, bananas, potato, fish sauce, and whole peppercorn in a slow cooker. Set the slow cooker or crock pot to high and slow cook for 8 to 10 hours.
  2. Gently stir the mixture. Add cabbage, green beans, and bok choy. Continue to cook for 12 to 15 minutes. Add more fish sauce if necessary.
  3. Transfer to a serving bowl. Serve hot.
  4. Share and enjoy!


Beef Lauya

Want to start your own blog?

We can help. Click this link to view the tutorial on How to Create a Food Blog .

The post Slow Cooked Beef Nilaga Soup Recipe appeared first on Panlasang Pinoy.

Beef and Tripe Pochero Recipe

$
0
0

I love kare-kare and pochero. I like the ox tripe in kare-kare and I thought that it is be a good match with beef especially when cooked pochero style. I wanted the tripe and beef simmered until both gets really tender. That is something like this pochero dish that I made for you; the tripe and beef is so tender and delicious.

Beef and Tripe Pochero_

I started out by cleaning the tripe well. I made sure to wash it with water and soak it in hot water for a few minutes to get rid of the odor. The cooking process is simple and straightforward; you just need to ensure that the tripe and beef gets really tender though. This means cooking in very low heat (also called simmering) while the cooking pot is covered. You will also need to check the liquid and make sure that it does not dry-up. Add water if you think that the sauce is evaporating too fast. Aside from simmering for more than an hour, you can use a pressure cooker to speed-up the process. 25 to 35 minutes in the pressure cooker should be enough.

I enjoyed my beef and tripe pochero with warm white rice and a dip made-up of fish sauce and cayenne pepper. I don’t usually drink soda, but I think that it made my meal more enjoyable.

Try this Beef and Tripe Pochero Recipe. Let me know what you think.

Beef and Tripe Pochero Recipe

Beef and Tripe Pochero Recipe
 
Author: 
Nutrition Information
  • Serves: 5
  • Serving size: 5
Prep time: 
Cook time: 
Total time: 
Ingredients
  • 1 lb. beef chuck, cubed
  • 1 lb. ox tripe, sliced into squares and cleaned
  • 6 to 8 pieces small potato
  • 1 bunch baby bok choy
  • 1 (15 oz.) can chickpeas, water removed
  • 1 (4 oz.) can tomato sauce
  • 3 cups beef broth
  • 3 pieces Chinese sausage, sliced
  • 1 medium yellow onion, minced
  • 1-teaspoon garlic, minced
  • 1½ tablespoons fish sauce
  • ¼ teaspoon ground black pepper
  • 3 tablespoons cooking oil
Instructions
  1. Heat a cooking pot then pour-in the oil.
  2. Once the oil gets hot, sauté the onion and garlic
  3. Add the ox tripe and cook for 2 minutes.
  4. Put-in the beef and sliced sausage. Continue to cook for 2 to 3 minutes or until the color of the beef turns light brown.
  5. Pour-in the beef broth and tomato sauce. Let boil.
  6. Cover and simmer for 90 minutes or until the tripe and beef are tender. Add water if needed.
  7. Once the meat gets tender, make sure that there is enough liquid left. If the sauce is a bit thick, add more beef broth or water. Put the chickpeas and potato in and cook for 10 to 12 minutes.
  8. Add the ground black pepper and fish sauce. Stir and cook for 2 minutes.
  9. Put the bok choy in the cooking pot. Stir and cook for 3 minutes.
  10. Transfer to a serving bowl.
  11. Serve. Share and enjoy!


Want to start your own blog?

We can help. Click this link to view the tutorial on How to Create a Food Blog .

The post Beef and Tripe Pochero Recipe appeared first on Panlasang Pinoy.


Slow Cooked Beef Lauya Soup Recipe

$
0
0

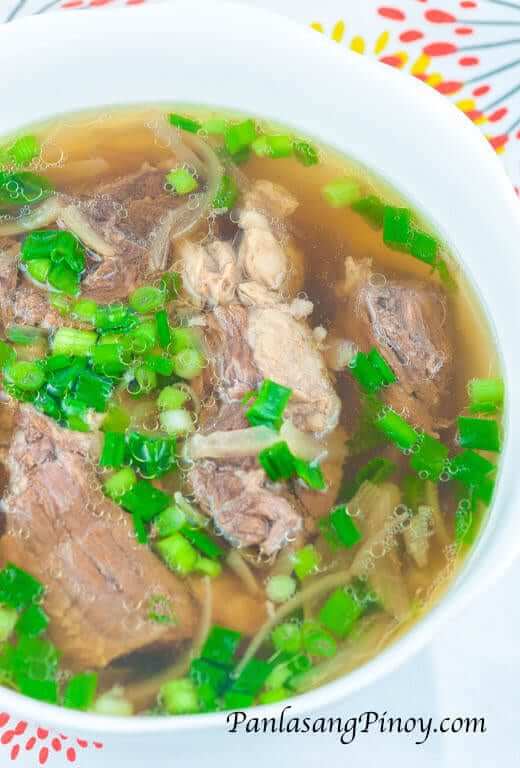
Slow cooked beef lauya soup is a tasty and delicious beef soup that is so tender. I enjoyed every bit of this dish and I thought that it even tasted better with a dip of patis (fish sauce), lemon, and chili flakes. Imagine having a warm soup with delicious beef that literally melts in your mouth; it took me 2 cups of rice to realize how good this dish was.

Beef Lauya Soup

It is easy to prepare this Slow Cooked Beef Lauya Soup. However, you really need to have patience because it takes a long time to get the beef ready. You will also need a slow cooker to get the best result. This Slow Cooked Beef Lauya Soup is called as such because it makes use of ginger; this is known as luya or lauya in Filipino.

I think that Beef Lauya is best to keep you warm during cold weather. The warm soup and the ginger (along with the peppercorns) warm the body and can make you feel more comfortable. This is what I felt after having this dish.

Beef Lauya Soup Recipe

Beef Lauya has many versions in the Philippines. This particular version is just one of the many ways you can make beef lauya. Other versions are similar to beef nilaga (boiled beef), except that these make use of ginger.

Do you have your own version of cooking beef lauya? How do you cook it?

Try this Slow Cooked Beef Lauya Soup Recipe. Let me know what you think.

5.0 from 1 reviews
Slow Cooked Beef Lauya Soup Recipe
 
Author: 
Nutrition Information
  • Serves: 6
  • Serving size: 6
Prep time: 
Cook time: 
Total time: 
Ingredients
  • 3 lbs. beef chuck, sliced
  • 1 medium yellow onion, sliced
  • 1 teaspoon whole peppercorn
  • 1 cup, chopped scallions (green onions)
  • 8 cups water
  • 2 thumbs ginger, sliced
  • 1 piece beef cube
  • 2 ½ tablespoons fish sauce
Instructions
  1. Combine the beef chuck, peppercorns, ginger, water, and onion in a slow cooker.
  2. Cover the slow cooker and start to slow cook in high for 8 to 10 hours.
  3. Put-in the scallions and fish sauce. Stir and continue to slow cook for 30 minutes.
  4. Transfer to a serving bowl. Serve with a small bowl of fish sauce and lemon along with some chili flakes.
  5. Share and enjoy!


Want to start your own blog?

We can help. Click this link to view the tutorial on How to Create a Food Blog .

The post Slow Cooked Beef Lauya Soup Recipe appeared first on Panlasang Pinoy.

Pork Adobo Paksiw Recipe

$
0
0

Do you like Pork Adobo? I do, but sometimes I cook too much of it to the point that there are lots of leftovers. Of course, it’s okay to keep leftover pork adobo for more than a couple of days in the fridge because it does not spoil quickly. However, I think that it will be better to taste something different after having quite a few servings of this dish. Pork Adobo Paksiw is what I recommend to turn the leftovers into something better.

Pork Paksiw_

Pork Adobo Paksiw or at least this recipe is all about the transformation of your leftover pork adobo into something better. It is a hybrid of our delicious adobo dish and the yummy lechon paksiw. What makes this more exciting is the homemade lechon sauce that we will be using.

Pork Adobo Paksiw

You will know better about the pork adobo recipe by following the recipe link below. It should tell you how easy it is to make your pork adobo (if you have not done it yet). If you already have leftovers available, then all you need is to prepare the lechon sauce. The recipe is also available through the link below. I know that there are times when we are lazy to do something (trust me, this happens to me a lot). You can use store-bought bottled lechon sauce if you feel lazy or have no time to make your homemade lechon sauce.

Try this Pork Adobo Paksiw Recipe. Let me know what you think.

Pork Adobo Paksiw Recipe
 
Author: 
Nutrition Information
  • Serves: 6
  • Serving size: 6
    Prep time: 
    Cook time: 
    Total time: 
    Ingredients
    Instructions
    1. Heat the leftover pork adobo in a cooking pot.
    2. Add the lechon sauce, sugar, and water, stir, cover and cook in low heat for 20 minutes. Try to stir after every 5 minutes. You can add more water if the sauce is getting too thick.
    3. Transfer to a serving bowl and serve.
    4. Share and enjoy!

    Pork Paksiw Recipe

    Want to start your own blog?

    We can help. Click this link to view the tutorial on How to Create a Food Blog .

    The post Pork Adobo Paksiw Recipe appeared first on Panlasang Pinoy.

    Shrimp Fried Rice Recipe

    $
    0
    0

    I am a fan of Fried Rice. One version that I like most is the Filipino Fried Rice (sinangag). Yang Chow Fried Rice and Adobo Fried Rice are also on the top of my favorite fried rice list. Our featured fried rice recipe, Shrimp Fried Rice, is also something that I often make for breakfast or lunch when I have tiny shrimp available.

    Shrimp and Veggie Fried Rice_

    This Shrimp Fried Rice Recipe makes use of little frozen shrimp. I like to use these types of shrimp because these are tastier compared to the larger varieties. I also like the idea that these are cheaper, most of the time. Shrimp fried rice also makes use of frozen green peas, carrots, and butter.

    Preparing Shrimp Fried Rice is quick and easy. I use leftover white rice if I can, and I make sure that the rice variety is not sticky; long grain rice works best for me. I simple mash the rice gently using my hands and add some garlic, onion powder and some salt. Instead of using oil, I use butter for this recipe.

    Shrimp Fried Rice_

    Butter is an important ingredient for shrimp fried rice, but you have to understand that there is a proper way to handle butter so that it can be in harmony with the other ingredients. Butter should also be cooked in low to medium heat to prevent it from getting burnt. The peas and carrots are great additions that make this fried rice dish taste and look better.

    You may also want to refer to this Shrimp and Vegetable Fried Rice Recipe to have more options.

    Do you have your version of Shrimp fried rice? How do you prepare it?

    Try this Shrimp Fried Rice Recipe. Let me know what you think.


    Shrimp Fried Rice Recipe
     
    Author: 
    Nutrition Information
    • Serves: 4
    • Serving size: 4
      Prep time: 
      Cook time: 
      Total time: 
      Ingredients
      • 4 cups cooked white rice
      • ¾ cup frozen green peas
      • ¾ cup frozen small shrimp (with no shell)
      • ½ cup carrot, diced
      • ½ teaspoon garlic powder
      • ¼ teaspoon salt
      • ¼ teaspoon onion powder
      • 3 tablespoons butter
      Instructions
      1. Combine the rice, salt, garlic powder, and onion powder Gently mix to blend all the ingredients.
      2. Melt the butter in a pan.
      3. Once the butter starts to get hot (make sure not to get the butter very hot), put-in green peas and carrots. Cook for 1 to 2 minutes.
      4. Add the rice mixture. Cook for 10 minutes in medium heat while tossing once in a while. Make sure to toss the ingredients while cooking to blend them properly.
      5. Transfer to a serving bowl. Serve for breakfast or lunch with your favorite dish.
      6. Share and enjoy!

      Shrimp and Veggie Fried Rice Recipe


      Want to start your own blog?

      We can help. Click this link to view the tutorial on How to Create a Food Blog .

      The post Shrimp Fried Rice Recipe appeared first on Panlasang Pinoy.

      Easy Kung Pao Shrimp Recipe

      $
      0
      0

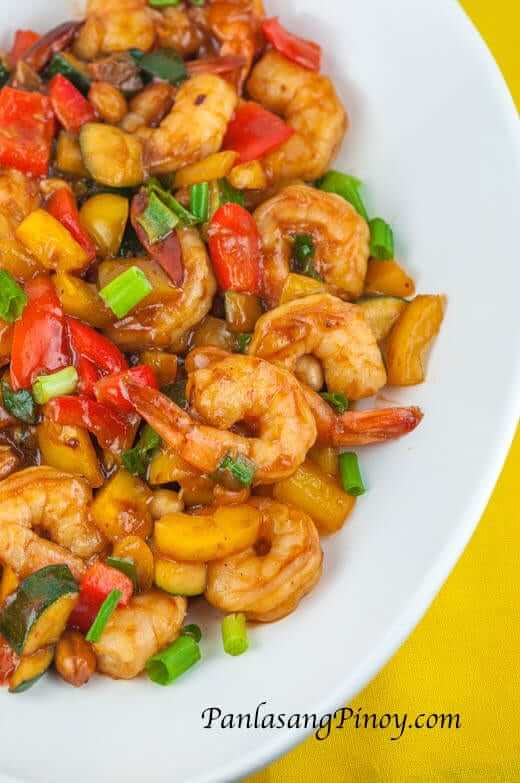
      This Easy Kung Pao Shrimp Recipe is all about making your own homemade kung pao shrimp a little bit quicker. If you were able to see our previous recipe for kung pao shrimp (with video), you know that it demonstrates how to cook the dish from ground-up; this means also making your own kung pao sauce — which is really easy and delicious. However, many of us do not have the time to mix-up ingredients for the sauce and would prefer a faster way complete the entire kung pao shrimp dish. This recipe will help you make kung pao shrimp faster because we will be using store bought kung pao sauce, instead of making one from scratch. I think that you got the idea: yes, this also applies to kung pao chicken and kung pao pork.

      Easy Kung Pao Shrimp_

      This Kung Pao Shrimp Recipe makes use of simple ingredients such as bell peppers, zucchini, and scallions. I also added some roasted peanuts o complete the dish. You can use any bell pepper color that you want. I did use yellow and red for this particular recipe because I just felt like having this combination — use green and red, orange and yellow, or yellow and green. The choice is all yours. I got the kung pao sauce from my local grocery. This might not be always available in your local supermarkets, so that mean you have to make one from scratch if this happens (you know where to get the recipe anyway…if not, here’s a hint — click this link).

      There are two ways to eat kung pao shrimp with, one is with white rice, and the second is with Yang Chow fried rice. Okay, I know that some of you will still disagree so I will mention brown rice to be the third option (wink). Have fun in trying this recipe and do not hesitate to ask questions.

      Try this Easy Kung Pao Shrimp Recipe. Let me know what you think.

      Easy Kung Pao Shrimp Recipe
       
      Author: 
      Nutrition Information
      • Serves: 3
      • Serving size: 3
      Prep time: 
      Cook time: 
      Total time: 
      Ingredients
      • 1 lb. large shrimp, head and shell removed
      • ½ red bell pepper, chopped
      • ½ yellow bell pepper, chopped
      • ½ cup chopped scallions
      • ¼ cup roasted peanuts
      • ¾ cup store bought kung pao sauce
      • 1 piece zucchini, diced
      • 5 pieces dried red chili
      • 1 thumb ginger, minced
      • 1 tablespoon garlic, minced
      • 3 tablespoons cooking oil
      • Salt and pepper to taste.
      Instructions
      1. Heat a pan or wok then pour the cooking oil.
      2. Once the cooking oil gets hot, quickly saute the ginger and garlic. Do this fast to prevent the spices from getting burnt.
      3. Put-in the zucchini, peanuts, chili, and bell peppers. Stir-fry for 3 minutes.
      4. Add the shrimp. Continue to stir-fry for 2 to 5 minutes. do not overcook the shrimp
      5. Pour-in the kung pao sauce. Stir and cook for 1 minute.
      6. Add the scallions. Sprinkle salt and pepper, if needed. Try to taste your dish at this point to see if you will need to add salt and pepper.
      7. Stir and transfer to a serving plate.
      8. Serve with Yang Chow Fried Rice.
      9. Share and enjoy!

      Easy Kung Pao Shrimp Recipe

      Want to start your own blog?

      We can help. Click this link to view the tutorial on How to Create a Food Blog .

      The post Easy Kung Pao Shrimp Recipe appeared first on Panlasang Pinoy.

      Sinigang na Bangus sa Bayabas

      $
      0
      0

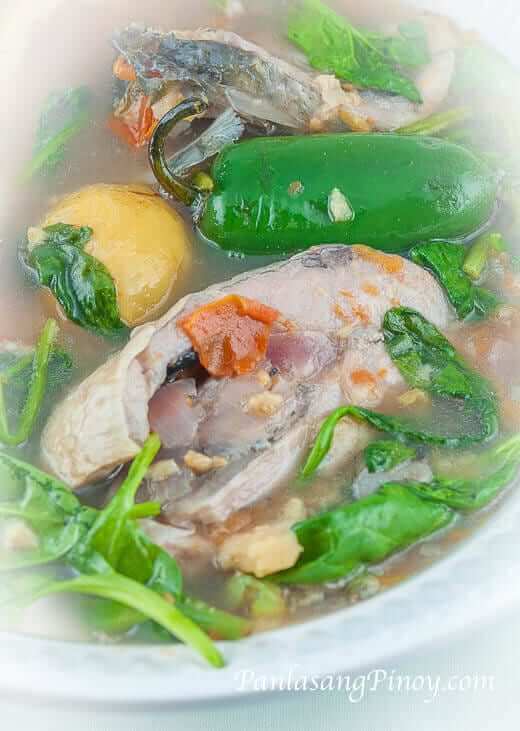
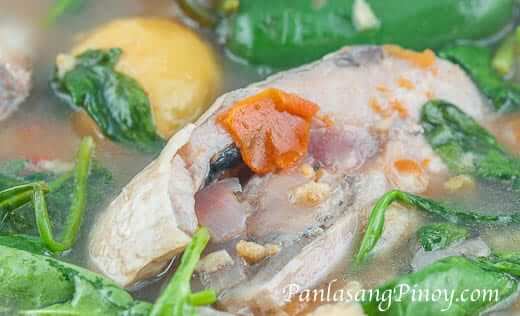
      Sinigang na Bangus sa Bayabas is a version of sinigang that makes use of ripe guava as the souring agent. Sinigang is a Filipino sour soup dish that commonly uses unripe tamarind or bilimbi to make the sour sour. This singang na bangus sa bayabas is not as sour as the traditional singing dishes, but it has a nice mild flavor that I liked.

      Sinigang na Bangus sa Bayabas

      I was not able to enjoy this sinigang version as I was growing up. This is one of the reasons why I was skeptical about this dish. However, things changed when I had the courage to try it. I thought that it was not bad, and I even had more until finished the entire bowl.

      I think that it takes a little getting used to, or what they call acquired taste in order for most of us to enjoy any sinigang sa bayabas version. I am not a fan of guava, but I like milkfish and fish sauce. The flavor of the milkfish blends well with the guava and the fish sauce making this dish successful. It will be better if you use the ripest guava that you can get for optimum flavor.

      Sinigang na Bangus sa Bayabas Recipe

      Try this Sinigang na Bangus sa Bayabas. Let me know what you think.

      Sinigang na Bangus sa Bayabas
       
      Author: 
      Nutrition Information
      • Serves: 3
      • Serving size: 3
      Prep time: 
      Cook time: 
      Total time: 
      Ingredients
      • 1 medium milkfish (bangus), cleaned and scales removed and sliced into steaks
      • 2 cups baby spinach
      • 4 to 6 pieces guava (ripe)
      • 8 pieces okra
      • 1 small onion, wedged
      • 2 medium tomato, wedged
      • 2 pieces Jalapeno pepper
      • 2 tablespoons fish sauce
      • 1 teaspoon ground black pepper
      • 4 to 5 cups water
      Instructions
      1. Pour the water in a cooking pot. Bring to a boil.
      2. Put-in the guava, tomato, onion, and whole peppercorn. Let it boil. Continue to boil (covered) for 15 minutes or until the guava and vegetables are soft. You may add more water if needed.
      3. Using a fork of potato masher, mash the guava and vegetables inside the cooking pot to extract the flavors. This is an optional step, be extra careful.
      4. Pour-in the fish sauce. Stir.
      5. Add the milk fish. Cook for 5 to 10 minutes in medium heat.
      6. Add the okra and Jalapeno. Continue to cook for 5 minutes.
      7. Put-in the spinach. Cover the cooking pot. Turn the heat off. Let the spinach stay in the pot for 5 minutes.
      8. Transfer to a serving bowl. Serve.
      9. Share and enjoy!


      Watch the cooking video:

      //www.youtube.com/watch?v=1TQAEgneCqA

      Want to start your own blog?

      We can help. Click this link to view the tutorial on How to Create a Food Blog .

      The post Sinigang na Bangus sa Bayabas appeared first on Panlasang Pinoy.

      Crispy Tilapia Sticks Recipe

      $
      0
      0

      Crispy Tilapia Sticks is a delicious crispy flavorful tilapia fillet dish. The fish is seasoned and dredged in a beading of Panko breadcrumbs, then deep fried until crispy. Crispy Tilapia Sticks makes a delicious appetizer and I think that it goes well with fresh homemade ranch dressing.

      Crisp Tilapia Sticks_

      This Tilapia sticks recipe was from my mom. She made the entire thing while I salivate and wait for it to be done. I was whipping-up some fresh homemade ranch in anticipation of the dish that I will soon be devouring. I can say that even though this dish is really simple, it tasted good and the texture is just perfect.

      I know that most of us will say and think that nothing beats our mom’s cooking. I still think the same up to now. She was the reason why I got interested in the kitchen and all things related to food and cooking, in the first place — and she still continues to perform her magical cooking tricks to this day. I am really glad that she came here in the US to visit us.

      Crispy Tilapia Sticks also goes well as a main dish. If I will eat this with rice, my preference is to have a dip made-up of soy sauce and lemon or calamansi (or simply Toyomansi).

      Try my mom’s Crispy Tilapia Sticks Recipe. Enjoy!

      Crispy Tilapia Sticks Recipe
       
      Author: 
      Nutrition Information
      • Serves: 4
      • Serving size: 4
      Prep time: 
      Cook time: 
      Total time: 
      Ingredients
      • 1 lb. thick tilapia fillet. each piece sliced lengthwise into 3 to 4 pieces
      • ½ teaspoon garlic powder
      • ½ teaspoon onion powder
      • 1 teaspoon sea salt
      • ¼ teaspoon ground black pepper
      • 2 eggs, beaten
      • 1 cup Panko breadcrumbs
      • 2 cups cooking oil
      Instructions
      1. Combine the salt, garlic powder, onion powder, and ground black pepper in a bowl mix well.
      2. Rub the mixture all over the sliced tilapia fillets.
      3. Meanwhile, pour the oil in a deep cooking pot. Turn-on the heat and start to heat-up the oil.
      4. Dip the tilapia fillet in the bowl with beaten egg then dredge the tilapia in Panko breadcrumbs. ake sure that the tilapia is well coated. To save more breadcrumbs and for better coating, you can place the breadcrumbs in a container with cover. Simply put 2 to 3 pieces if tilapia fillet in the container with breadcrumbs, cover it, and then shake the container back and forth. You will see that the tilapia will be coated properly.
      5. Put the breaded tilapia into the hot oil and start to deep fry the fish until the color turns golden brown. Use medium heat in this step
      6. Remove the deep fried crispy tilapia sticks from the cooking pot and place in a plate lined with paper towel.This will absorb the excess oil.
      7. Transfer the crispy tilapia sticks in a serving plate and serve with a bowl of fresh ranch dressing. You can also serve this with tartar sauce.
      8. Share and enjoy!


      Crisp Tilapia Sticks Recipe

      Want to start your own blog?

      We can help. Click this link to view the tutorial on How to Create a Food Blog .

      The post Crispy Tilapia Sticks Recipe appeared first on Panlasang Pinoy.

      Adobo Meatballs Recipe

      $
      0
      0

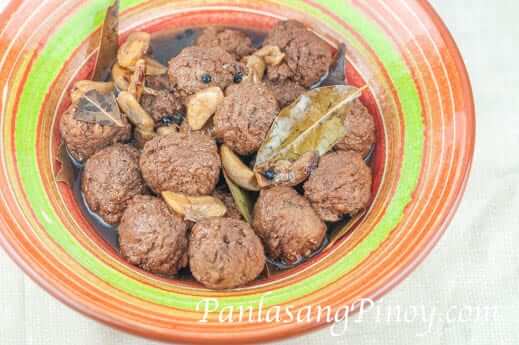
      Adobo Meatball is a dish made using our easy meatball recipe and cooked inadobo style. Since I made a lot of meatballs for our Spaghetti and meatball dinner, there was an extra batch that I was not able to use and I thought that it will be nice to turn them into meatball adobo.

      Meatball Adobo

      This Adobo meatball tasted just the way I wanted. It was nice to have for breakfast with warm garlic fried rice. I also had it with fried salted dried fish and the entire meal was a blast.

      I made the meatballs using our easy meatball recipe. This recipe calls for ground beef, but you can always use pork as a substitute. The good thing bout making meatballs separately is the idea that you can use it for many dishes. As I mentioned, part of the meatballs were used for our spaghetti dinner while some of it were turned into meatball adobo – there a still a few left and I might make some albondigas out of them.

      Try this Adobo Meatball Recipe. Let me know what you think.

      Meatball Adobo bowl

      Adobo Meatballs Recipe
       
      Author: 
      Nutrition Information
      • Serves: 6
      • Serving size: 6
      Prep time: 
      Cook time: 
      Total time: 
      Ingredients
      • 1½ lb meatballs (see meatball recipe here)
      • ¼ cup soy sauce
      • 2 tablespoons vinegar
      • 6 cloves garlic, crushed
      • ¾ cup beef broth
      • 1 teaspoon peppercorn
      • 4 pieces dried bay leaves
      • 2 tablespoon cooking oil
      • ½ teaspoon granulated white sugar
      • Salt to taste
      Instructions
      1. Heat oil in a pan.
      2. Put-in the garlic. Let the garlic cook until the color turns light brown. Make sure to keep an eye on the garlic so that it won't get burnt.
      3. Add the meatballs, peppercorn, and bay leaves. I am using cooked meatballs and the recipe link is available above.
      4. Pour-in the soy sauce and beef broth. Add the sugar. Stir and let boil.
      5. Cover and simmer for 15 minutes. Add a little water if the liquid starts to dry-up.
      6. Try to taste your meatball adobo and add salt if necessary.
      7. Transfer to a serving bowl. Serve.
      8. Share and enjoy!


      Meatball Adobo Recipe

      Want to start your own blog?

      We can help. Click this link to view the tutorial on How to Create a Food Blog .

      The post Adobo Meatballs Recipe appeared first on Panlasang Pinoy.


      Beef Morcon Recipe

      $
      0
      0

      Beef Morcon has been a favorite dish during special occasions. I like morcon because it is delicious and all the ingredients blends well into a unified flavor that makes my palate happy. It goes well with or without rice, and we can always have it even if there are no special occasion.

      Morcon Recipe-2

      I understand that there are such dishes dubbed as fiesta food, holiday food, and special food. These are mostly prepared during the holidays, fiestas, and during special events. Beef Morcon is one of these foods, but I think that we should not be limited by the idea — yes, we enjoy beef morcon anytime of the year. This simplified recipe (which is another version) will be able to help.

      As I have mentioned in my previous post, my mom recently came here in Illinois to visit. She was the ultimate cook in the family and I got my interest in cooking because of her. Since I missed her cooking so much, I had her rule my kitchen for the time being so that I can sample the different dishes that I have been longing for — and her beef morcon is one them.

      This beef morcon recipe makes use of our flank steak marinade. This is a very tasty concoction that adds flavor to the beef. You can also use the marinade for steaks and other meats for grilling.

      There is no special occasion today, but we are having beef morcon. Well, I guess that everyday is a special event that most of us neglect. Let’s enjoy life with our family. Cheers to good food!

      Try this Beef Morcon Recipe. Enjoy!

      Beef Morcon Recipe
       
      Author: 
      Nutrition Information
      • Serves: 4
      • Serving size: 4
      Prep time: 
      Cook time: 
      Total time: 
      Ingredients
      • 2 lbs. flank steak, thinly sliced
      • 1 medium carrot, sliced into sticks
      • 1 serving flank steak marinade (see recipe here)
      • 4 pieces hard boiled eggs, wedged
      • 3 pieces medium whole sweet pickles, sliced into 4 long sticks
      • 2 pieces chorizo de bilbao (or beef franks)
      • ½ cup all-purpose flour
      • 3 tablespoons cooking oil
      • 1 cup beef broth
      • 1 tablespoon soy sauce
      • 1 cup water
      • Salt and ground black pepper to taste
      Instructions
      1. Combine the flank steak with the flank steak marinade in a large bowl. Cover the bowl and place inside the refrigerator. Marinate for 1 to 3 hours.
      2. Lay the marinated flank steak in a plate. Assemble the stuffing in the middle. Start by lining the carrot sticks, sweet pickle sticks, sliced chorizo, and egg. Make sure that the stuffings are close to each other. Roll the flank steak from one end to another to cover the stuffing. Use a kitchen twine to tie the meat. This will seal the stuffing inside. You can watch our previous morcon recipe video for the procedure.
      3. Meanwhile, heat the oil in a frying pan.
      4. While the oil is starting to heat-up, dredge the rolled flank steak (morcon) in flour. Make sure that the entire piece is coated.
      5. Pan fry the morcon until the outer part turns light to medium brown. This should be around 2 minutes per side.
      6. Remove the pan-fried morcon from the frying pan. Arrange in a wide cooking pot and pour-in water, soy sauce, and beef broth.
      7. Heat the cooking pot and let boil. Cover and simmer for 60 minutes or until the meat gets tender.
      8. Add salt and ground black pepper to taste.
      9. Slice the beef morcon into serving pieces and arrange in a serving plate. Pour the sauce on top.
      10. Serve. Share and enjoy!


      Filipino Morcon Recipe

      Want to start your own blog?

      We can help. Click this link to view the tutorial on How to Create a Food Blog .

      The post Beef Morcon Recipe appeared first on Panlasang Pinoy.

      Sinigang na Hipon sa Sampaloc

      $
      0
      0

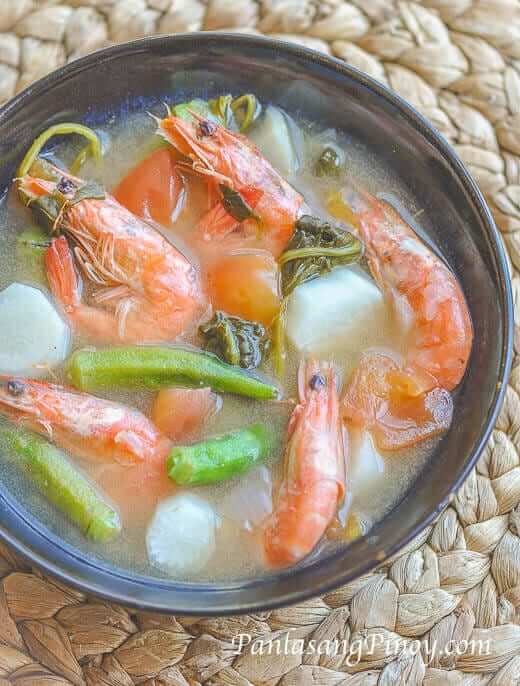
      Sinigang na Hipon sa Sampaloc or Filipino Shrimp Soup in tamarind broth is a quick and easy soup dish that you can prepare for lunch or dinner. This dish is quite flexible with the vegetable ingredients because you can mix and match your preferred sinigang veggies and you can also add some long green chili or finger pepper to make it bit spicy.

      Sinigang na Hipon

      There are many ways to cook Sinigang na Hipon; this recipe is just one of them. For this recipe, daikon or white radish was used along with common veggies such as okra and tomato. The good thing about this Sinigang na hipon version is its simplicity. There are minimal veggies involved, but still the outcome was good and I really find it to be comforting. I always feel some comfort after having warm sour soup even in warm weather.

      There is another Shrimp sinigang recipe that I previously featured which is somewhat similar, except that it made use of more veggies and I also used a pouch of sinigang powder for convenience. I think that both recipes are good and full of flavor. The reason behind this is the shrimp that was used for both recipes. If you will look closely, I used clean shrimp with shell and head still intact. Most of the flavor comes from the head of the shrimp, and that is what makes the soup flavorful.

      Speaking of flavorful seafood sinigang, I remember the sinigang na panga ng tuna (tuna jaw) and sinigang tuna belly that I always make when I was still in the Philippines.

      Try this Sinigang na Hipon sa Sampaloc Recipe. Let me know what you think.

      Sinigang na Hipon sa Sampaloc
       
      Author: 
      Nutrition Information
      • Serves: 4
      • Serving size: 4
      Prep time: 
      Cook time: 
      Total time: 
      Ingredients
      • 2 lbs. medium to large shrimp with head and shell
      • 1 lb. unripe tamarind
      • 1 small daikon (white radish), sliced
      • 1 bunch spinach or kangkong
      • 12 pieces okra
      • 2 tablespoons fish sauce
      • 2 medium plum tomato, quartered
      • 1 medium yellow onion, quartered
      • 6 cups water
      • Ground black pepper to taste
      Instructions
      1. Pour the water in a cooking pot. Bring to a boil.
      2. Add the tamarind. Cover and boil for 30 minutes. Add more water if needed.
      3. Separate the tamarind from the water. Make sure to squeeze the juice out of the tamarind for maximum flavor.
      4. Heat the cooking pot with the remaining water and tamarind extract. You can add more water if you think that the amount of remaining liquid is less than 5 cups. Let boil.
      5. Add the tomato and onion. Cook for 5 minutes.
      6. Put-in the daikon,okra, and shrimp. Cook for 3 to 8 minutes in medium heat.
      7. Add the spinach and fish sauce. Stir. Cover and turn the heat off.
      8. Sprinkle some ground black pepper to taste.
      9. Transfer to a serving bowl. Serve.
      10. Share and enjoy!


      Sinigang na Hipon Recipe

      Want to start your own blog?

      We can help. Click this link to view the tutorial on How to Create a Food Blog .

      The post Sinigang na Hipon sa Sampaloc appeared first on Panlasang Pinoy.

      Crispy Fried Jeprox

      $
      0
      0

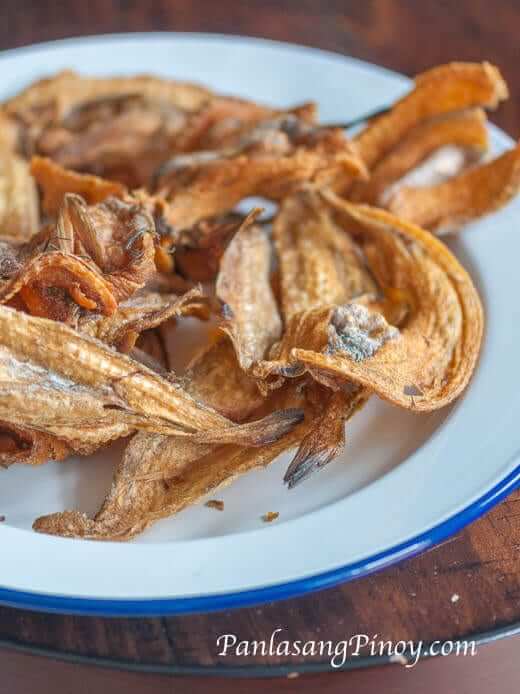
      Crispy Fried Jeprox is a simple dried fish dish similar to daing.This is a very simple and straightforward recipe that will remind you on how to cook daing or salted dried fish (and we are using Jeprox for this recipe).

      Jeprox recipe

      What do you think about the name of this dried fish? If you will ask me, I think that naming a type of dried fish as “Jeprox” is funny sounding. An old Pinoy Rock song is the first thing that come into my mind when I see this fish. However (and although it sounds funny), the satisfaction that I get when eating crispy fried jeprox is no joke at all. I enjoy having this for breakfast with a bowl of super spicy vinegar and sinangag.

      So what is the difference between Jeprox with Daing? You see, I had the same question too because they all look the same at first glance. Although you will notice that jeprox is lighter and thinner compared to regular salted dried fish. From what I gathered, Jeprox is made from a variety of fish called Smelt; it is a species of fish that can commonly be found in North America.

      Having said that, I am now wondering if there is also Jeprox in the Philippines? Don’t get me wrong, I know that most of you will say that there are lots of Jeprox out there almost anywhere — but I’m asking about the fish though. I heard that there is a type of dried fish with the same name in Pangasinan, but I have not tried it yet. It may or may not be using the same kind of fish. since you know better than I do, a quick comment with your thoughts will help.

      Try this Crispy Dried Jeproc Recipe. Enjoy!

      Crispy Fried Jeprox
       
      Author: 
      Nutrition Information
      • Serves: 3
      • Serving size: 3
      Prep time: 
      Cook time: 
      Total time: 
      Ingredients
      • 3 ounces packaged dried jeprox
      • 4 tablespoons cooking oil
      • ½ cup spicy vinegar
      Instructions
      1. Heat the oil in a frying pan
      2. Once the oil heats-up add around 3 pieces of dried jeprox and fry each side until the color turns golden brown and the fish starts to curl. Make sure that the oil is not too hot when you put the fish in. This will prevent it from getting burnt quickly and will avoid a bitter aftertaste. Perform this step until all the fish are consumed.
      3. Using a spoon, scoop some hot oil from the pan and pour-it over the fish so that the opposite side will get cooked and crispy. Turning the fish over will not cook the fish equally since it is already curly.
      4. Remove the fried jeprox from the hot pan. Place in a plate lined with paper towels.
      5. Transfer to a serving plate. Serve with rice and spicy vinegar.
      6. Share and enjoy!


      Jeprox

      Want to start your own blog?

      We can help. Click this link to view the tutorial on How to Create a Food Blog .

      The post Crispy Fried Jeprox appeared first on Panlasang Pinoy.

      Shrimp Pancit Canton Recipe

      $
      0
      0

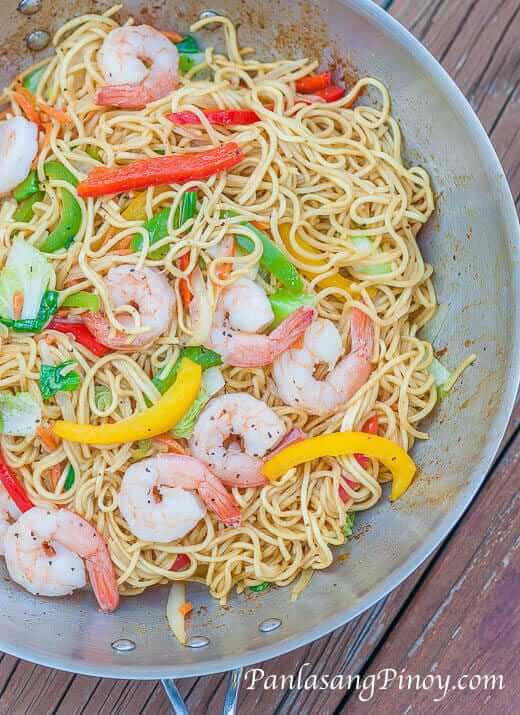
      Our perfect lunch today is composed of Shrimp Pancit Canton and nothing else. This noodle dish can stand on its own in terms of overall flavor and satisfaction, as far as I am concerned. It is simple, delicious, and can provide you with the necessary energy that you need to continue what you have started for the day.

      Shrimp Pancit Canton

      I made this Shrimp Pancit Canton because I wanted to use all the ingredients that I have in the fridge, without the need to buy extra ingredients. I guess that I want to show you that you can build a successful dish by just using whatever is available in your kitchen – as long as there are enough left and that you are using these ingredients properly.

      I remember using a lot of bell peppers every time I prepare crispy noodles. Since I got plenty of it, I thought of using them for this recipe. I still have an extra pack of flour sticks (pancit canton), but making crispy noodles is not my intention. I only wanted one simple dish – a Pancit Canton using whatever I have in the kitchen. This goal led me to make this Shrimp Pancit Canton. By the way, it should have been past tense in the time of writing since it is nowhere in sight (and that was only 20 minutes ago). It must have been good. I know it was, and everyone in the household will surely agree.

      On the side note, I found a cute little bunny in the yard. He is injured, so I took him home for the night to care for him and to keep him warm because it was still in the mid 50’s tonight. He was motionless when I got him and I was afraid that the he might be a prey to the owls nearby. I am hopeful that the bunny will get stronger by tomorrow. My kids (including the little ones) took good care of the bunny. I will post a picture in my instagram page in the morning so that you can also see how he’s doing.

      Going back to this Shrimp Pancit Canton Recipe – I thought that some fish sauce with lemon works well. I was thinking of having the same meal for merienda, but it was nowhere in sight.

      Try this Shrimp Pancit Canton Recipe. Cheers!

      Shrimp Pancit Canton Recipe


      Shrimp Pancit Canton Recipe
       
      Author: 
      Nutrition Information
      • Serves: 6
      • Serving size: 6
      Prep time: 
      Cook time: 
      Total time: 
      Ingredients
      • 1 lb. medium to large shrimp, shell and head removed
      • 16 ounces Pancit Canton noodles (flour sticks)
      • 1 cup baby bok choy, chopped (small pechay)
      • 1 cup chopped Napa cabbage (pechay Baguio)
      • ½ small red bell pepper, cut into strips
      • ½ small yellow bell pepper, cut into strips
      • ½ small green bell pepper, cut into strips
      • 1 medium yellow onion, sliced
      • 2½ cups chicken broth
      • 2 tablespoons oyster sauce
      • 1 teaspoon garlic powder
      • Salt and ground black pepper to taste
      • 3 tablespoons cooking oil
      Instructions
      1. Combine shrimp, garlic powder, a sprinkle of salt and ground black pepper. Toss to coat the shrimp. Let is stay for at least 10 minutes.
      2. Heat a wok and pour-in 2 tablespoons of cooking oil.
      3. Once the oil gets hot, pan-fry the shrimp for 1 minute per side. Remove the shrimp and put in a clean plate. Set aside.
      4. Add the remaining cooking oil. Once the oil gets hot, stir-fry the bell peppers for 2 minutes.
      5. Put-in the bok choy and Napa cabbage. Continue to stir fry for 2 minutes. remove the veggies form the wok and place in a plate. Set aside.
      6. Using the same wok, pour-in the chicken broth. Add the oyster sauce. Stir and let boil.
      7. Put-in the flour stiucks or pancit canton noodles. Let the noodles absorb the liquid. Toss the noodles after every minute so that all the noodles can absorb the same amount of liquid.
      8. Once the noodles completely absorb the chicken broth, put-in the stir-fried veggies. Toss and continue to cook for 2 minutes.
      9. Add the cooked shimp. Toss and cook for 2 to 3 minutes. Add salt and pepper if needed.
      10. Transfer the shrimp Pancit Canton in a serving plate.
      11. Serve. Share and enjoy!


      Easy Shrimp Pancit Canton Recipe

      Want to start your own blog?

      We can help. Click this link to view the tutorial on How to Create a Food Blog .

      The post Shrimp Pancit Canton Recipe appeared first on Panlasang Pinoy.

      Meatball Adobo with Shrimp Fried Rice and Egg

      $
      0
      0

      Meatball Adobo with Shrimp Fried Rice and Egg is something that I came-up with after combining two dishes that I recently prepared. I had this meal for breakfast and it was the first time that I will be having both together as a meal.

      Adobong Meatball With Fried Rice and Egg_

      Meatball Adobo or adobong bola-bola and shrimp fried rice might not be that common, but these two make a delicious pair and I really loved it. I consider the fried egg as a bonus or something that they call the icing in the cake.

      I tried the meatball adobo with steamed rice and it was just okay. I mean, it was good, but not as exciting at it was when having it with fried rice. The fried rice can stand on its own since there are many ingredients in it that make it tasty, but having both together is really wonderful. It is like eating longganisa fried rice and pork tocino at the same time or even bacon and egg fried rice with pork asado.

      Try this Meatball Adobo with Shrimp Fried Rice and Egg Recipe. Let me know if the combination works for you too.

      Meatball Adobo with Shrimp Fried Rice and Egg
       
      Author: 
      Prep time: 
      Cook time: 
      Total time: 
      Ingredients
      Instructions
      1. Prepare the adobo meatball and shrimp fried rice according to the recipe provided in the links above.
      2. In 4 to 6 individual plates, arrange a portion of the fried rice and adobo meatballs. Top with fried egg. your fried egg does not need to be perfect, unless you really insist.
      3. Serve for either breakfast, lunch or dinner. This can also be a good "baon" for school or for the office.
      4. Share and enjoy!


      Adobong Meatball With Fried Rice and Egg Recipe

      Want to start your own blog?

      We can help. Click this link to view the tutorial on How to Create a Food Blog .

      The post Meatball Adobo with Shrimp Fried Rice and Egg appeared first on Panlasang Pinoy.

      Viewing all 460 articles
      Browse latest View live