Quantcast
Channel: Recipes – Panlasang Pinoy
Viewing all 460 articles
Browse latest View live

Spring Fried Chicken

$
0
0

Spring Fried Chicken reminds me of the old restaurants in Manila that serve delicious crispy fried chicken. This fried chicken recipe is a sure keeper. I enjoy eating this with banana ketchup and fried rice.

There are three steps to make this yummy spring fried chicken. The first step is to marinate the cornish game hens (small chicken) in a mixture of soy sauce, fish, sauce and cooking wine. The next is to steam the chicken and let it dry in open air. The last step is to deep fry the chicken. Although the process might not be that simple compared to other fried chicken recipes, the outcome of this recipe is worth the time and effort.

When you watch the cooking video below, you will see that I am using a multi-purpose steamer. You can use the same steamer or use a bamboo steamer instead. I recommend steaming the chicken instead of boiling them. Why? Boiling the chicken will defy the purpose of marination. The absorbed marinate will only be infused in water making the chicken less flavorful — because of this, a steamer is really needed here. I used a deep fryer to fry the chicken. It is acceptable to deep fry the chicken using a cooking pot, as long as you take extra precautions. Use deep and thick cooking pots to fry the chicken. Also, gradually submerge the chicken when you are about to deep fry, instead of throwing it in the pot with hot oil. This will prevent the oil from splattering.

About the air drying process, this simply means leaving the steamed chicken in open air until the skin dries. I usually place the chicken on top of a wire rack (this is the rack that I use for cookies and bread). Letting the skin dry before deep frying helps to make the skin crispy.

Try this Spring Fried Chicken Recipe. Let me know what you think.

Spring Fried Chicken

Spring Fried Chicken Recipe

Ingredients

  • 2 cornish game hens
  • 2 tablespoons soy sauce
  • 4 tablespoons fish sauce
  • 1/2 cup dark brown sugar
  • 1/2 cup cooking wine (shaoxing or dry sherry)
  • 1 1/2 teaspoons nutmeg
  • 1 teaspoon garlic powder
  • 1 teaspoon ground black pepper
  • 5 cups water
  • 5 cups cooking oil

Cooking Procedure

  1. Prepare the marinade by Combining cooking wine, fish sauce, soy sauce, dark brown sugar, nutmeg, garlic powder and grund black pepper. Stir to mix.
  2. Place the chicken in a resealable freezer bag. Pour-in the marinade.Make sure that the chicken is well coated with the marinade. Seal the bag and refrigerate for 3 to 5 hours.
  3. Pour the water in a steamer and let it boil. Steam the marinated chicken for 40 to 50 minutes.
  4. Remove the chicken from the steamer and place over a wire rack or a plate. Leave it that way for 2 to 3 hours until the skin becomes dry.
  5. Heat the oil in a cooking pot or deep fryer. Fry at 350F for 8 to 10 minutes or until the chicken turns medium to golden brown.
  6. Remove from the fryer, transfer to a serving plate.
  7. Serve. Share and enjoy!

Number of servings (yield): 4

Watch the cooking video

http://www.youtube.com/watch?v=DcoOEBvrCqg

>>Download the Free eCookbook here<<


Panara Recipe

$
0
0

Panara is an appetizer dish made from chopped upo (bottle gourd) and minced shrimp wrapped in a wonton wrapper and deep fried until golden brown. This dish is comparable to pinsec frito and fried siomai.

If my memory serves me right, this dish originated from the Visayas. While this is a perfect appetizer, it can also be eaten for lunch or dinner with rice. I usually dip panara either with spiced vinegar or banana ketchup. This goes well too with toyomansi (ponzu) and sweeet and sour sauce.

Preparing panara is quick and easy. This is one of the top recipes for beginners that I recommend. All you have to do is saute the filling (vegetables and shrimps); seal them in the wonton wrapper; and deep fry until the color turns golden brown. Don’t forget to let excess oil drip by placing newly fried panara in a plate lined with paper towel.

Try this Panara Recipe. Let me know what you think.

Panara Recipe

Panara Recipe

Ingredients

  • 2 cups chopped bottle gourd (upo)
  • 10 pieces medium shrimp (shells and head removed), chopped
  • 1 medium yellow onion, minced
  • 1 teaspoon garlic powder
  • 2 cups cooking oil
  • 15 pieces square wonton wrapper
  • 1 egg, beaten
  • Salt and pepper to taste

Cooking Procedure

  1. Prepare the filling by heating 2 tablespoons of cooking oil in a pan.
  2. Saute the onion. Add the shrimp and cook for 1 minute.
  3. Put-in the chopped upo. Put-in the garlic powder. Stir and cook for 3 to 4 minutes.
  4. Add salt and pepper to taste. Stir.
  5. Transfer to a plate. Let the temperature cool down.
  6. Wrap the mixture in the wonton wrapper. Do this by first lining the sides of the wrapper with beaten egg. Dip your finger into the beaten egg and run it through the side of the wrapper. Scoop about a tablespoon of mixture and place it in the middle of the wrapper. Fold the wrapper such that a triangular shape is formed. Press the sides to seal. Do this procedure until the entire mixture is consumed.
  7. Heat the remaining oil in a cooking pot.
  8. Deep fry the wontons with filings until the color turns medium to golden brown.
  9. Transfer to a serving plate. Serve!
  10. Share and enjoy!

Number of servings (yield): 6

>>Download the Free eCookbook here<<

Panko Parmesan Crusted Halibut

$
0
0
Panko Parmesan Crusted Halibut
 
Author:
Serves: 4
Prep time:
Cook time:
Total time:
 
Halibut happens to be my most favorite fish. My crusted halibut recipe is a perfect for a healthy dinner at home.
Ingredients
  • 4 halibut fillets
  • ¾ cup panko bread crumbs
  • ½ cup shredded Parmesan cheese
  • 1 tbsp dried parsley flakes
  • 1 teaspoon garlic powder
  • 3 tablespoons extra virgin olive oil
  • 1 lemon
Instructions
  1. Rub the lemon juice and olive oil on each side of the halibut. Season with salt and pepper
  2. Place a wire rack over a baking tray.
  3. Combine the Parmesan cheese, parsley , bread crumbs, garlic powder, and some additional salt and pepper. Roll the fish over the mixture to coat. Put the coated fish above the wire rack.
  4. Preheat the oven to 460F.
  5. Place the tray inside the refrigerator for 15 minutes.
  6. Bake for 17 minutes or until the fish is flaky. Remove from the oven and serve with a mixed vegetables on the side.


>>Download the Free eCookbook here<<

Ginarep Recipe (Shrimp and Corn Soup)

$
0
0

Ginarep or shrimp and corn soup with malunggay is a tasty soup dish that originated from the Bicol region. This simple yet healthy soup is packed with vitamins and nutrients that gives you energy to face your day — take it easy on the shrimp though.

In this recipe, I added the shrimp close to the last part of the process because I did not want to overcook them. However, if you saute the shrimp along with the onion and tomato– I recommend that you immediately remove the shrimp after a minute and add it back during the final steps of the process.

Ginarep is best consumed during lunch or even in the morning. It is the perfect dish to serve during cold weather (and snowstorms too). Have you had this dish lately?

Try this Ginarep Recipe. Let me know what you think.

Ginarep

Ginarep Recipe

Ingredients

  • 1 lb. shrimp, head and shell removed
  • 2 (15 oz.) cans whole kernel corns
  • 1 medium onion, minced
  • 3 cloves garlic, minced
  • 1 medium plum tomato, diced
  • 1 1/2 cups malunggay leaves
  • 4 cups chicken broth
  • 2 cups water
  • 2 tablespoons cooking oil
  • Salt and pepper to taste

Cooking Procedure

  1. Shred the kernel corn using a food processor. Set aside.
  2. Meanwhile, heat the oil in a cooking pot.
  3. Saute the garlic, onion, and tomatoes.
  4. Once the onion and tomatoes become soft, add the shredded corn. Cook for 3 minutes.
  5. Pour-in the chicken broth and water. Bring to a boil. Cover and simmer for 10 to 12 minutes.
  6. Add the shrimp. Stir and cook for 2 to 3 minutes.
  7. Put-in the malunggay leaves. cook for a minute.
  8. Add salt and pepper to taste.
  9. Transfer to a serving bowl. Serve.
  10. Share and enjoy!

Number of servings (yield): 6

>>Download the Free eCookbook here<<

Yummy Blueberry Pancake Recipe

$
0
0
Yummy Blueberry Pancake Recipe
 
Author:
Recipe type: Breakfast Recipe
Serves: 3
Prep time:
Cook time:
Total time:
 
Pancakes are really good for breakfast. I like my blueberry pancakes with a little sweet syrup; I eat it with some fresh brewed tea. Fresh blueberries are my number one choice when I get a chance to get some in the supermarket but frozen blueberries are ok too.
Ingredients
  • 2 cups all purpose flour
  • ¾ cup fresh blueberries
  • 6 tbsp granulated white sugar
  • 1¼ teaspoon baking powder
  • 1 cup fresh milk
  • 1 large egg
  • ⅛ teaspoon salt
  • 1¼ tbsp canola oil
Instructions
  1. Mix the dry ingredients (flour, salt, sugar, baking powder) in a bowl.
  2. Using another clean bowl, whisk in egg, oil, and milk.
  3. Add the egg mixture to the dry ingredients. Mix by folding.
  4. Fold the blueberries in the mix.
  5. Heat and lightly spray some oil on the pan.
  6. Scoop ¼ cup of mixture and pour in the pan. Let it cook until bubbles comes on top. Turn the pancake over and cook for a few seconds.
  7. Serve with pancake syrup.


>>Download the Free eCookbook here<<

Sinigang na Liempo sa Sampaloc

$
0
0
4.0 from 1 reviews
Sinigang na Liempo sa Sampaloc
 
Author:
Recipe type: Soup Recipe
Cuisine: Filipino
Serves: 4
Prep time:
Cook time:
Total time:
 
Sinigang is very good during the cold season. No need for many vegetables, as long as there is kangkong, gabi and liempo. I suggest that you prepare patis and crushed hot pepper for the dipping sauce. Delicious!
Ingredients
  • 1 kilo sliced liempo (pork belly)
  • 1 bundle chopped kangkong
  • 3 peeled taro roots (gabi)
  • ¼ kilo fresh unripe tamarind
  • 6 cups tap water
  • 1 sliced onion
  • 2 chopped tomato
  • 2 tablespoons patis
  • 1 long green pepper
Instructions
  1. Put the water and onion, tomato, and tamarind in a casserole. Let it boil for 20 minutes.
  2. Remove the tamarind.
  3. Mix the pork belly in the boiling water and cook it for 45 minutes.
  4. Add the taro root and pepper. Cook it for 10 minutes.
  5. Add the kangkong and patis. Cook it for 2 minutes.
  6. Serve this with rice.


>>Download the Free eCookbook here<<

Panlasang Pinoy Omelet

$
0
0

Panlasang Pinoy Omelet is what I came-up with one morning when I was craving for a great tasting omelet. This recipe is a product of whatever I had in the fridge that day. I think that the addition of the scallions did great in terms of presentation and taste. The bell pepper also made it look and taste perfect.

I like to have my omelet with toast. Sometimes I also eat it with garlic fried rice (sinangag). Adding some banana ketchup and spreading it on top works best for me. Of course, we all have our own way of enjoying our omelet — and that is my regular messy way. I enjoyed every bit of it though.

How do you make your omelet? What do you eat it with. I’d love to hear from you.

Try this quick and easy Panlasang Pinoy Omelet Recipe. Let me know what you think.

Panlasang Pinoy Omelet

Panlasang Pinoy Omelet

Ingredients

  • 3 large eggs
  • 3 stalks scallions (onion leaves), sliced
  • 1/2 small red bell pepper, chopped
  • 1 small yellow onion, sliced
  • 1 small tomato cubed
  • 2 tablespoons extra virgin olive oil
  • 1/4 cup shredded cheddar cheese
  • Salt to taste

Cooking Procedure

  1. Crack the eggs and place in a bowl. Add some salt (a pinch to 1/4 teaspoon) and beat until the texture becomes smooth. Set aside.
  2. Heat the oil in a pan.
  3. Saute the yellow onion and tomato.
  4. Once the onion and tomato becomes soft. Add the bell pepper and scallions. Cook for 1 minute.
  5. Pour-in the beaten egg. Spread the mixture over the pan. Cook in medium heat for 2 to 3 minutes or until the bottom part forms.
  6. Flip the omelet to cook the other side. Note: you can put the omelet on a plate with cooked part facing down. Gently flip and slide the omelet from the plate to the pan. The cooked part should be facing up now.
  7. Transfer to a serving plate. Top with shredded sharp cheddar cheese.
  8. Serve. Share and enjoy!

Number of servings (yield): 3

>>Download the Free eCookbook here<<

Quick Roast Beef Sandwich

$
0
0
5.0 from 1 reviews
Quick Roast Beef Sandwich
 
Author:
Recipe type: Sandwiches
Prep time:
Cook time:
Total time:
 
A quick roast beef sandwich is all I needed to start my day. It is not a fancy recipe but it comes out delish.
Ingredients
  • 4 slices whole grain bread
  • 7 ounces thinly sliced deli roast beef
  • 1 large tomato, thinly sliced
  • ½ cup chopped lettuce
  • 1 pickled cucumber thinly sliced lengthwise
  • 2 tablespoons mayonnaise
  • ½ teaspoon chopped fresh rosemary
  • Salt and pepper
Instructions
  1. Toast the bread.
  2. Mix rosemary and mayonnaise in a bowl. Season with salt and pepper
  3. Spread mayonnaise on one side of the toasted bread. Put roast beef, tomato, pickled cucumber, and chopped lettuce on top. Cover with another piece of toasted bread.
  4. Cut the bread in half.

>>Download the Free eCookbook here<<


Friday Chicken Noodle Soup

$
0
0
Friday Chicken Noodle Soup
 
Author:
Recipe type: Soups
Serves: 4
Prep time:
Cook time:
Total time:
 
My granny makes chicken noodle soup with milk for supper every Friday. She handed her recipe to me when I started my own family. Can’t wait for Friday?
Ingredients
  • 7 oz. sliced boneless chicken breast or thigh
  • 2 medium carrots diced
  • 2 cups dumpling noodles
  • 6 cups chicken stock
  • 1 onion chopped
  • 1 tbsp minced parsley
  • 1 cup whole milk
  • sea salt and freshly ground pepper
Instructions
  1. Prepare a soup pot with chicken stock. Turn the fire on and boil the stock.
  2. Gently throw-in the chicken, carrots, and onion in while the stock boils. Leave it for half an hour.
  3. Pour the milk. Add dumpling noodles and parsley.
  4. Taste the soup and adjust by adding salt and pepper.
  5. It is now ready to serve.

>>Download the Free eCookbook here<<

Delicious Oven Baked Potatoes

$
0
0
Delicious Oven Baked Potatoes
 
Author:
Recipe type: Potato Recipe
Prep time:
Cook time:
Total time:
 
These is a perfect side dish for roast chicken or simply anything. These oven baked potatoes will make your day.
Ingredients
  • 4 medium baking potatoes (washed and cubed)
  • 3 tsp Garlic salt
  • 1 tsp dried rosemary
  • 3 tbsp olive oil
  • Cooking oil spray
Instructions
  1. Preheat oven to 450F
  2. Get a baking pan; line with foil. Apply cooking oil spray on the aluminum foil.
  3. Place the potatoes in a deep bowl.
  4. Add olive oil, garlic salt and rosemary. Toss.
  5. Line the potatoes in the baking pan with aluminum foil.
  6. Bake for 40 minutes. Turn the potatoes for the other side to brown.
  7. Adjust the heat to broil. Broil for an additional 12 minutes.


>>Download the Free eCookbook here<<

Banana Yogurt Smoothie

$
0
0
Banana Yogurt Smoothie
 
Author:
Recipe type: Smoothie Recipe
Serves: 2
Prep time:
Total time:
 
Amazingly creamy and yummy. I learned this recipe from my barista friend in high school and I still use the same recipe to make the perfect banana yogurt smoothie until today.
Ingredients
  • 2 fresh ripe bananas
  • 2 cups unflavored yogurt
  • 2 tbsp honey
  • 2 cups ice cubes
  • 1 tsp vanilla extract
Instructions
  1. Put all the ingredients in a blender.
  2. Turn the blender on and blend everything until thick and creamy.
  3. Serve in tall glasses. Yummy!
  4. This will give you 2 glasses of creamy banana yogurt smoothie goodness. Cheers!


>>Download the Free eCookbook here<<

Billy’s BBQ Chicken Recipe

$
0
0
5.0 from 1 reviews
Billy’s BBQ Chicken Recipe
 
Author:
Recipe type: BBQ Chicken Recipe
Serves: 6
Prep time:
Cook time:
Total time:
 
An easy BBQ chicken recipe anyone can do. Use your favorite BBQ sauce for basting.
Ingredients
  • 3 pounds chicken that are cut in serving pieces
  • ¾ cup barbecue sauce (like sweet baby ray’s)
  • Salt and freshly ground black pepper
  • Half cup canola oil
Instructions
  1. Coat the chicken pieces with oil and rub salt and pepper all over.
  2. Start heating-up your grill. Both charcoal and gas grills are ok to use.
  3. Place the chicken on the hot grill. Let each side grill for 7 minutes. Baste the uncooked side of the chicken with BBQ sauce.
  4. Turn-over the chicken. Baste the grilled side with BBQ sauce. Close the grill. Have the chicken grill for 8 to 10 minutes. Continue to turn over the chicken and grill for 5 minutes on each side until the inside temp reaches 170F (you need a meat thermometer to be on the safe side).
  5. Serve this with grilled corn on the cob.


>>Download the Free eCookbook here<<

Sour Cream Noodle Bake

$
0
0

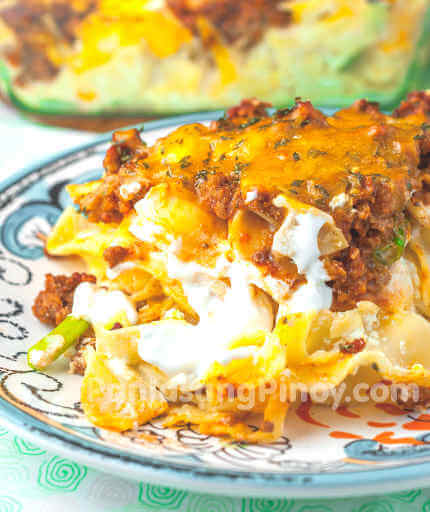
Sour Cream Noodle Bake is a rich baked noodle dish perfect for lunch or dinner. This recipe makes use of 3 different cheeses: ricotta, Parmesan, and sharp cheddar.

This is my third time making Sour Cream Noodle Bake. During the first two tries, I learned that a little flavor should be added to the noodle and ricotta cheese mixture. This was the reason why I added Parmesan cheese to the mix.

I like Sour Cream Noodle Bake because it is rich and makes me feel comfortable. I love having this with either garlic bread or Texas toast.

It is also a good idea to sprinkle freshly chopped basil or flat parsley on top after baking to make the dish look, smell, and taste fresh.

Try this Sour Cream Noodle Bake Recipe. Let me know what you think.

Sour Cream Noodle Bake

Sour Cream Noodle Bake

Ingredients

  • 10 oz. dumpling noodles
  • 1 lb. ground beef
  • 2 tablespoons salted butter
  • 2 teaspoons garlic salt
  • 8 ounces tomato sauce
  • 1 1/4 cups sour cream
  • 1 cup ricotta cheese
  • 1/4 cup grated Parmesan cheese
  • 1/2 cup chopped scallions
  • 3/4 cups sharp cheddar cheese, shredded
  • 1/8 teaspoon ground black pepper

Cooking Procedure

  1. Cook the noodle according to package instructions. Drain. Set aside.
  2. Melt the butter in a pan.
  3. Add the ground beef and cook until brown.
  4. Put-in garlic salt. Stir and cook for 2 minutes.
  5. Pour-in tomato sauce. Let boil and simmer until the sauce reduces to half. Set aside.
  6. Preheat oven to 350 Fahrenheit.
  7. Combine the cooked noodles, ricotta cheese, Parmesan cheese, sour cream, and scallions. Gently toss to mix.
  8. Arrange the noodle mixture at the bottom of a baking pan. Top with a layer of the cooked ground beef. Arrange the shredded sharp cheddar cheese on top.
  9. Bake for 20 minutes.
  10. Remove from the oven. Serve.
  11. Share and enjoy!

Number of servings (yield): 6

>>Download the Free eCookbook here<<

Pamplina Recipe

$
0
0

Pamplina is a Spanish soup dish that was embraced by Filipinos. It is usually made from leftover soup dishes such as beef nilaga or pork nilaga, but I decided to prepare this dish from scratch using raw pork pata and a slow cooker.

Have you tried eating a slow cooked meat before? The texture is really different because the meat literally falls-off the bone and the fat melts in your mouth. It is a very enjoyable experience. This is the reason why I decided to present my pamplina recipe this way.

Pamplina can be eaten with rice, or simply without any side dishes. I like to have this for lunch on a cold day. While this is such a delicious concoction, bear in mind to limit your fat intake. We can always enjoy great tasting dishes without sacrificing out health — so eat moderately.

I understand that it takes a lot of time to complete this dish. That is OK though because it is worth the wait. I’m sure that you will enjoy Pamplina as long as you follow this recipe.

Try this Pamplina Recipe. Let me know what you think!

Pamplina Soup Recipe

Pamplina Recipe

Ingredients

  • 2 lbs. pork pata, sliced
  • 2 pieces chorizo de bilbao
  • 2 cups beef or pork broth
  • 1 cup water
  • 1can (11 oz.) pork and beans
  • 1 medium yellow onion, chopped
  • 2 medium plum tomatoes, chopped
  • 1 head medium Napa cabbage, chopped
  • Salt and pepper to taste

Cooking Procedure

  1. Combine the pork, pork and beans, onion, tomato, chorizo, and pork broth in a slow cooker. Slow cook in high mode for 5 hours. This will make the pork pata very tender and the soup more flavorful because of the flavors extracted from the ingredients.
  2. Once the pata becomes tender. Add water and Napa cabbage. Continue to slow cook for 1 to 1 1/2 hours.
  3. Add salt and pepper to taste. Stir.
  4. Transfer to a serving bowl. Serve.
  5. Share and enjoy!

Number of servings (yield): 4

>>Download the Free eCookbook here<<

Strawberry Greek Yogurt Smoothie

$
0
0

I am starting to love smoothies. You can tell that I’m telling the truth because I chose to enjoy smoothies over hot cocoa or tea while it is not officially spring yet here in Chicagoland. It is around 28F this morning, but I don’t mind having this rich and satisfying Strawberry Greek Yogurt Smoothie.

You might be asking what influenced me to make some smoothies at this time. If it was summer, or if the weather is somewhat hot and humid — then it is quite understandable. You see, strawberry is one of my favorite fruits. I usually get real fresh ones whole year round except winter. It happened that my local grocery store (the nearest is Jewel-Osco after Dominicks’s permanently closed not so long ago) started to sell fresh strawberries. I got more than I can handle — that is the reason why I though of making smoothies out of the surplus (so to speak), and I enjoy every sip of it.

I used to make regular fruit smoothies — you know, fruits plus sugar and milk. I heard from a friend that yogurt smoothies are becoming a trend and greek yogurt smoothies are the favorites. After trying some yogurt smoothie recipes, I tried to tweak the ingredients and measurements according to my own taste preference. This Strawberry Greek Yogurt Smoothie recipe is one of the recipes that I improvised. I think that this is awesome!

Have you tried making yogurt smoothies before? What fruits are your favorites? If you have tips to share, I love to hear it.

Try to make Strawberry Greek Yogurt Smoothie. I’m sure you’ll like it!

Strawberry Greek Yogurt Smoothie

Strawberry Greek Yogurt Smoothie

Ingredients

  • 10 medium strawberries, hulled
  • 1 1/4 cup plain greek yogurt
  • 1 teaspoon vanilla extract
  • 2 1/2 cups ice cubes
  • 2 tablespoons granulated white sugar
  • 1/2 cup whole milk (liquid fresh milk)

Cooking Procedure

  1. Combine all the ingredients in a blender. Start with the ice then you can add the rest of the ingredients.
  2. Blend until the texture of the mixture becomes smooth.
  3. Pour the Strawberry Greek Yogurt in a glass.
  4. Serve. Share and enjoy!

Number of servings (yield): 2

>>Download the Free eCookbook here<<


Delicious Whole Wheat Pancakes

$
0
0
Delicious Whole Wheat Pancakes
 
Author:
Serves: 2
Prep time:
Cook time:
Total time:
 
Whole Wheat Pancakes are better than regular ones. My delicious whole wheat pancakes is healthy alternative.
Ingredients
  • 1¼ cups whole wheat flour
  • 1¼ cup buttermilk
  • 1 medium egg
  • 1¼ teaspoon baking powder
  • ¼ teaspoon baking soda
  • 1 tablespoon brown sugar
  • 1 tablespoon clarified butter
  • ¼ teaspoon salt
Instructions
  1. Preheat pan or griddle
  2. Sift the dry ingredients together in a bowl
  3. Beat egg in; add brown sugar, buttermilk, and butter
  4. Pour into bowl with dry ingredients; stir but not too much
  5. Scoop a quarter cup batter onto the pan. Flip when bubbles starts to show-up; cook for 15 to 20 seconds
  6. Serve


>>Download the Free eCookbook here<<

Tuna Swiss Melt Sandwich

$
0
0

Tuna Swiss Melt Sandwich makes a perfect lunch or breakfast. Besides being one of the best tuna sandwiches around, Tuna melt sandwich is quick and easy to prepare. This is ideal for busy people who do not want to sacrifice the quality of their food.

I love to have sandwiches for lunch and this type of sandwich is a regular treat in lunch bag, of course there are the usual fruits such as bananas, apples, and/or oranges.

I’m sure that you will all agree on my statement on how quick and easy it is to make your own tuna melt sandwich. It only took me less than 10 minutes to complete everything.

Aside from the listed ingredients in the recipe below, you may also add minced celery. This give the tuna mixture a good crunch and it also improves the flavor.

Any brand of Swiss cheese will do. It is always best to use your favorite/trusted brand. You can melt the cheese by toasting the sandwich in the skillet, as indicated in the recipe, or by toasting the whole sandwich in an oven toaster.

Try this Tuna Swiss Melt Sandwich Recipe. Let me know what you think!

Tuna Melt Sandwich

Tuna Swiss Melt Sandwich

Ingredients

  • 10 ounces Albacore Tuna (in can), drained
  • 1 medium yellow onion, minced
  • 4 to 5 tablespoons mayonnaise
  • 1 1/2 tablespoons sweet pickle relish
  • 6 bread slices
  • 6 thick slices, Swiss cheese
  • salt to taste

Cooking Procedure

  1. Combine the drained tuna, onion, pickle relish, and mayonnaise in a medium bowl. Gently mix the ingredients.
  2. Use a small teaspoon to taste the mixture. Add salt as needed. Mix well.
  3. Arrange the cheese on top of one slice of bread. Top with 1/3 of the tuna mixture. Place another slice of cheese on top of the tuna mixture, and then top with the second bread slice. Do this step until all 3 sandwiches are assembled.
  4. Heat a skillet. Put one tuna sandwich on the heated skillet and let one side cook for 1 to 2 minutes or until the cheese starts to melt. Flip the sandwich to toast the other side.
  5. Remove the sandwich from the skillet. Slice in half.
  6. Serve. Share and enjoy!

Number of servings (yield): 3

>>Download the Free eCookbook here<<

Fish Adobo

$
0
0

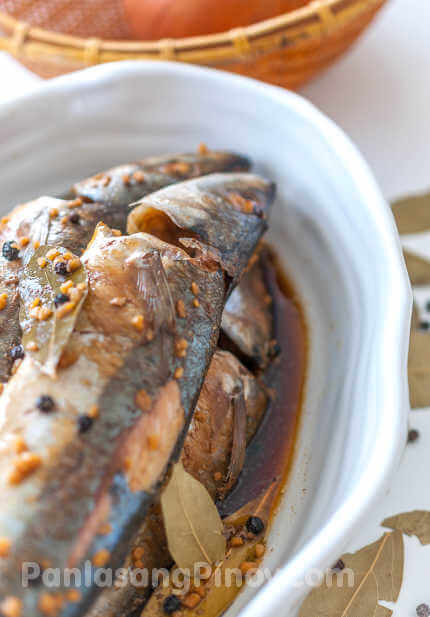
Adobo is the Filipino way of cooking food inadobo style. This means that any meat or vegetable is cooked in soy sauce, vinegar, and garlic. Along with these ingredients are pepper or whole pepper corn, and dried bay leaves. This is considered as the signature dish of the Philippines.

Fish Adobo, as the name suggest, is any fish cooked inadobo style. I am presenting this recipe using a fish that is common to the the low to middle class people in the Philippines — galunggong (round scad). Personally I love galunggong. I grew up eating this fish presented in different dishes. I love crispy fried galunggong –especially the small one because they get perfectly crispy when fried for a while. I like to have them with “sukang maanghang” spiced vinegar.

Fish adobo is very easy to prepare. I prefer medium-sized fish for this recipe — so I am using medium round scad. It does not take long before the fish is ready to eat and it is best to have this with white rice — which is the staple food of the Philippines. Don’t worry if there are some leftovers, you can always make fried fish adobo out of them.

I understand that there are many ways to prepare fish adobo. I love to hear how you prepare yours. What is your fish adobo recipe and what type of fish do you use? The comments section is always available for you.

Try this Fish Adobo Recipe. Let me know what you think.

Fish Adobo

Fish Adobo Recipe

Ingredients

  • 2 lbs. round scad (galunggong), gutted and cleaned
  • 1 tablespoon minced garlic
  • 4 dried bay leaves
  • 1 tablespoon whole pepper corn
  • 5 tablespoons dark soy sauce
  • 3 tablespoons white vinegar
  • 1 cup water
  • 2 tablespoons sea salt

Cooking Procedure

  1. Arrange the fish in a cooking pot.
  2. Pour-in water and soy sauce. Bring to a boil.
  3. Put-in garlic, pepper corn, and bay leaves. Cook uncovered for 5 minutes.
  4. Pour-in vinegar. Cover and allow to re-boil. Cook for 10 to 15 minutes in low to medium heat or until the liquid reduces.
  5. Transfer to a serving plate.
  6. Serve with steamed white rice. Share and enjoy!

Number of servings (yield): 4

>>Download the Free eCookbook here<<

Simple Kimchi Fried Rice

$
0
0

Simple Kimchi Fried Rice is the simplest fried rice recipe that involves kimchi. All I have here are kimchi, rice, and the oils (sesame and vegetable oil) used for stir-frying. This mild recipe is intended for people who are just starting to enjoy this delicious fermented cabbage. I will try to feature other kimchi fried rice recipes in the future, which will be more of a higher level, when compared to this recipe.

Almost everyone knows or must have heard about kimchi. This is a spicy concoction of cabbage, spring onions, and other ingredients that underwent fermentation. This is best enjoyed as a side dish along with rice. Some say that you need to have an acquired taste to appreciate kimchi. This is true in my case because I only enjoyed kimchi when I was in my late teens. When I was younger, I associate this delicious side dish with something pungent — but everything was reversed as I grew up; I learned to like kimchi and appreciate its unique aroma and flavor; it even makes me feel warm and better every time I eat it.

Making kimchi fried rice is quick and easy. All you need are chopped kimchi with juice, steamed white rice, and sesame and vegetable oils. The sesame oil enhances the taste and aroma of kimchi fried rice making it more pleasurable. Since this is a simple recipe, those are all the ingredients that we will need for now. If you want to go the extra mile, you can add meat such as beef or chicken to this recipe — all you have to do is to saute the thinly sliced meat in oil before adding the kimchi. This will ensure that the meat is fully cooked by the time you are done cooking your fried rice.

Try this Simple Kimchi Fried Rice. Let me know what you think.

Kimchi Fried Rice

Simple Kimchi Fried Rice

Ingredients

  • 2 1/2 cups cooked white rice
  • 3/4 cups kimchi, chopped
  • 2 tablespoons kimchi juice
  • 1/2 teaspoon sesame oil
  • 1 teaspoon vegetable oil

Cooking Procedure

  1. Heat the vegetable oil and sesame oil in a pan.
  2. Add-in the chopped kimchi. Cook for 1 to 2 minutes.
  3. Put-in the white rice. Stir-fry for 3 to 5 minutes.
  4. Pour-in the kimchi juice. Stir. Cook for 2 minutes more.
  5. Transfer to a serving plate. Enjoy with galbi.
  6. Share and enjoy!

Number of servings (yield): 2

>>Download the Free eCookbook here<<

How to Make Homemade Guacamole

$
0
0

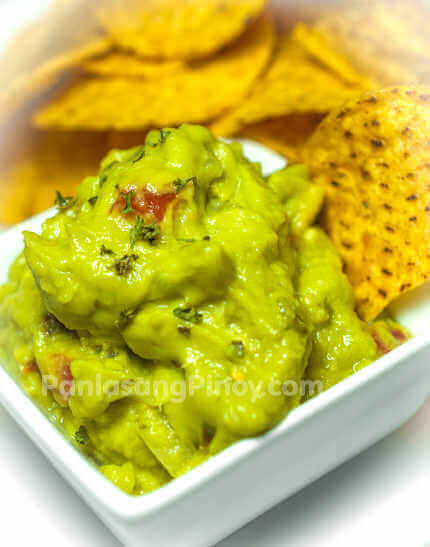
Holy Guacamole! This was my reaction when I tried this homemade guacamole recipe. I felt that I should share this because I enjoyed every dip. The thing that I liked most about this homemade guacamole was its freshness. The lime juice and cilantro (wansuy) really did a good job in making this concoction smell and taste fresh. I also loved the little kick from the cayenne pepper powder that I added.

I was eating this with restaurant style tortilla chips. The mild salty flavor of the chips complimented well with the guacamole dip. Too bad though because we were able to finish the dip before the tortilla chips were gone. Well, I guess that means I need to make more again.

I am using 4 medium hass avocados for this recipe. Hass avocados are the most common varieties sold in the grocery stores here in the Midwest. These are medium sized avocados that are dark purple-red in color. When I was visiting my relatives in Florida, I noticed that they have an avocado tree in their front yard. It produced hall variety avocados, which are extremely bigger compared to the hass. I haven’t really tried making guacamole from bigger avocado varieties, but I’m positive that bigger avocados will make good guacamole too. Have you tried making your homemade guacamole from larger varieties of avocado? How was it? I love to hear from you.

How to Make Homemade Guacamole

How to Make Homemade Guacamole

Ingredients

  • 4 medium avocados
  • 1/4 cup chopped cilantro
  • 2 medium plum tomatoes, diced
  • 1 medium yellow onion, diced
  • juice from 1 medium lime
  • 1 teaspoon finely minced garlic
  • 1/2 to 1 teaspoon salt
  • a dash of cayenne pepper powder or crushed red pepper

Cooking Procedure

  1. Slice the avocadoes in half by running a knife around it lenghtwise, just about to the point that you reach the surface of the pit (large seed). Do not slice through the pit. Instead, hold one side of the avocado with your left hand and the other with your right, and begin to to twist both hands in opposite directions. This will let the avocado split in half making the pit fully visible.
  2. Remove the pit from the avocado and scrape the avocado using a spoon until you reach the skin.
  3. Discard the skin and place the avocado in a bowl.Squeeze lime juice immediately over the avocado to prevent oxidation.
  4. Add salt and then mash the avocados.
  5. Put-in tomato, onion, cilantro, pepper, and garlic. Fold-in the mixture until well incorporated.
  6. Place in a covered container and cool inside a refrigerator for a couple of hours.
  7. Serve with tortilla chips. Share and enjoy!

Number of servings (yield): 6

>>Download the Free eCookbook here<<

Viewing all 460 articles
Browse latest View live